Ria

Onion Soup… the French Influence

The weather has turned quite chilly, all of a sudden. The mind seeks interesting books to read and warm sofas to curl up on; the tummy seeks comfort foods. I might be – no, I am – wrong in going for the ultimate in winter comfort foods, so early in the season… but I wanted onion soup! Bubbling over with cheesy goodness, the thick brown gravy smelling heavenly, the French concoction was calling my name!
 
OS-done1

French cuisine is well known for its long and rich history and high level of sophistication. And many dishes of ancient origin have been adapted and modified to fit the French tradition. Onion soup is one such dish.
 
OS-onions

Existing from the ancient Roman times (8th century BC to 5th century AD), it was considered poor man’s food as onions used to grow abundantly in Europe and was an easy to cultivate crop.
 
OS-baguette

The basic recipe was adapted to the current version in the French tradition around the 18th century.
 
OS-onions-sliced

The main ingredients of an onion soup are onions (of course!), broth, vermouth, cheese, and crusty bread.
 
OS-cheese

Though the best onion soup I have ever tasted had chunks of beef in it, cooked to a melt-in-the-mouth perfection. This was at a historic tavern in the Gettysburg area, reputed to be in existence since 1776. It was one heck of a soup indeed!
 
OS-baguette-sliced

How many onions to a cup of broth? The opinions and recipes vary to a great extent on that. As far as Americans are considered, there is no one above Julia Child as an authority on French cuisine. And it is her recipe that I have taken and followed. Of course, with some minor changes. 🙂
 
OS-assembled

The one thing you need to make a good onion soup is time… lots of it. You can’t hurry the process, especially of caramelizing the onions.
 
OS-onionscaramelised

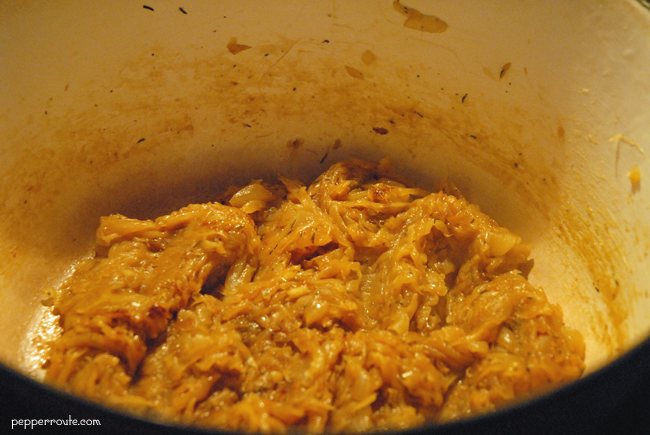
You have to let it slowly brown to perfection, without hurrying it. Even a slight burning of the onions will give the soup an unpleasant taste.
 
OS-done2

So… enjoy the cool weather with a piping hot bowl of cheery onion soup!

~Ria

Onion Soup… the French Connection
 
Author: 
Recipe type: Soup
Cuisine: French
Ingredients
  • 2 tbsp butter
  • 4 onions, yellow or white
  • 1 tsp dried thyme
  • 6-8 cups beef, chicken or vegetable stock
  • ½ cup dry white wine or vermouth
  • 2 cups gruyere or emmentaler cheese
  • 1 French baguette
  • Salt and black pepper to taste
Directions
  1. Slice the onions thinly, lengthwise.
  2. Grate the cheese using a medium grater.
  3. Slice the baguette into thick slices and toast them in a slow oven.
  4. In a large pan, heat the butter.
  5. Add the sliced onions and thyme.
  6. Cook on low heat, stirring occasionally. If the heat is high, the onions will get burned and will not caramelize well.
  7. When the onions are caramelized into a darkish brown, add the wine or vermouth.
  8. Stir for two minutes to evaporate the alcohol in the wine.
  9. Add the stock along with enough sale and black pepper.
  10. Bring to a boil and continue cooking on low heat, for another 15 to 20 minutes.
  11. Heat the oven to 400 degree farenheit.
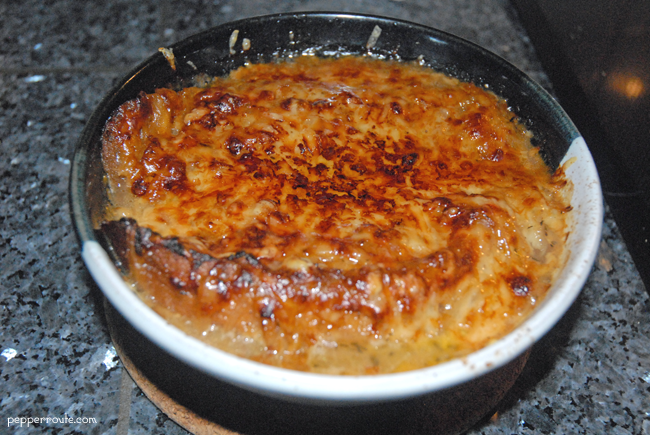
  12. To assemble the dish, you can either use a set of ramekins or an oven-proof gratin pan.
  13. Fill the ramekins three quarters full with the soup.
  14. Float a slice of toasted baguette on each ramekin.
  15. Sprinkle the top liberally with grated cheese.
  16. Place in the pre-heated oven and bake until the cheese is bubbly and browned (about 10-15 minutes).
  17. Serve hot as a starter or light meal. Yummy!

Baked Pasta Surprise

Do you like pasta? Do you like baked stuff? Do you like surprises? Yay! Then this is for you!

 
BPS-closeup

And the best thing is, you can select your own surprise, sort of customizing the dish to your personal preferences. Who wants to follow some standard recipe, where you have to strictly follow what is written down, right? I’m all about flexibility in cooking, and I expect my readers would be too.

 
BPS-midview

Conceptually, the dish is very simple. You prepare a set of ramekins…

 
BPS-ramekins-empty

You choose a pasta – you can pick your shape, as long as it is not too big. My choice was a simple spaghetti. Drench the cooked pasta in a creamy béchamel sauce.

 
BPS-pasta-ingredients

Now comes the surprise… a filling, something that contrasts with the creaminess of the béchamel sauce. Something spicy or tomatoey will do very well. Chopped turkey cooked in a thickened tomato sauce with onion, ginger and garlic is what I used here. You can even do a vegetarian filling.

 
BPS-meat-ingredients

Put down a layer of the pasta in the ramekins, a layer of your chosen filling, and another layer of pasta to wrap up.

 
BPS-all-ingredients

If you want, you can enhance the flavours with the addition of cheese at different layers. I added some pecorino at the bottom of the ramekin and a bit of shaved cheddar over the filling.

 
BPS-ramekins-filling

For best results, you need to bake this in a water bath, with the water level coming up to half the height of the ramekins.

 
BPS-ramekins-filled

Make sure to wipe down the rims of the ramekins so that you don’t get burnt crusts along the top.

 
BPS-ramekins-closeup

When done, just inverse the ramekins onto a plate and dig in!

 
BPS-done

Though this dish is a bit time consuming, it is well worth the effort. And all you need is a plain green salad to go with it.


~Ria


Baked Pasta Surprise
 
Author: 
Recipe type: Main meal
Ingredients
  • 8 oz spaghetti
  • 4 tbsp butter
  • 4 tsp flour
  • 2 ½ cups milk
  • ½ tsp nutmeg powder
  • 1 tsp dried oregano
  • Salt and black pepper to taste
  • 1 ½ lb chopped lean turkey
  • 1 large onion
  • 5 cloves of garlic
  • 1 inch piece of ginger
  • 1 tsp cumin powder
  • ½ tsp chilli powder
  • 2 tbsp oil
  • Salt to taste
  • 4 tbsp butter
  • 1 cup breadcrumbs
  • ¼ cup grated pecorino cheese
  • ¼ cup yellow cheddar cheese, shaved into thin slices
Directions
  1. Chop the onion into small, thin slices.
  2. Slice the ginger and garlic thinly.
  3. In a largish pan, heat 2 tablespoon oil.
  4. Add the onions and fry.
  5. When the onions are half done, add the ginger and garlic and continue frying.
  6. When the onions start to caramelise, that is they begin to brown, add the cumin and chilli powders.
  7. After a quick stir, promptly add the chopped turkey and stir to mix.
  8. Add enough salt and cover and cook, adding a little water if required.
  9. When all the water has evaporated and the meat mix is dry, remove from the heat.
  10. In a large pot of salted water, boil the pasta till it is just tender.
  11. Drain and rinse under cold water and keep aside.
  12. To make the béchamel sauce, melt the butter in a large pan,
  13. Add the flour and mix together, stirring continuously.
  14. Continue cooking for two minutes.
  15. Add the milk in one stream, stirring continuously.
  16. Mix thoroughly and reduce the heat.
  17. Add the nutmeg powder and the oregano to the sauce, along with enough salt.
  18. Bring to a slow boil, continuously stirring, and remove from heat.
  19. Add the boiled pasta to the sauce and mix well.
  20. Take 4 oz ramekins and brush their insides with butter.
  21. Sprinkle them liberally with breadcrumbs and shake off any excess.
  22. Pre-heat the oven to 420 degree farenheit.
  23. To assemble, sprinkle half a spoon of pecorino cheese in each ramekin.
  24. Fill one third of each ramekin with the pasta mix.
  25. Add the meat filling till two thirds of each ramekin.
  26. Add a few thin slices of cheddar cheese.
  27. Finally add enough pasta as the third layer till it is a little below the rim.
  28. Place the ramekins in a baking pan and fill the pan with water till the water level comes up to half the height of the ramekins.
  29. Place the pan in the pre-heated oven and bake for 20 minutes.
  30. Check for doneness by inserting a skewer into the center of a ramekin. If the skewer comes clean, the dish is ready.
  31. Remove from the oven and allow to cool for 5 minutes.
  32. Carefully invert each ramekin onto a plate, and serve hot with a green salad on the side.


Monkey Bread with Pecans and Blueberries

Time to put away the utensils and dig in with your bare fingers! Yes, it is Monkey Bread time!

 
MB-closeup
A cluster of warm, sweet, delicious pieces of bread, baked usually in a ring shape in a bundt pan… and you pull apart these pieces just like a monkey! Hence the name, monkey bread.

 
MB-done1
Somewhere along my peregrinations over the alleyways of the cyberspace, I came across the name, ‘monkey bread’. And without a second thought, I knew I had to make it, I had to eat it. It was just hours from thought to action, and here we are with a lovely, gooey, fragrant monkey bread! 🙂

 
MB-mid-view1
There are various theories about how it got its name… its resemblance to the fruit of the monkey puzzle tree, the monkeying around you have to do to make the dish (absolute pish-posh; it is an easy dish to make), and my favourite… one can channel one’s inner monkey while eating it!

 
MB-mid-view2
Monkey bread does not have a long tradition on the food scene, the first mention of it appearing in cookbooks and magazines in the 1950s, according to the foodtimeline. Nancy Reagan used to serve it at the white house, during the Christmas season.

 
MB-ingredients
Many of the traditional recipes use yeast in the monkey bread dough, which in my opinion is a lot of time wasted, waiting for the yeast to act. Instead, you could use a combo of buttermilk and baking powder to get the same buoyancy.

 
MB-butter-into-dough
You prepare the dough, cutting in the butter and then adding the buttermilk.

 
MB-dough-cutting
The dough is divided into small pieces and rolled in brown sugar.

 
MB-dough-in-sugar
These are then layered at the bottom of the pan along with nuts and dried fruits.

 
MB-pan-first-layer
And if you want a really short shortcut, you could use the biscuit dough that comes in a tube instead of making your own dough.

 
MB-pan-last-layer
The pecans and blueberries used in the recipe can be replaced with any nuts and dry fruits.

 
MB-nut-fruit
The giant baobab tree (of ‘The Little Prince’ fame) is called ‘monkey fruit tree’ in Africa. And the insides of that fruit looks very much like monkey bread. Do take a look


~Ria


Monkey Bread with Pecans and Blueberries
 
Author: 
Recipe type: Snack
A 8 or 9 inch bundt pan works well for baking this monkey bread.
Ingredients
  • 4 cups all purpose flour
  • 3 tsps baking powder
  • 1 tsp baking soda
  • 1 tsp salt
  • ¾ cup butter
  • 1 cup buttermilk
  • ½ cup pecans (can be replaced with walnuts)
  • ½ cup dried blueberries (can be any dried fruit)
  • ½ cup brown sugar
  • 1 tsp of cinnamon powder
  • ½ tsp nutmeg powder
  • 1 ½ cup brown sugar
  • ¾ cup butter
Directions
  1. Soak the blueberries in one cup of warm water for 30 minutes. Drain and keep aside.
  2. Lightly toast the pecans. Let cool and keep aside.
  3. Mix half a cup of brown sugar with the cinnamon and spread flat on a platter.
  4. Melt together 1 ½ cup brown sugar and ¾ cup butter. When fully melted, remove from heat.
  5. Pour a quarter of the butter-sugar mix into the bundt pan and swirl around to coat the bottom. Keep aside.
  6. Pre-heat the oven to 350 degrees farenheit.
  7. In a large bowl, mix together the flour, baking powder, baking soda, and salt. Cut in ¾ cup of butter into the flour. Add the buttermilk and mix into a smooth dough.
  8. On a floured surface, roll the dough into a log and cut into three pieces.
  9. Take one of the pieces and roll it into a longish rope.
  10. Cut the rope shaped dough into uniform sized pieces, about 1 inch in diameter.
  11. Shape each piece of dough into a rough ball and roll in the brown sugar-cinnamon mix to coat.
  12. Place the round shapes at the bottom of the bundt pan in a single layer.
  13. Sprinkle half the pecans and blueberries over the dough.
  14. Spoon a quarter of the butter-sugar mix evenly over the layers in the bundt pan.
  15. Repeat the process with the remaining two portions of dough, interspersing with layers of pecans, blueberries and butter-sugar mix.
  16. When all the dough is used up, pour the remaining butter-sugar mix on the top.
  17. Place in the center of the oven and bake for 30 to 35 minutes.
  18. When done, remove from the oven and allow to cool for 5 minutes.
  19. Invert on to a serving platter and serve warm.


Potatoes in a Spicy Pan-roasted Sauce

Today was a cloudy, clammy day. It just threatened to rain throughout the day; didn’t actually rain, which would have been better, by the way. But it didn’t rain. And the humidity hit the ceiling. Such days do have a depressing effect on most people, including me. So I wanted to make a dinner that would be a definite ‘pick-me-up’. Something spicy and fairly hot, and made up of my ultimate comfort food… you guessed it… potatoes!

PWRG-closeup3

At the same time, I did not want to spend much time experimenting either. It had to be something tried and trusted. And there it was, among my trusted recipes – potatoes in a spicy pan-roasted sauce.

PWRG-done1

The roasting actually happens twice: first you roast the ingredients for the sauce…

PWRG-ingredient-roasting

And then you roast the sauce itself.

PWRG-gravy-roasting

While selecting the ingredients for the sauce, do not select large onions or tomatoes. Smaller sizes work best with the roasting. And it is important to get them fairly well charred.

PWRG-roasted-ingredients

I have prepared this dish with fresh or dried herbs and don’t think the difference is discernible. Today, I did not have any thyme or oregano growing at home, and was too lazy to go get them. So I used the dried variety.

PWRG-ingredients

This dish calls for vegetable or chicken stock. However, if you do not have stock handy, water will work as well.

PWRG-closeup2

This will keep in the refrigerator very well. In fact, it might even taste better on the second day!

PWRG-done3

Boiled or steamed rice or flat breads are good combinations with this dish.

~Ria

Potatoes in a Spicy Pan-roasted Sauce
 
Author: 
Recipe type: Main meal
Ingredients
  • 1 ½ lb small potatoes
  • 1 zucchini
  • 5 small tomatoes
  • 2 smallish onions
  • 6 cloves garlic
  • 1 jalapeno
  • 1 bunch cilantro leaves
  • 1 tsp dried oregano
  • 1 tsp dried thyme
  • 1 tsp cumin
  • 1 cup stock; can be vegetable or chicken
  • 2 tbsp olive oil
  • Salt to taste
Directions
  1. If the potatoes are bigger than bite size, cut them into bite sized pieces.
  2. Cut the onions lengthwise into two.
  3. Cut the zucchini into bite sized pieces.
  4. Finely chop the cilantro leaves.
  5. Boil the potatoes in a large pot of salted water, until almost done. Do not overcook.
  6. When done, drain and keep aside.
  7. Crush the cumin carefully.
  8. Place the tomatoes, onion, garlic and jalapeno on a hot thick-bottomed pan, without any oil.
  9. Roast them, turning them around so that char marks appear all over them. Keep aside to cool.
  10. When cool, peel and chop the veggies. Grind them in a blender till a smooth consistency is achieved.
  11. Add the thyme, oregano and crushed cumin and blend again.
  12. In a large pan, heat the olive oil.
  13. When the oil is very hot, add the sauce from the blender and keep frying for 6-8 minutes, stirring constantly.
  14. When the sauce has thickened, add the boiled potatoes and zucchini, along with half of the chopped cilantro.
  15. Add the stock and cover and cook till the vegetables are done.
  16. Check and adjust salt, if required.
  17. Serve with the rest of the chopped cilantro sprinkled on top.

Green Apple and Manchego Salad

Usually, cheese in a salad refers to some crumpled feta or mozzarella sprinkled on top. But to build an entire salad based on a cheese? You need an exemplary cheese for that and Manchego fits that bill to perfection!
 
GAMS-closeup1

Manchego cheese is made from sheep’s milk, and has a firm and compact, yet creamy, texture. It is light yellow in colour with a minimum fat content of 6.5% and protein content of 4.5%. A wheel of Manchego cheese is barrel-shaped, with a height of 12 cm and a diameter of 22 cm. It is a cheese that has been made for thousands of years, without any changes in the ingredients.
 
GAMS-done1

Traditionally, the cheese was made in plaited grass baskets, which left a pattern of zig-zag weaving on the outside of the cheese. In modern times, this pattern is achieved using a mould which has a relief pattern on the inside. The top and bottom surfaces have the imprint of an ear of wheat as well.
 
A Manchego cheese has to be aged for a period of 2 months to 2 years, in the natural caves of the region. Based on the aging time, Manchego cheeses are categorised as Semi-curado (up to three months of aging), Curado (three to six months), and Viejo (one year to two years). The longer the cheese ages, it gets firmer and develops a complex flavour.
 
GAMS-closeup2

During the process of maturing, a natural rind is formed around the cheese. This rind is not edible, but official rules do not allow this rind to be removed before sale.
 
Manchego cheese is made only in the La Mancha region of Spain, from the milk of the Manchega sheep. Remember La Mancha? It is the setting for the epic novel ‘Don Quixote’ by Miguel de Cervantes. Actually, the full title of the book is, ‘The Ingenious Gentleman Don Quixote of La Mancha’.
 
GAMS-closeup2

La Mancha is a geographical region, a high plateau that extends to the south of the capital city Madrid reaching up to the Sierra Morena mountain range of the Iberian peninsula. Most of the plateau is not suitable for agriculture due to its arid climate and the rocky terrain which allow only hardy plants to grow. The original name given to the region by the Arabs who lived in the area thousands of years ago, was Al Mansha, meaning ‘waterless land’. The unique plants and herbs that the Manchega sheep live on are the reason for the cheese’s distinctive flavour.
 
GAMS-closeup3

Artisanal Manchego cheese is handmade by farmers from raw milk while commercially produced varieties are made from pasteurised milk. It is difficult to get the artisanal variety outside of Spain, though. Yep, one more thing to look forward to, in Spain!
 
This salad, it is so simple. It has two ingredients and a dressing with three.
 
GAMS-ingredients1

If you can wield a knife, you can make this. But believe me… it doesn’t taste simple at all.
 
GAMS-ingredients2

The gelling together of the ingredients result in a delicious dish, which can be a side or a snack.
 
GAMS-done2

Or, even a lunch!
 
Note: I have eaten this salad without adding any salt and it tastes great.

~Ria


Green Apple and Manchego Salad
 
Author: 
Recipe type: Salad
Ingredients
  • 8 oz Manchego cheese
  • 2 Granny Smith apples
  • 1 tbsp chopped parsley
  • 1 tsp red chilli flakes
  • 3 tbsp extra virgin olive oil
  • Salt to taste
Directions
  1. Cut the cheese into matchstick sized pieces.
  2. Peel and core the apples. Cut them into matchstick size as well.
  3. In a bowl, combine the cheese and apple pieces.
  4. Sprinkle chopped parsley and red chilli flakes over the mix.
  5. Add salt as required.
  6. Drizzle the olive oil over the mix.
  7. Toss well and serve right away.


Grilled Korean Spiced Pork with Water Chestnut Salad

With August steadily advancing into September, and the specter of cold also getting nearer, the days of the grill are numbered. So when a lovely weekend came around, we made the best of a sunny Sunday by opting for a grilled pork meal.

GPWCS-closeup

The pork was marinated with a kochujoung paste, which is a hot pepper paste commonly used in Korean cuisine. The usual ingredients for the kochujoung paste are red chili powder, powdered glutinous rice, fermented soybeans and salt.

This dark red paste adds layers of flavour to the meat and gives it enough of a kick to make it interesting.

GPWCS-grilling

In place of kochujoung paste, you could use samchang paste, which is another hot pepper sauce of Korean origin.

In addition to the water chestnuts, the salad has cucumbers, red and orange peppers, scallions, and cilantro.

GPWCS-uncut

The assortment of vegetables adds colour appeal to the salad.

GPWCS-cut-ingredients

To align the flavours of the salad with the grilled meat, I used a dressing with mirin, tamari, fish sauce, and lime zest.

GPWCS-done2

This worked very well with the crispy vegetables, giving them a lovely coating of tang and freshness.

GPWCS-dressing-ingredients

For a coolish evening, after a sunny day, this meal was just right; fully balanced in flavours and nutrition. A well chilled fruity white wine was the perfect companion for this meal.

GPWCS-done1

And a major plus, the leftover grilled pork makes great sandwiches for next day’s lunch!

~Ria

Grilled Korean Spiced Pork with Water Chestnut Salad
 
Author: 
Recipe type: Dinner
Ingredients
  • 6 pieces thin cut pork loin
  • 1 tbsp kochujoung paste; can be replaced with samchang paste
  • One 8 oz can of water chestnuts
  • 1 cucumber
  • 4 scallions
  • 1 each red and orange sweet pepper
  • 10 sprigs of cilantro
  • ½ green chili
  • ¼ inch ginger
  • Zest of 1 lime
  • 1 tbsp mirin
  • ½ tsp tamari
  • ¼ tsp fish sauce
  • Salt to taste
Directions
  1. Apply the kochujoung paste and salt on the pork and let sit for 30 minutes.
  2. Thinly slice all the vegetables for the salad (can be done in a food processor) and set aside.
  3. Thinly slice the green chili for the dressing.
  4. Finely mince the ginger.
  5. Mix all the ingredients for the dressing, in a small bowl and keep aside.
  6. Cook the pork on an outdoor grill (about 3 minutes per side). You can also use a grill pan indoors, if you prefer.
  7. Toss all the salad vegetables together.
  8. Season with salt and pepper.
  9. Dress the salad with the prepared dressing and serve.

A Simple Curry with a Miracle Ingredient… Drumstick Leaves Elissery

The other day, I was reading about some exotic chocolates with the essence of moringa oleifera, which apparently has a heap of health benefits. The name ‘moringa’ seemed to ring a bell and wondered where I had heard the name… and of course, one of my best friends, Wikipedia, was right there with the answers. Moringa oleifera is nothing other than our good old drumstick tree!
 
SCDLE-leaves1

The drumstick tree gets its name from the stick like shape of its fruits. The leaves, flowers and fruits of the tree are edible… nah, they are delicious. I have enjoyed all of them, routinely cooked in a myriad ways, from early childhood. And yet I didn’t know a thing about the extent of its worth as a miracle food!
 
SCDLE-closeup

The drumstick tree, moringa oleifera, has been called the ‘miracle tree’ due to its innumerable health benefits to humans. According to NIH (National Institutes of Health) and Memorial Sloan-Kettering Cancer Center, it has the ability to treat over 300 diseases.
 
SCDLE-leaves3

The leaves of this tree can provide all of the amino acids required by the human body, some of them enzymatically active amino acid sequences that do not exist in the food chain anywhere else. It contains 36 natural anti-inflammatory agents and 46 different antioxidants. The leaves also contain 7 times the vitamin C found in oranges, 4 times the calcium in milk, 4 times the vitamin A in carrots, 2 times the protein of yogurt, 25 times the iron in spinach, and 3 times the potassium in bananas.
 
SCDLE-leaves2

In addition, the drumstick tree has the ability to enhance the immune system function in human beings. What is more, this tree has anti-bacterial, anti-fungal, anti-viral and antibiotic qualities as well! Last but not least, the drumstick tree acts as a detoxifying agent.
 
SCDLE-leaves4

That is a glimpse into the benefits the tree provides for the humans. Talking about the tree itself, it has the ability to retain high concentrations of electrolyte minerals, and stay internally hydrated in the driest of conditions. The tree is prevalent in Asia, Africa and South America.
 
SCDLE-leaves5

The drumstick tree was recognized by the National Institutes of Health as the Botanical of the Year for 2007, and praised again in 2011 and 2012.
 
SCDLE-plated2

I am not sure how far I believe the paean of praise bestowed on moringa oleifera, aka the drumstick tree. But one thing I can say, any dish prepared out of the leaves, flowers or fruits of this tree is delicious!
 
SCDLE-ingredients

Elissery is a common dish prepared in Kerala, the tiny little state on the south western coast of India. It is very versatile in the sense that you can prepare it with a wide variety of vegetables. The dish here has been made with the leaves of the drumstick tree, but you can make the same with either the flowers or fruits.
 
SCDLE-in-dish

While getting the leaves ready, you have to be careful to pluck only the leaves, eliminating even the smallest stems, as the stems taste slightly bitter when cooked. Also, be careful not to overcook them. The leaves are quick cooking, being done in about five minutes.
 
SCDLE-plated1

Note: Spell check suggested that I change ‘elissery’ to ‘emissary’… All I could say was, what do you know about the excellence of elissery? 😉


~Ria


A Simple Curry with a Miracle Ingredient... Drumstick Leaves Elissery
 
Author: 
Recipe type: Main meal
Ingredients
  • 3 cups drumstick leaves, picked free of stems
  • ¾ tuvar dal
  • 1 tsp chili powder
  • ½ tsp turmeric powder
  • 1 cup scraped coconut (can be fresh or frozen; if frozen, thaw to room temperature)
  • 1 tsp cumin
  • 2 sprigs curry leaves
  • 1 tsp mustard seeds
  • 2 red chilies, broken into pieces
  • 1 tbsp oil
  • Salt to taste
Directions
  1. Boil the tuvar dal with enough water, till tender. If you use a pressure cooker, the dal will get cooked faster.
  2. Using a blender, coarsely grind the scraped coconut and cumin seeds, adding ladlefuls of water as required.
  3. When the dal is done, add the drumstick leaves, chili powder, turmeric powder and salt to taste to the cooked dal.
  4. Stir well and cook covered, for five minutes.
  5. Add the ground coconut mixture to the dal-drumstick leaves mix and stir to combine.
  6. Remove from heat before the curry comes to a boil.
  7. In a small pan, heat the oil.
  8. When the oil is hot, add the mustard seeds. Keep a splatter screen handy, or you will have oil all over your stovetop.
  9. When they have finished spluttering, add the chili pieces and curry leaves.
  10. When the chili is fried, add the mustard-chili mix to the curry, along with the oil.
  11. Stir well and serve with boiled or steamed rice.

Green Apple and Potato Salad with Arugula and Goat Cheese

The name says it all… potato, green apple, arugula, goat cheese… what more could you ask for, in a salad? But there is still more… roasted walnuts and a tangy, spicy dressing to top it all! Honestly, this is one of the easiest and tastiest of salads that I have ever made or eaten!
 
PGA-closeup

Though any variety of potatoes can be used in this salad, red potatoes have proved to be the best choice. Also, crispy, tangy granny smith apples go very well with the red potatoes.
 
PGA-ingredients1

Arugula is my favourite salad leaf. Not ‘one of’, but ‘the’! Sometimes I keep some in a dish and keep munching on the leaves as I go about my cooking. This lovely green with a peppery flavour is full of phytochemicals, anti-oxidants, vitamins, and minerals!
 
PGA-done2

Goat cheese is the perfect counterfoil for the sharpness of arugula. Add some walnut for crunch, and you got an absolute winner.
 
PGA-ingredients2

A simple lemon juice and olive oil dressing with a tiny bit of honey is kicked up with crushed cumin and a tiny pinch of red chili flakes. Shake together the lot, and the fabulous dressing is ready in two minutes!
 
PGA-potato

This salad is assembled layer by layer starting with the boiled potato slices. After placing each layer, add some of the dressing on top the layer and continue with the next layer.
 
PGA-done

Potatoes, apple pieces, arugula, goat cheese, and walnuts at the top.
 
PGA-mid1

And end with a drizzle of the remaining dressing.
 
PGA-mid2

It’s not a good idea to keep this salad for long – in or out of the refrigerator. So you should keep all the ingredients ready – even make the dressing – and assemble it just before serving.


~Ria

Green Apple and Potato Salad with Arugula and Goat Cheese
 
Author: 
Recipe type: Salad
Ingredients
  • 4 medium sized red potatoes
  • 1 granny smith apple
  • 1 cup arugula leaves
  • ¾ cup goat cheese
  • ½ cup walnuts
  • 2 tbsp lemon juice
  • 3 tbsp olive oil
  • 1 tbsp honey
  • ½ tsp cumin
  • ½ tsp red chili flakes
Directions
  1. Boil the potatoes in salted water, with the skin on and keep aside.
  2. Cut the apple into bite sized pieces.
  3. Dry roast the walnuts till they start to turn golden brown around the edges.
  4. Mix together the lemon juice, olive oil, and honey.
  5. Crush the cumin coarsely and add to the dressing mix, along with the red chili flakes and mix thoroughly.
  6. Slice the boiled potatoes thickly and place on a salad platter.
  7. Using a pastry brush, brush the dressing on the potato slices.
  8. Add the apple pieces, arugula and goat cheese bits, adding some dressing after each layer.
  9. Toss the roasted walnuts on top and drizzle the remaining dressing over them.
  10. Serve the salad at room temperature. Yum!


Moroccan Wild Rice Salad

A salad that is full of flavor and a combination of healthy ingredients… at the same time filling enough that you won’t be looking for something to eat in 45 minutes! That is what this Moroccan wild rice salad is! Starting with a base of varieties wild rice, it goes on to build up the goodness with garbanzo beans, vegetables, dry fruits and nuts. A generous dressing that combines multiple flavors completes the dish to end up with a complex flavourful, and satisfying meal in itself!
MWS-closeup1
I had bought this bag of wild rice mix, consisting of red, black and brown rices. Since then, it has become a sort of go-to ingredient to me for adding heft to simple salads. This salad started the same way, but turned into something that was much more interesting than a simple salad.
MWS-done-half
A rice and beans combination is always a good base to start. And again, I went with my go-to beans variety… the garbanzo beans. For vegetables, I chose what came in handy – zucchini, peppers, tomato and red onion. Unfortunately, I only had green peppers in the refrigerator, but am sure the use of multi-hued peppers would have looked better. Dried apricots and raisins add a touch of sweetness to the mix.
MWS-ingredients
This theme of tartness and sweetness is repeated in the dressing too… with rice vinegar, lemon juice, and honey. And soy sauce to flavor the base.

However, the dry spices used in the dressing are the key to the smoky, zesty flavour of the whole dish, along with a bunch of cilantro leaves that add a tangy freshness. These spice powders are dry roasted to bring out their fragrance.
MWS-liquid-ingredients
Though the dish has a longish ingredient list, the process is quite simple.

Mix all the chopped up vegetables and dried fruits with cilantro and the beans.
MWS-ingredients-in-bowl
Cook the rice with the soy sauce.
MWS-rice-done
Mix together the dressing ingredients.
MWS-mixing1
Add the rice and vegetable-beans mixture to the dressing.
MWS-mixing2
Garnish with almond slices, and the salad is ready to go!
MWS-done-whole
Looks pretty when served on a bed of lettuce leaves with wedges of lemon.
MWS-closeup2
This keeps very well in the refrigerator for up to 24 hours. Only, remember to bring it to room temperature before serving.


~Ria

Moroccan Wild Rice Salad
 
Author: 
Recipe type: Salad
Ingredients
  • 1 cup mixed wild rice
  • 3 tbsp soy sauce
  • 1 green or yellow zucchini
  • 1 cup cooked garbanzo beans, from a can
  • 1 green pepper
  • 1 tomato
  • ½ red onion
  • ½ cup dried apricots
  • ¼ cup raisins
  • 1 bunch cilantro leaves
  • 1 tbsp coriander powder
  • ½ tsp turmeric powder
  • 1 tsp curry powder
  • ½ tsp red chili powder
  • 2 tbsp rice vinegar
  • 2 tbsp lemon juice
  • 1 tbsp honey
  • ¼ cup almond slices and1 lemon, to garnish
  • Lettuce leaves, to serve
  • Salt to taste
Directions
  1. Cut the zucchini into bite sized pieces.
  2. Cook the wild rice, according to package instructions, along with the soy sauce and salt to taste.
  3. When the rice is cooked, turn off the heat and place the zucchini pieces on top of the rice. Cover the pan and let it rest for 10 minutes.
  4. Thinly slice the red onion, pepper and tomato.
  5. Slice the apricots thinly.
  6. Chop the cilantro.
  7. Mix together the vegetables, garbanzo beans, sliced apricots, raisins, and chopped cilantro.
  8. Set a frying pan on low heat and dry roast the coriander powder for 1 minute.
  9. Add the turmeric powder and continue roasting for another minute.
  10. Add the curry powder and chili powder and remove from the heat and keep stirring till cool.
  11. In a large bowl, mix the rice vinegar, lemon juice and honey.
  12. Add the roasted powders and mix well to make the dressing.
  13. Add the cooked rice to the dressing. Mix well.
  14. Add the vegetables-beans-fruits-cilantro combination and mix well.
  15. Serve on a bed of lettuce leaves, garnished with almond sliced and lemon wedges.

Sweet and Spicy Fruit Salad

Before long, summer will be gone, summer harvests will be gone too. No more fresh fruit from the farmers’ market. And I’m determined to make the best of the last chance foods before they are gone behind the colours of the arriving autumn. Salads, salads… and lots of fruits, that is my motto for now.

SSFS-closeup1

This particular salad is aimed at doing just that. Just lots of fruits, in a simple dressing. Nothing complicated, but the effect and the flavour of the combined fruit and the dressing is awesome.

SSFS-basket1

This can be a dessert after a meal, or half a brunch or even a lunch with a slice of frittata or an omelette added.

SSFS-fruit-closeup

So we start with the fruit. Any type of fruit, even slightly sour ones like kiwis, will work well in this salad.

SSFS-basket2

Most of the fruits I used are fresh, except for pineapple and oranges which came out of cans. And the liquid in which they were preserved in is not used.

SSFS-fruit-addition1

I started with pineapple cubes, orange segments, and a pink lady apple…

SSFS-fruit-addition2

Some ripe cherries, a golden delicious apple, and kiwis…

SSFS-fruit-addition3

Continuing with peaches and plums, bananas, and finally strawberries. That’s it; all the fruit in.
Now about the dressing…

SSFS-spice-mix

I used a pinch of red chilli flakes and a bit of chat masala, which is available in Indian grocery stores. If not, you can just use finely crushed cumin and black pepper. Juice of a fresh lime and some honey. That completes it.

SSFS-finished

Add all the dressing ingredients to the fruits along with the lime juice and honey. Mix well. Finally, chill in the refrigerator for 30 minutes at least.

SSFS-closeup2

And done! Yummy spicy sweet fruit salad is ready!


~Ria


Sweet and Spicy Fruit Salad
 
Author: 
Recipe type: Salad
Ingredients
  • Different fruits, at least 5 or 6 varieties
  • ½ tsp red chilli flakes
  • 1 tsp chat masala (can be replaced with ground cumin and black pepper)
  • 1 fresh lime
  • 2 tbsp honey
Directions
  1. Prepare the fruit as required.
  2. Cut the fruit into bite sized pieces.
  3. Sprinkle the red chilli flakes and chat masala over the fruits.
  4. Squeeze the lime and add the juice to the honey.
  5. Pour the mix over the fruit.
  6. Mix well carefully, without crushing the fruits.
  7. Serve garnished with sprigs of fresh mint.