Cookies

Pepper Cumin Cookies… A Spicy, Sweet Treat

All traditional cuisines have prescribed ways of combining and contrasting flavours and textures in food. However, chefs these days seem to be taking more of an experimental approach in their choice of flavours… be it in food or drink. What is most interesting about these new trends is that many of the combinations that work really well are indeed contrasts! Many of the new food products that have been successful fall into this category.
 
PCC-closeup2

The highly popular salted caramel, a direct influence from France, is a perfect case of contrasting flavours finding success. Anything from candies and ice cream to cakes and macaroons are available in this flavor which was unheard of in the mass market, just a few years back. In fact, an article in the New York Times talks about how 2008 was the lucky year for ‘sweet caramel seasoned with fancy salt’.
 
PCC-done2

Though the theory that different areas of the human tongue are responsible for detecting different basic tastes has been debunked, scientists are still of the opinion that some parts of the tongue taste some flavours before the others. Would that be a likely explanation why contrasting tastes prove to be very satisfying sometimes?
 
PCC-done

Right now, what sent me in the direction of contrasting flavours is the thought of some cookies. You bite into one… you are a bit confused at first… is it spicy, hot, sweet? All at the same time? As the pepper cumin cookie crumbs melt in your mouth, you realise… aah, it is a combination of all those flavours!
 
PCC-ingredients

This is a cookie that is very popular with my friends as well. In fact, I have a friend who can smell these baking in the oven even from far away, and can be at the door at the right moment! 🙂
 
PCC-flour-butter

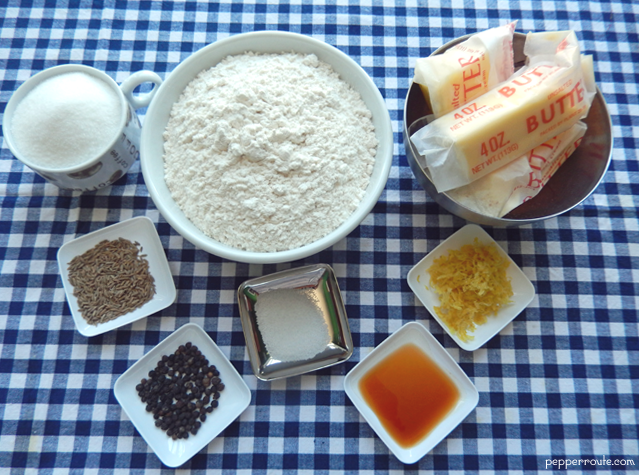
As the name indicates, the ingredients that add a zest to the cookies and kick it up several notches are pepper, cumin and lemon zest.
 
PCC-crumpled-dough

And there are no eggs in the recipe. So perfectly vegetarian!
 
PCC-cumin-crushing

The black pepper and cumin are crushed coarsely, adding to the texture of the cookie.
 
PCC-dough-rolls

Chilling the rolled up dough in the refrigerator for a minimum of 30 minutes makes it easy to cut it into rounds. BTW, the dough can be refrigerated for up to 24 hours.
 
PCC-dough-cutting

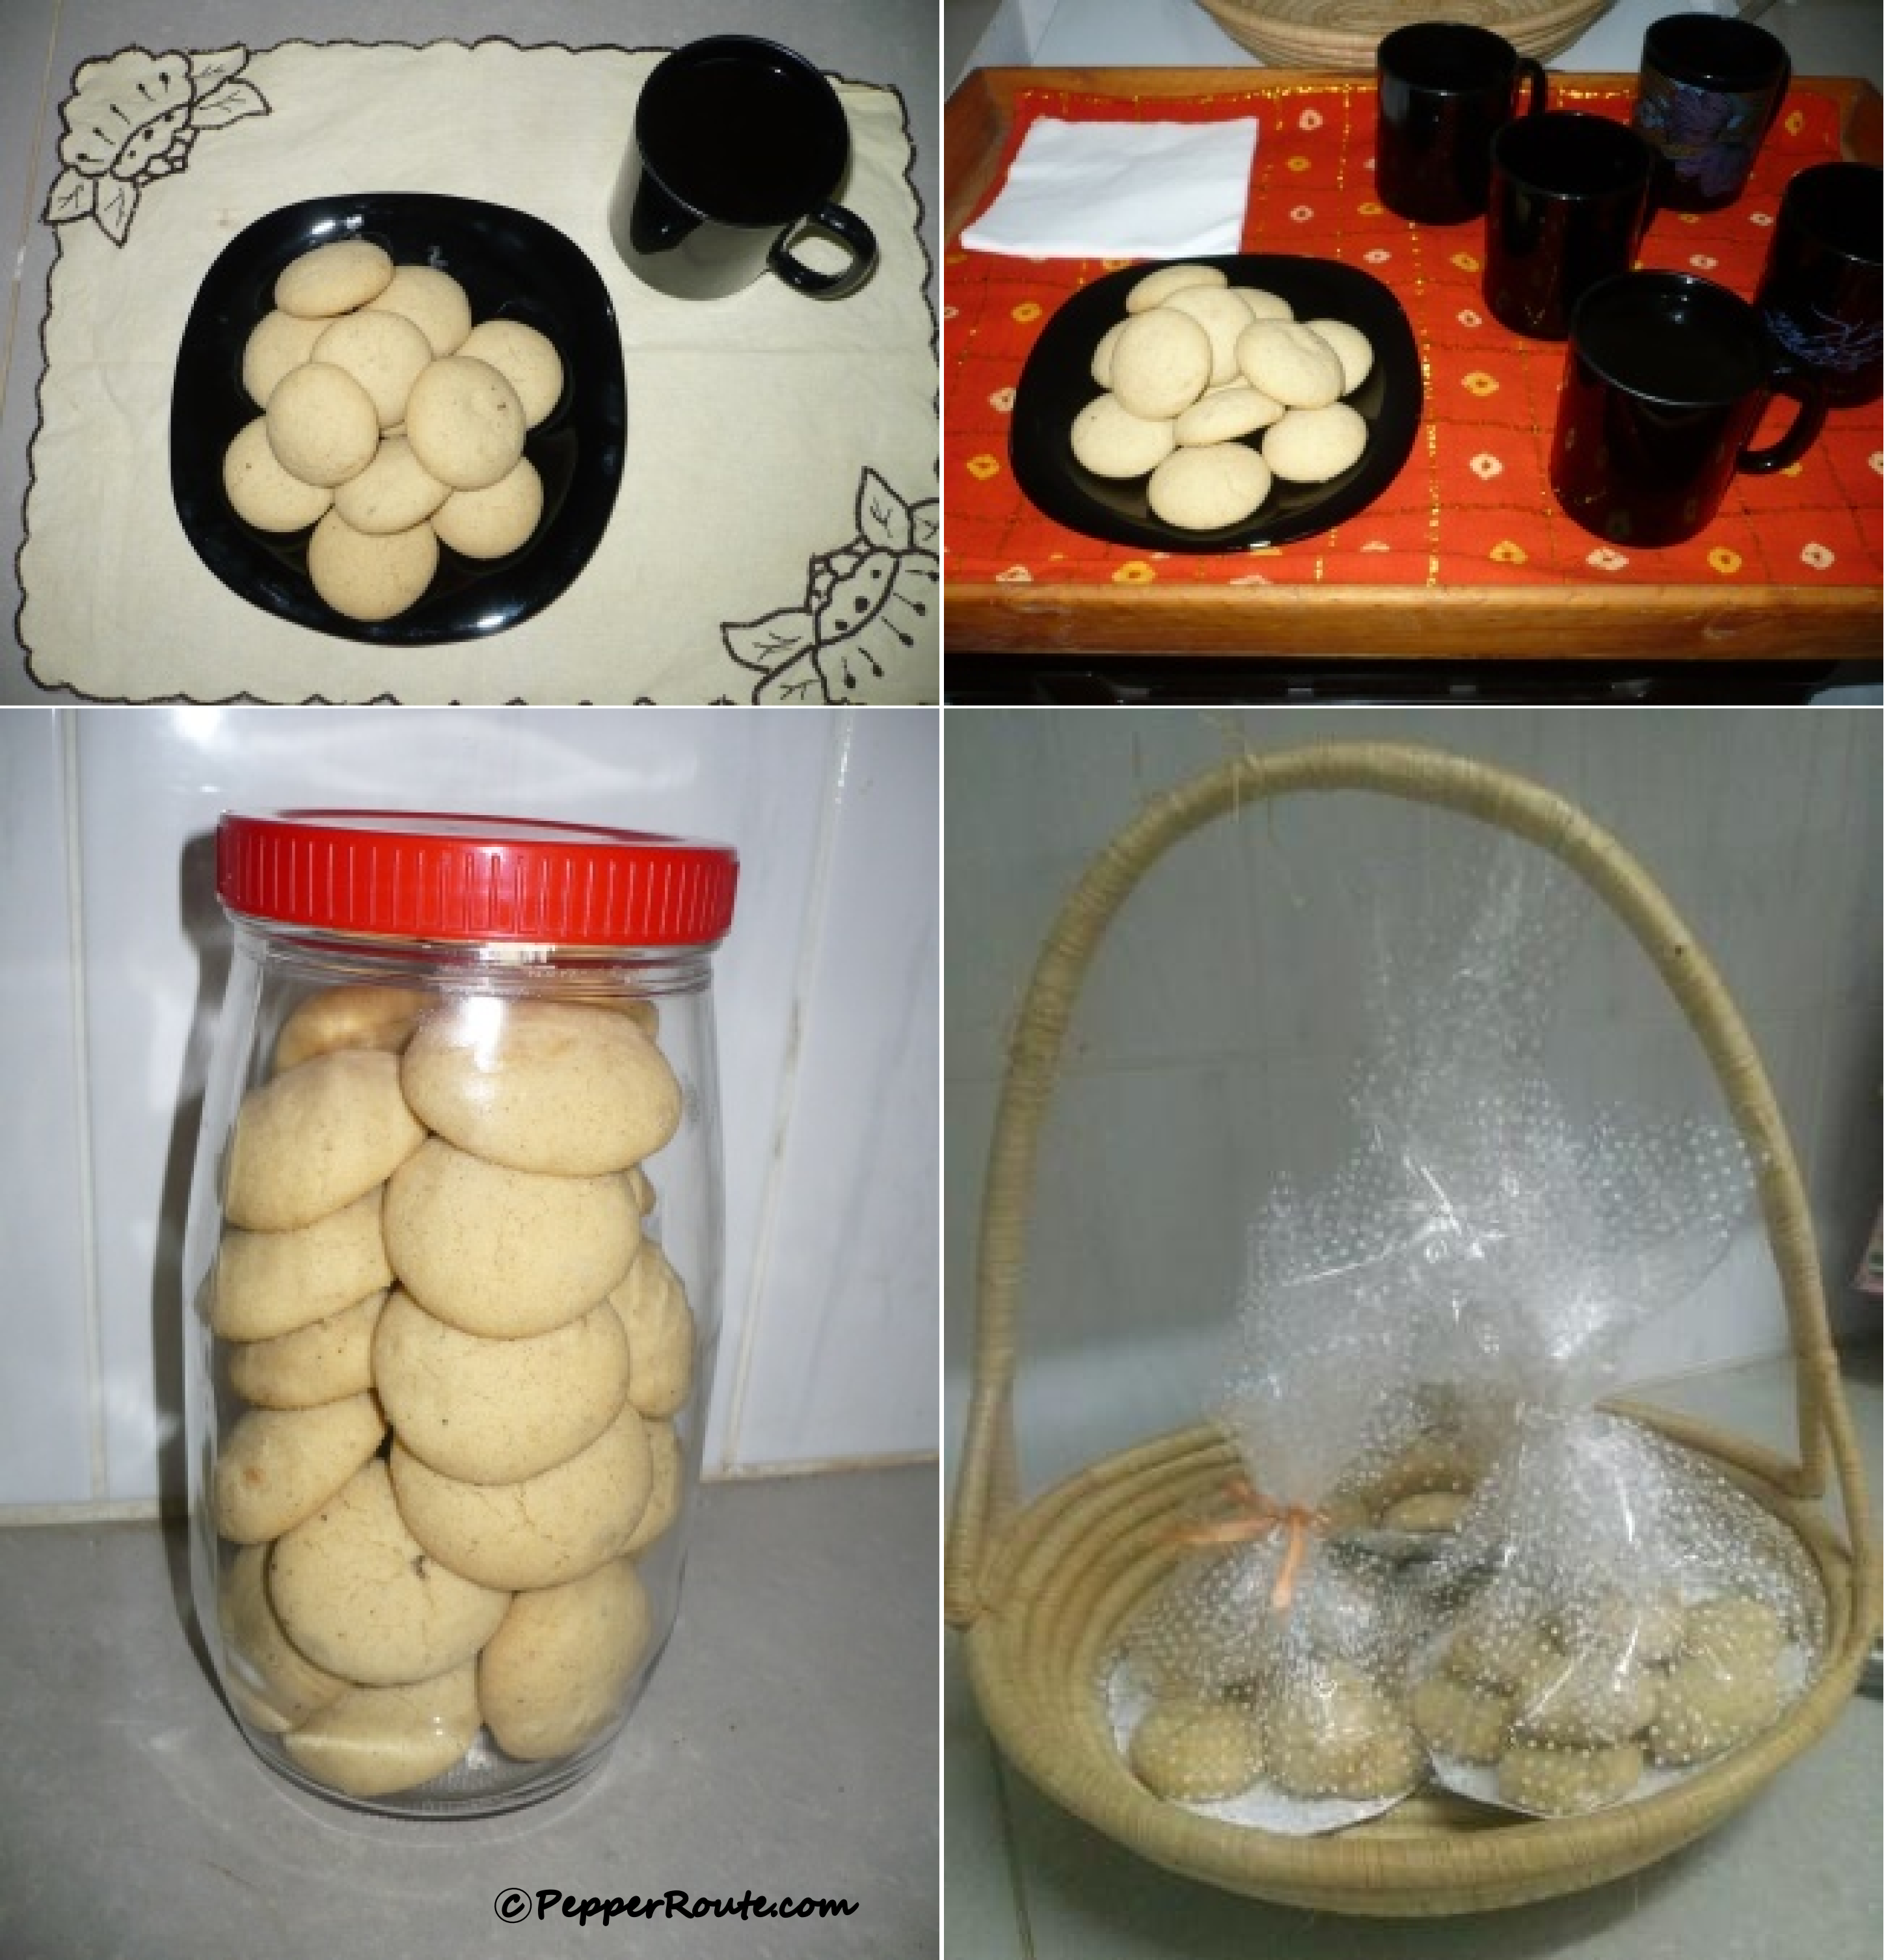
Remember to place the cookie rounds far enough apart on the cookie sheet as they will expand quite a bit.
 
PCC-raw-ready

I like to make them a bit on the thick side, but you can make them very thin as well. Only, remember to reduce the baking time.
 
PCC-ready

Perfect with a cup of green tea, on a lazy afternoon.
 
PCC-closeup

Or some sweet wine will work equally well.

~Ria

 
P.S. The contrast of flavours is so enticing… check back for a Caramelized Pears and Roquefort Tart soon.


Pepper Cumin Cookies… A Spicy, Sweet Treat
 
Author: 
Recipe type: Snacks
Ingredients
  • 2 cups all purpose flour
  • 6 tbsp sugar
  • 1 tsp salt
  • 1 lemon
  • 1 tsp black peppercorns
  • 1 tsp cumin
  • 1 cup unsalted butter, at room temperature
  • 1 tsp vanilla extract
Directions
  1. Zest the lemon and keep aside 1 tablespoon of zest.
  2. Coarsely crush the black pepper and cumin.
  3. Preheat the oven to 350 degrees farenheit.
  4. In a large bowl, mix together flour, sugar, salt, lemon zest, and crushed pepper and cumin.
  5. Cut the butter into pieces and drop in the flour.
  6. Add the vanilla extract.
  7. Using finger tips, mix the butter into the flour mixture, till it resembles bread crumbs. Do this quickly and do not over mix.
  8. Gather together the mixture and form into two logs, about 1 ½ inch thick.
  9. Chill in the refrigerator for 30 minutes.
  10. Prepare a baking sheet with parchment paper.
  11. Cut the dough rolls into uniform rounds.
  12. Place the rounds on the cookie sheet, leaving 1 inch space between them.
  13. Place in the middle of the preheated oven and bake for 15 to 20 minutes, till the cookies are lightly browned.
  14. When done, remove from the oven and allow the cookies to cool on a rack.
  15. Stored in an airtight container, the cookies will keep fresh for up to one week.


Spritz Butter Cookies

Desastre, Katastrofe, Sakuna, Inhlekelele… In how many languages can I say the word ‘disaster’? However many, it won’t be enough to express my sense of frustration… I had this vision of beautiful smooth soft thin buttery morsels decorated with multicoloured crystals of sugar lying on a black plate next to a cup of coffee… And what it all turned out… it’s not that long a story, and let me start at the beginning.

SK-cookie2

Though I had got a spritz cookie maker as a present, a while back, it is only last week that I decided to try it out. So on a warm Sunday afternoon, I gathered together the ingredients for a classic butter cookie recipe.

SK-ingredients2

Two batches… one orange flavoured and one chocolate. That was my plan. And I would use two different disks for each batch.

SK-ingredients3

I could already see them sitting on a plate, the light coloured with the dark, studded with multi-coloured sugar crystals.

SK-ingredients

For the first batch – orange flavoured – I selected a simple five petaled flower pattern. Mixed the dough to a nice pliable consistency, filled the cookie maker. Set the oven to pre-heat. Took out the cookie sheet and placed a fitting piece of parchment on it. And started pressing the cookies. Alas… the cookies totally refused to co-operate!

Instead of staying on the cookie sheet and forming a nice shape, the pressed cookie rose with the cookie maker! Every time I pressed it down, the dough came out dutifully, but the cookie refused to stay down… to the point that I had a lump of cookie dough at the end of the cookie maker and a few bits on the cookie sheet! I was aghast! I, who has mastered pinwheels and Florentines and macaroons… failing miserably with some basic pressed cookies!
Setting lamentations aside, I turned my attention to salvaging the situation. After pressing each cookie, I carefully cut it off with a sharp knife. Okay, now I can see the flower shape and there are cookies on the cookie sheet.

SK-cookies-on-pan

The first batch came out of the oven… and to my great relief, they tasted good.

SK-cookie-rack

And in a rustic way, the cookies looked good too. A pinch of sugar crystals while they are still hot on the rack, made them actually look pretty smart.

SK-cookie1

Somehow, with the workaround, I was able to finish making the cookies, though it took a bit of time. Of course, I had to abandon the idea of the second batch of chocolate flavoured ones. No sense in lengthening the misery, right?

SK-cookies-on-plate

After all the cookies were done and photographed and distributed to friends (along with the story, of course!), I still was wondering what went wrong. And I went back to the directions that came with the cookie maker. The instructions were to use an ungreased cookie sheet. And it struck me right away… no wonder the cookies were not staying down on the sheet! They were supposed to stick to the sheet and here I was pressing the cookies on parchment that nothing sticks to! That was one moment when I felt the need for some facility to kick oneself… 🙂


~Ria

Spritz Butter Cookies
 
Author: 
Recipe type: Cookies
Ingredients
  • 3 cups all-purpose flour
  • 1 teaspoon baking powder
  • A pinch of salt
  • 1½ cups butter, softened
  • 1 cup granulated sugar
  • 1 egg
  • 2 tablespoons cream or milk
  • 1 tsp vanilla extract
  • 1 tsp orange essence
  • 1 tbsp orange zest
Directions
  1. Preheat oven to 350º fahrenheit.
  2. Sieve together flour, baking powder and salt.
  3. In a mixing bowl, beat the butter and sugar till light and fluffy.
  4. Add the egg and beat thoroughly.
  5. Add the cream (or milk), vanilla extract and orange essence.
  6. Add the orange zest and combine well.
  7. Add the flour to the mix, in batches, and mix well, gently. The dough should be pliable but not too loose. Do not chill the dough.
  8. Insert the pattern disk you want to use in the cookie maker and tighten the bottom.
  9. Fill the cookie maker with the dough and attach the top.
  10. Place the bottom of the cookie maker on an UNGREASED cookie sheet, and press down to shape the cookie.
  11. Lift up and repeat the process. The cookies can be placed at a distance of one and a half inches.
  12. Bake till the edges of the cookies turn light brown. This will take 10 to 12 minutes.
  13. Place the cookies on a cooling rack and sprinkle the center of each cookie with coloured sugar crystals.
  14. Store in airtight containers when completely cool.

Eggless Butter Cookies

P1 I can never say no to a cookie. They are always good to savour with a cup of tea or coffee or to serve with ice cream or other light desserts. I love to have savoury cookies with soup. Americans call them cookies and British traditionally used the term biscuits, although now the word cookie has become common all over the world. Cookies are not only ideal for everyday eating or a special treat (especially in lunch boxes) they can also be gift wrapped and given away as special gift. Though there is almost no end to the range of cookies that can be made at home, this time I made some eggless cashew butter cookies to gift a pure vegetarian family. P2 EC Without any fancy ingredients and as the process involved is an “all in one" method, these cookies are very easy to make. These butter cookies will fill your kitchen with a wonderful aroma when they are ready to come out of the oven especially with the cinnamon powder in the dough. P3EC Cookie dough should be handled as little as possible otherwise the cookies will be very hard (no one likes butter rocks!) Adding bits of cashew nuts give a nice bite to the otherwise soft cookies. Baking them for 18 – 22 minutes, depending on your oven, will yield cookies that are still slightly soft to touch when being removed from the oven. If you want crispy, crumbly cookies bake it for an extra 3 minutes. Once it’s removed from the oven leave it on the cookie sheet for another 5 minutes before transferring to a cooling rack. The mentioned quantity of ingredients will yield about 10 – 12 cookies. P4 EC

~Min

Eggless Butter Cookies
 
Author: 
Ingredients
  • Butter ½ cup at room temperature
  • Powdered sugar ½ cup
  • Corn flour 1 tablespoon
  • All purpose flour 1 cup
  • Baking powder ¼ teaspoon
  • Salt ⅛ teaspoon
  • Cinnamon powder 1 teaspoon
  • Nutmeg powder ½ teaspoon
  • Cashew nuts (broken into tiny pieces) ½ cup
Directions
  1. Preheat the oven at 150°C or 300°F.
  2. Combine powdered sugar, corn starch and butter and mix thoroughly with a wooden spoon or a silicone spatula till it becomes light and creamy.
  3. Sift the flour with baking powder and salt.
  4. Add the cinnamon and nutmeg powder into the flour mixture and mix well.
  5. Add the flour mixture into the beaten mixture of sugar and butter and knead well till it forms a dough. If the dough is too crumbly add one or two tablespoons more of butter and knead. Care should be taken not to over knead. Excess kneading will make the cookies hard.
  6. Cover with cling film and leave it to rest for 20 minutes.
  7. Knead it lightly once more and make into smooth lime-sized balls and place them on a buttered or parchment lined cookie sheets. Leave some space in between the balls of dough as they get bigger on baking.
  8. Place the cookie sheets in the preheated oven for 18 – 22 minutes depending your oven. After 15 minutes keep a close watch on them and remove them from the when they are still slightly soft in the middle.
  9. Leave it on the sheet for another 5 minutes before transferring to a cooling rack.