Baking

Muffins to the Rescue of Bananas

Four bananas going south… cannot eat anymore as two already downed… don’t like to waste food either… what is a girl to do?

Make some banana muffins, of course! Especially when she is in need of some interesting breakfast stuff.

BPGCWM-single-glazed

And that is how it started. But then, isn’t it too tame to go ahead and make some regular run of the mill muffins? Why not add some different stuff to make it a bit more interesting? That is the path I took. And the end result? Well worth the effort… a healthier, tastier set of muffins!

BPGCWM-on-the-rack

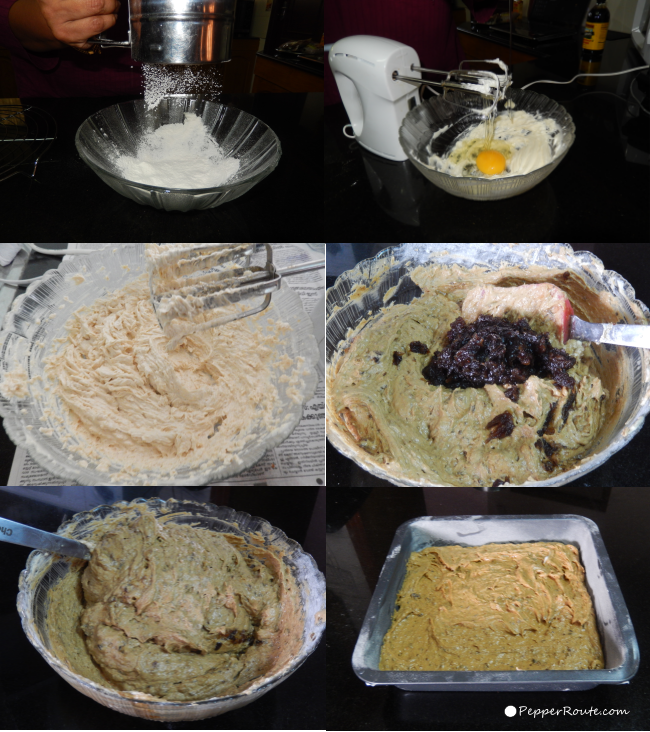
So I went around assembling the ingredients… the bananas are very sweet; so what is a fruit that is not so sweet? Dried plums! They do have a good texture too.

BPGCWM-to-be-chopped

And now for some colour… what better than glazed cherries for colour? And some walnuts for crunch. Last item… a pinch of orange zest. Nothing invokes that sunny morning feeling like the flavour of oranges!

BPGCWM-to-be-beaten

With the ingredients assembled, the rest was easy. As easy as beat’em, chop’em, blend’em… beat the liquid stuff, chop the fruits and nuts…

BPGCWM-all-chopped

And blend everything together!

BPGCWM-batter-making

When the muffins came out of the oven, they were looking so good I felt it is a shame not to give them a topping… at least some of them.

BPGCWM-baked

So I made a quick topping with a bit of cream cheese and a dash of mascarpone. They are sufficiently sweet, so just a spoonful of honey to sweeten just the topping.

BPGCWM-group-glazed

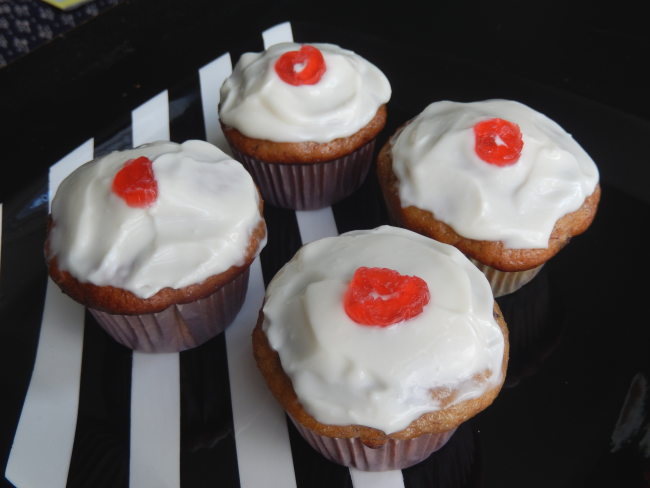
A sliver of glazed cherry to garnish, and you got a winner!

 ~Ria


Muffins to the Rescue of Bananas
 
Author: 
Recipe type: Breakfast
Ingredients
  • 3 cups all purpose flour
  • 1 tsp baking soda
  • ½ tsp baking powder
  • ½ tsp nutmeg powder
  • ½ tsp salt
  • 1 ½ cup granulated sugar
  • 1 cup vegetable oil
  • 3 eggs at room temperature
  • 1 ½ tsp vanilla extract
  • 4 very ripe bananas
  • 1 cup dried plums
  • ½ cup glazed red cherries
  • ¾ cup walnuts
  • 1 tbsp orange zest
Directions
  1. Preheat the oven to 325 degree fahrenheit.
  2. Prepare muffin pans with paper liners. The quantity mentioned will get you 20 muffins; so you could either use two muffin pans, or bake them in two batches.
  3. Mix the flour with baking soda, baking powder, nutmeg and salt. Keep aside.
  4. Toast the walnuts in a hot pan for 3 minutes and let cool. Chop the walnuts into a rough chop, each walnut being cut into not more than two or three pieces.
  5. Mash two of the bananas coarsely so that lumps remain.
  6. Chop the dried plums and glazed cherries coarsely.
  7. In a large mixing bowl, beat the eggs, using an electric beater.
  8. Add the sugar and continue beating till the sugar is completely dissolved.
  9. Add the remaining two bananas and beat them into the egg-sugar mixture.
  10. Add the oil and vanilla extract and beat to mix thoroughly.
  11. Using a spatula, mix the lumpily mashed bananas into the mix.
  12. Now add the chopped ingredients – dried plums, glazed cherries, walnuts – and the orange zest, one by one, mixing well after each addition to form the batter.
  13. Add half the flour mixture into the batter and gently blend in.
  14. When all the flour is mixed in, add the remaining flour and continue blending till smooth. Do not beat the batter at this stage or over blend.
  15. Using a large spoon, drop the batter into the prepared muffin pans till each cup is ¾ full.
  16. Place the pan into the heated oven.
  17. Bake for 15 to 18 minutes, till the muffins have risen well and the top is golden brown. At this stage, a skewer inserted into the center of a muffin will come out clean.
  18. Remove from the oven and place individual muffins on a rack to cool.
  19. If you would like to add a topping, mix together 3 tablespoons of cream cheese with 2 tablespoons of mascarpone cheese. Sweeten just enough with honey and spread on top of the muffins.

Vanilla sponge cake with chocolate frosting

Although I make frosted cakes occasionally, birthday cakes are not really my forte. So when I had to get a birthday cake for my friend’s son, I decided to improve my skills and make one myself. It had been a long while since I last made a birthday cake, the last one I remember baking was a three layer cake for my daughter’s birthday a few years ago.

P1 VSC

The birthday boy’s craze was strawberry this season. So I decided to make a two layer vanilla sponge with white butter icing and lots and lots of fresh strawberries. Since the tastes and preferences of 8 year olds are prone to changes, I wasn’t surprised that he changed his mind and opted for a chocolate cake instead. But I had already baked the vanilla sponge when I came to know about his new preference. So the initial plan of white butter icing was changed to chocolate frosting. I made this cake when I was in Kerala and the summer was at its peak with almost unbearable levels of heat and humidity. I could only do the frosting at night and still had to make many trips to the refrigerator to keep chilling the icing and cake before I could finish frosting the cake.

P2 VSC

For the vanilla cake I used a mixture of 2 ¼ cups of all purpose flour and 6 tablespoons of corn flour. This makes the cake very soft. Since the frosting adds to the sweetness of the cake, the quantity of sugar mentioned in the recipe can be reduced by ¼-½ cup. The quantity of ingredients mentioned is enough to make two 9 inch cakes. I used the creaming method for this cake. Butter and sugar are beaten together till it becomes creamy and light. Then the eggs are added one at a time and beaten well. While making cakes the flavouring agent (vanilla essence, in this case) should always follow the eggs to get rid of any odour of the eggs.  Then the sifted flour and baking powder mixture is added in small batches alternating with milk and beaten well.

P3 VSC

P4 VSC

For the chocolate frosting I used milk chocolate as the cake was for an eight year old but dark or semi-sweet chocolate could also be used instead.  I had to make sure the frosting gets a smooth spreadable consistency. The consistency of the frosting is very important which can be adjusted by the addition of more milk. If the frosting is too thick, spreading it will be difficult and will also tear the cake and if it’s too thin it will run. If the cake is too soft to handle leave it in the freezer for 30 minutes before frosting. To avoid any mess around the cake while assembling on the serving plate insert narrow strips of aluminium foil under the cake on all four sides. Once the frosting is done these foil strips can be carefully pulled off.

P5 VSC

I certainly needed a shot of caffeine after the hard work.

P6 VSC

~Min

Vanilla sponge cake with chocolate frosting
 
Author: 
Recipe type: Cake
Ingredients
  • For the cake
  • All purpose flour 2 ¼ cup
  • Corn flour 6 tbsp
  • Baking powder 1 tbsp
  • Strawberry fruit flakes ¼ cup (optional)
  • Sugar (powdered) 1 ¾ - 2 cups
  • Unsalted butter 1 cup @ room temperature
  • Eggs 4
  • Pure Vanilla Essence2 tsp
  • Milk 1 cup
  • For the frosting
  • Chocolate 1 cup (broken into pieces)
  • Butter 1 cup (at room temperature)
  • Icing sugar 4 cups
  • Milk 2-4 tbsp (use as needed)
Directions
  1. Cake
  2. Preheat the oven at 180 degree Celsius / 350 Fahrenheit for 10 minutes.
  3. Prepare the pans by buttering and flouring two 9 inch cake pans. Lining the bottom of the pans with butter paper/ parchment really helps in releasing the cakes from the pans once done.
  4. Sift the flours and baking powder together.
  5. Cream butter and sugar using an electric beater or wire whisk.
  6. Add eggs one at a time and beat well. Once the eggs are incorporated add vanilla essence.
  7. Now add the flour and milk in small batches and mix well.
  8. Divide the batter equally between the two prepared tins and bake in the oven for 25 – 30 minutes or till a cocktail stick inserted comes out clean.
  9. Leave the cakes in the pan for 10 minutes to cool. Remove from the pan and cool it on a wire rack.
  10. Frosting
  11. Melt the chocolate pieces by keeping it in a bowl over simmering water and stir well.
  12. Once it’s almost melt remove from the heat and let it cool completely.
  13. Beat butter and icing sugar together till creamy.
  14. Add the melted chocolate and mix well.
  15. Add milk little by little till it reaches the required spreadable consistency.
  16. Assembling
  17. Place one cake on the serving plate and spread some frosting uniformly on the cake.
  18. Place the second cake on top of the frosting (with the bottom side facing up) .
  19. Now cover the cake with the remaining frosting.
  20. Pipe a border around the top edge of the cake and decorate with slices of strawberries and silver balls or whatever you fancy.

Eggless Butter Cookies

P1 I can never say no to a cookie. They are always good to savour with a cup of tea or coffee or to serve with ice cream or other light desserts. I love to have savoury cookies with soup. Americans call them cookies and British traditionally used the term biscuits, although now the word cookie has become common all over the world. Cookies are not only ideal for everyday eating or a special treat (especially in lunch boxes) they can also be gift wrapped and given away as special gift. Though there is almost no end to the range of cookies that can be made at home, this time I made some eggless cashew butter cookies to gift a pure vegetarian family. P2 EC Without any fancy ingredients and as the process involved is an “all in one" method, these cookies are very easy to make. These butter cookies will fill your kitchen with a wonderful aroma when they are ready to come out of the oven especially with the cinnamon powder in the dough. P3EC Cookie dough should be handled as little as possible otherwise the cookies will be very hard (no one likes butter rocks!) Adding bits of cashew nuts give a nice bite to the otherwise soft cookies. Baking them for 18 – 22 minutes, depending on your oven, will yield cookies that are still slightly soft to touch when being removed from the oven. If you want crispy, crumbly cookies bake it for an extra 3 minutes. Once it’s removed from the oven leave it on the cookie sheet for another 5 minutes before transferring to a cooling rack. The mentioned quantity of ingredients will yield about 10 – 12 cookies. P4 EC

~Min

Eggless Butter Cookies
 
Author: 
Ingredients
  • Butter ½ cup at room temperature
  • Powdered sugar ½ cup
  • Corn flour 1 tablespoon
  • All purpose flour 1 cup
  • Baking powder ¼ teaspoon
  • Salt ⅛ teaspoon
  • Cinnamon powder 1 teaspoon
  • Nutmeg powder ½ teaspoon
  • Cashew nuts (broken into tiny pieces) ½ cup
Directions
  1. Preheat the oven at 150°C or 300°F.
  2. Combine powdered sugar, corn starch and butter and mix thoroughly with a wooden spoon or a silicone spatula till it becomes light and creamy.
  3. Sift the flour with baking powder and salt.
  4. Add the cinnamon and nutmeg powder into the flour mixture and mix well.
  5. Add the flour mixture into the beaten mixture of sugar and butter and knead well till it forms a dough. If the dough is too crumbly add one or two tablespoons more of butter and knead. Care should be taken not to over knead. Excess kneading will make the cookies hard.
  6. Cover with cling film and leave it to rest for 20 minutes.
  7. Knead it lightly once more and make into smooth lime-sized balls and place them on a buttered or parchment lined cookie sheets. Leave some space in between the balls of dough as they get bigger on baking.
  8. Place the cookie sheets in the preheated oven for 18 – 22 minutes depending your oven. After 15 minutes keep a close watch on them and remove them from the when they are still slightly soft in the middle.
  9. Leave it on the sheet for another 5 minutes before transferring to a cooling rack.

No Fail Chocolate Cake

 P1f CC

I always love to make this chocolate cake because it’s so simple and it turns out right every time. I’ve been making this cake for years but I definitely made it the most when my girls were still in school, a few years ago. They had the annoying habit of remembering quite late on the night before that they had to bring something in for a bake sale the next day. So I would make my no fail chocolate cake late at night before bed or early in the morning just before leaving for school as it can be made without much planning as the ingredients used are store cupboard staples.

P2CC

Though this cake can be made with minimal effort and limited time, it doesn’t compromise on taste – it’s soft, light and just so yummy! Another plus is that since refined oil is used instead of butter, the cake will stay soft even if it’s been refrigerated.

P3CC

An orange glaze on this otherwise simple cake lifts it up a notch. Adding a tablespoon of finely grated orange zest to the cake batter can also complement the glaze quite well. The glaze is simple enough to make: just mix a quarter of a cup of icing sugar or powdered sugar into half a cup of orange juice. If the glaze seems too watery, a bit more icing sugar will do the trick. I also add a couple of teaspoons of orange liqueur to the glaze if it’s not a cake destined for a bake sale 🙂

Served with a dollop of orange cream cheese or a scoop of ice cream, this is perfection.

P4CC

Orange cream cheese can be made by mixing a quarter of a cup of cream cheese with 2 tablespoons of sugar, 1 tablespoon of freshly squeezed orange juice and 1 teaspoon of finely grated orange zest.

No Fail Chocolate Cake
 
Author: 
Cuisine: Cakes
Ingredients
  • Unsweetened cocoa ¾ cup
  • All purpose flour 2 ¼ cup
  • Sugar 1 ¾ cup
  • Yoghurt1 ½ cup
  • Vegetable oil 1 cup
  • Baking soda 2 teaspoons
  • Vanilla essence 1 ½ teaspoons
  • Eggs 3 large
Directions
  1. Preheat oven to 180°C or 350° F.
  2. Grease a 9” round tin.
  3. Sift the flour with cocoa and baking soda twice.
  4. Combine all the wet ingredients including eggs well with an electric mixer.
  5. Add flour in small batches and blend well with mixer at slow speed.
  6. Increase speed to medium and beat for 3 minutes.
  7. Bake for 30 minutes. Check whether it is done by inserting a tooth pick into the cake and ensuring it comes back clean.
  8. Once cooked, remove from the oven onto a wire rack.
  9. Cool for 10 minutes and remove cake from the tin.

~Min

Sticky Toffee Pudding

Sticky Toffee pudding is an indulgent and comforting pudding on a cold winter day. The warm, sweet decadent crumbs drenched in toffee sauce, topped with some cold ice cream, is a treat indeed.

p1 STF

The excitement turning into disappointment on Natasha’s face is the regular visual I get whenever I plan to make sticky toffee pudding. Natasha, a good friend of ours, is a wonderful person who appreciates good food, especially the latter part of the meal viz. desserts, with oohs and aahs. A few years back some of us got together for dinner at a restaurant called “Blue Mango”. It was Natasha’s birthday. As usual she scanned the dessert section as soon as she got hold of the menu and her face lit up the moment she spotted sticky toffee pudding. Many laughs were shared over the meal and soon it was time to place the order for desserts.Orders were promptly placed and were executed in a random manner. Most of us digged in as soon as we got our desserts only to realise moments later that Natasha was yet to get hers. The guy  waiting on us, realised that he had forgotten to mention that they ran out of sticky toffee pudding and she therefore had to choose something else. The disappointment on her face was so intense that I had to ask her over the next weekend and I made sticky toffee pudding for her, despite my busy schedule.

This time the plan to make this pudding somehow got postponed a few times.And finally when I started putting the ingredients together I realised that the girl at the supermarket till had forgotten to pack the Oman dates I bought. Hence I had to return to the supermarket and for my misfortune on my way back home a young boy on a motorbike grazed the right side my car. He was perhaps trying to squeeze through the limited space available on the right since a bus had blocked off any options on the left.  To cut the story short,the minor accident held me up for the rest of the day and was in no mood to go ahead with the pudding that day thereafter. I finally managed to make the pudding yesterday. Yipee…

 P2 STP ingredients

Sticky toffee pudding is an English steamed dessert consisting of a very moist cake with lots of dates drenched in toffee sauce. This is actually a cross between a cake and a pudding and is normally served warm with custard, whipped cream or vanilla ice cream, besides the toffee sauce.

According to Wikipedia it’s Francis Coulson, who with his partner set up the first country house hotel, created and served this pudding at his Sharrow Bay Country House Hotel. It looks like he got the recipe from Patricia Martin who published the recipe and served it at her hotel. Her son later told Simon Hopkinson, the food critic thst she got it from two Canadian soldiers who stayed at her hotel during second world war. The Canadian origin makes sense as the batter for the pudding is more similar to the American muffin rather than to an English sponge. Anyway it’s considered a modern British classic alongside the bread and butter pudding and Jam RolyPoly.

P3 STF

I used dates from Oman, which is one of the world’s top producers of dates. As an age old tradition Omanis plant a shoot of the date palm to celebrate the birth of a son.

P4 STP

I used 2 tablespoon of blackstrap molasses. Regular molasses or treacle can be used as well. If you find the flavour of molasses too strong replace it with honey or golden syrup. I used demerara sugar for the pudding and light brown sugar for the toffee sauce. If you prefer lighter coloured sauce use white refined sugar instead of brown sugar. Calorie conscious people can sustitute double cream with single cream.

P4+1 STP ingredients

To make the pudding lighter, separate the eggs and only beat in the yolks at the beginning. The egg whites can be whipped stiff separately and folded in as the last step.

P5 STP

Ramekins can be used to make individual puddings. I used an 8 inch square pan as soaking of the pudding with toffee will be easier. This pudding can be made in advance, and left at room temperature. Rewarm before serving. Can be kept in the refrigerator for a couple of weeks and warmed again just before serving.

P6a

My personal preference for a topping is the humble vanilla ice cream 🙂

~Min

Sticky Toffee Pudding
Recipe type: Dessert
Ingredients
  • For the pudding
  • 225 gms Dates with stone
  • 175 ml water
  • 1 teaspoon Baking soda
  • 175 gms All purppose flour
  • 11/2 teaspoon Baking powder
  • ¼ teaspoon Salt
  • 85 gms Butter
  • 140 gms Demerara sugar
  • 2 Eggs
  • 1 teaspoon Vanilla extract
  • 2 tablespoon Molasses
  • For the Toffee Sauce
  • 175 gms Light brown sugar
  • 50 gms Butter
  • 1 tablespoon Molasses
  • 225 ml Double Cream
Directions
  1. Stone the dates and chop them into tiny pieces.
  2. Boil the water and add the chopped dates into the boiling water along with the baking soda and simmer for 3-4 minutes. Leave it aside to cool.
  3. Preheat the oven to 180 degree celsius. Butter and flour an eight inch square baking pan.
  4. Sieve all purpose flour with baking powder and salt.
  5. Beat the butter in a medium sized bowl till creamy.
  6. Add the demarara sugar and beat well till the mixture is smooth and creamy. Scrape the sides if needed.
  7. Now add the eggs one at a time and beat well. Vanilla extract can be added now.
  8. Once the mixture is beaten well, add the sieved flour in small quantities and beat mixture till well blended.
  9. Mix the cooked dates pulp and the molasses and beat well till it is uniformly distributed in the batter.
  10. Transfer the batter into the prepared cake tin and bake for 25-30 minutes, checking after 20 minutes. Keep a close watch after that and remove the pudding from the oven as soon as a wooden toothpick inserted comes out clean.
  11. While the pudding is in the oven, make the toffee sauce.
  12. When done, cool the pudding on a wire rack for 5 minutes.
  13. After 5 minutes poke the pudding with a skewer and pour half of the warm toffee sauce all over the pudding.
  14. Keep it aside for about 20 minutes.
  15. Cut it into pieces and serve with some more toffee sauce and custard, whipped cream or ice cream as you wish.
  16. To make the toffee sauce
  17. Heat the butter and sugar till the sugar melts. Add molassess and simmer for a minute.
  18. Add cream and simmer till it reaches the right consistency (similar to warm honey). It might take only 2-3 minutes. Leave it to cool.