Pork

Z is for Zha Jiang Mian 

Noodles have a history that go back to 4000 years, archeological evidence shows. It had its origin in north west China. Probably, there is no food item that travelled so far around the world, with noodles in some form or other being enjoyed in every part of the world.

Zha Jian Mian, literally translated to ‘fried sauce needles’ is one of the most popular noodle dishes, most prevalent in the city of Beijing. It originated from the Shandong province of Northern China and is common to Japan, Korea, Taiwan, and many other countries in the east as well, of course with minor variations.

This is one dish that must be familiar to anyone who has attempted any noodle dish. All the ingredients can be found in a Chinese grocery store. Regular wheat noodles of any shape will work very well. And extra firm tofu holds up much better without crumbling.

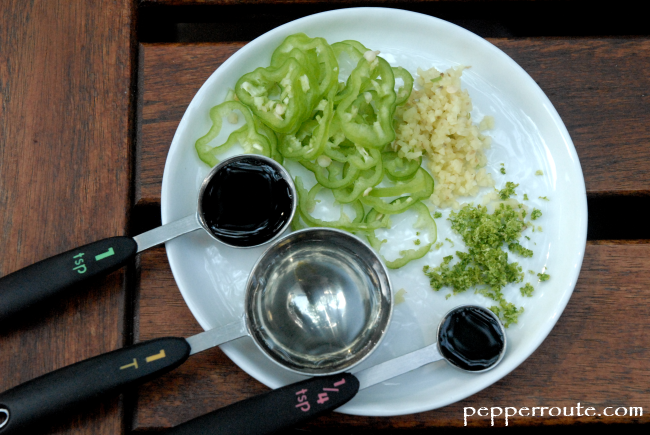
And you can safely make some ingredient swaps without affecting the flavor of the dish. You can use hoisin sauce in place of sweet bean sauce; only, in that case reduce the amount of sugar in the recipe as hoisin is sweeter. Japanese miso, especially if you mix the light and dark varieties (1:1) can easily replace the ground bean paste if you find it hard to get. And the chilis… you can use any of the hot chili varieties that you might have, or even a sweet chili. I used habanero because I had it in the fridge already.

And if you want to add more vegetables to the dish, you have so many options: sweet peas, snap peas, Napa cabbage, red and green peppers… any of them can be sliced this and added to the pan along with the carrots.

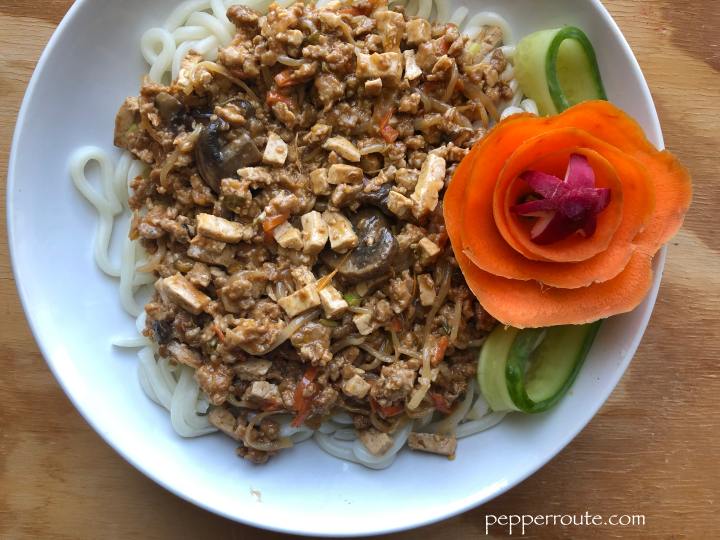
The meat sauce is served on top of the boiled noodles, with garnishes like sliced cucumber, radish, carrots etc and extra bean sprouts.

Z is for Zha Jiang Mian 

Difficulty:BeginnerServings:6 servings

Ingredients

Instructions

  1. Marinate the ground pork with 1 tsp corn starch, 1 tbsp soy sauce, 1 tsp sesame oil, and salt and pepper. Set aside for 15 minutes.
  2. Set a large pot of water to boil.
  3. Heat the cooking oil in a largish pan over high heat. When hot, add the scallions, hot chili, and shallot. Fry, constantly stirring, till the shallots are softened, 2 to 3 minutes.
  4. Add the marinated ground pork and stir together breaking up any lumps. Reduce the heat to medium and cover and cook till the pork is fully cooked, about 10 minutes. Sprinkle some water on the pork if the mixture is drying up too fast.
  5. When the pork is cooked, bring the heat back up to high. Add the tofu to the pan and mix well. Continue frying for another 2 minutes.
  6. Add the two bean sauces, soy sauce, carrots, mushrooms bean sprouts, and sugar to the pan. Add 2 tablespoons of water and stir well to combine all ingredients. Season with salt and pepper.
  7. Mix the remaining corn starch in a tablespoon of water. Add to the pan and mix well and continue cooking till the sauce has thickened, for about 2 more minutes. Check for seasoning. Turn off the heat and keep the pan warm.
  8. Check that the water set to boil in the pot is on full boil. Add the noodles to the boiling water and cook according to the package directions.
  9. When the noodles are done, drain them in a colander and toss with the 1 teaspoon of remaining sesame oil.
  10. Serve the noodles in bowls and top with the meat sauce mixture, with garnishes like strips of carrots and cucumbers, and bean sprouts.
Keywords:Chinese fried noodles, Noodles with meat sauce, Stir fry

R is for Ropa Vieja

Ropa Vieja literally means ‘old clothes’ which the dish can claim to resemble, if you use your imagination. It is the national dish of Cuba. According to a fun legend associated with the dish, a man who had no money and desperate to feed his family, started cooking his shredded clothes as he had nothing else to cook. He kept praying while the clothes cooked and tada… his old clothes turned into a delicious stew!

Though the national dish of Cuba, its origin story starts from the Iberian peninsula, in modern day Spain.The jewish community there used to prepare this slow cooked stew for sabbath. From there it spread to the seafaring Canary Islands and north Africa. Sailors from Canary Islands took the preparation to Cuba and the rest of the Caribbean. 

Ropa Vieja has a history of 500 years. Of course, originally it was cooked with beef, but ropa vieja can be cooked with pork or chicken thighs as well. I have used pork for this recipe simply because I have been cooking with beef a lot in the past few days and wanted a change.

A dish that has travelled so far, over so long a time, is bound to have some variations, especially when its footprint is spread over geographically separated areas like the Caribbean. That holds too true for ropa vieja, with versions being cooked all over the central and south Americas.

The olives and capers give the dish a bit of tartness, while the mix of peppers and onion gives it lots of color. This is the kind of dish that I cook in a large batch as it tastes better the next day. 

Ropa vieja is usually served with cooked rice and black beans. And fried strips of plantains. Rolled up in a tortilla is good too.

R is for Ropa Vieja

Difficulty:BeginnerServings:6 servings

Ingredients

Instructions

  1. Heat 2 tablespoons of oil in a largish pan over medium heat.
  2. Add the sliced peppers, onion, garlic, cumin and bay leaves to the pan. Season with salt and pepper.
  3. Stir together and cook till the vegetables are tender and the liquids have evaporated. Keep stirring till it is ready to prevent browning and sticking, about 25 minutes. Set aside when done.
  4. Season the meat well with salt and pepper.
  5. Add the remaining 2 tablespoons of oil to the pan. When the oil is hot, add the meat pieces to the pan in a single layer. Brown the meat on all sides, turning as required, about 8 to 10 minutes. This can be done in batches.
  6. When all the meat has been browned, add the peppers and onions mix to the browned meat in the pan, along with any previous batches of meat.
  7. Add the olives, capers, tomatoes, and stock. Mix well, stirring and scraping up any bits stuck to the bottom of the pan. Season with salt and pepper.
  8. Bring to a boil and reduce the heat to simmer. Cover with a lid, slightly open so that it doesn’t overflow. Continue cooking, checking on the liquid occasionally and stirring to prevent sticking. If you see there is not enough liquid, add a half cup of water to the pan.
  9. Continue cooking till the meat is tender and shreds easily when poked with a fork, about 2 hours for pork. Check the seasoning.
  10. Shred the meat using two forks and mix well. Serve with cooked rice and black beans.
Keywords:Cuban food, Pork, Ropa Vieja

F is for Fabada Asturiana 

Fabada Asturiana is a rich pork and beans stew from the Asturias region of northern Spain. Asturias is a rugged mountainous region, and like most mountain food, fabada asturiana is simple and hearty. 

Traditionally, the type of beans used for this stew is fabes de la granja – beans of the farm. As it is fairly difficult to find them in the US, you can use any kind of large white beans. I have used Spanish flat white beans here. 

As with any old recipe, there are several variations going around, especially regarding the meat used. Different types of ham and bacon, chorizo and blood sausages were variously included. For this recipe, I have used ham hock, smoked bacon, slab bacon, and Spanish chorizo sausages. And believe me, it is one of the most flavorful stews I have ever tasted. 

The smoked paprika in the dish enhances the flavors of the chorizo. And the saffron gives it a distinctive color and flavor.

The stew is started in cold water and the flavors are concentrated over slow simmering.

Fabada Asturiana is served with crusty bread, whole wheat being the best.

F is for Fabada Asturiana 

Difficulty:BeginnerServings:6 servings

Ingredients

Instructions

  1. Soak the beans in cold water, 8 hours prior to the time the stew is to be cooked.
  2. When ready to cook the stew, drain the beans and add them to a large pot.
  3. Add onions (halved), garlic (whole), paprika, saffron, ham hock (whole), two types of bacon (whole), salt and pepper, along with 10 cups of cold water to the pot.
  4. Bring the contents of the pot to a boil. Continue to cook on simmer for 1 hour.
  5. Check the liquid level of the pot; liquid should be sufficient to cover the ingredients. If required, add more water.
  6. Continue cooking for another 30 minutes.
  7. Add the chorizos to the pot. Continue cooking till the beans are soft and the liquid is thickened to the consistency of gravy, for about 30 minutes more.
  8. Check seasoning and adjust salt and pepper, if required.
  9. When ready, pick up the ham hock, slab bacon and chorizo out of the pot using a slotted spoon and place them on a chopping board. Cut the meat from the ham hock into large pieces, discarding the bone. Cut the slab bacon and chorizo into bite size pieces.
  10. Place the meat back in the pot with the beans.
  11. Serve hot along with thick slices of crusty bread.
Keywords:Bacon, Beans, Ham, Meat stew

A Symbol of Fall… Stuffed and Baked Acorn Squash

This is a wonderful time of year for locavores. The farmers’ markets are loaded with tomatoes, green beans and Brussels sprouts… kale, fennel and leeks… carrots, parsnips and rhubarb… turnips, pumpkins and squashes… though some of them like tomatoes and green beans will disappear pretty soon. They are all looking so fresh and lovely! Especially the winter squashes… they are new in the season and are at the height of their glory.
 
ASSB-closeup1

I had walked to the local market to pick up some long beans, mini/baby radishes and sweet peppers for a sinigang, a Filipino stew. But I couldn’t leave without a beautiful acorn squash perfectly shaped and a deep green in colour.
 
ASSB-acorn-squash

Acorn squash is a member of the squash family, belonging to the botanical genus Cucurbita, meaning ‘gourd’ in Latin.
 
The squashes have their origin in the Andean valleys and Central America. They were growing in those areas when the Europeans first conquered them. These squash varieties were carried to Europe after the discovery of ‘the new world’ and subsequently spread across the world.
 
ASSB-ingredients-closeup

Cultivation of the squashes as a plant species started over 5,000–6,500 years ago. It was domesticated before maize or beans, the three staples of Latin American agriculture.
 
Squashes come in two varieties… summer and winter squash. The summer squash are smaller, thin-skinned and are eaten before they are fully ripened. Zucchini, pattypan, and crookneck squashes belong to this category.
 
The winter squash grow late in the season and are harvested close to the frost setting in. They have hard rinds and keep for a long time, making them a reliable food source during the cold winter months. Acorn, spaghetti, and butternut squashes are of the winter squash variety.
 
The word ‘squash’ comes from the native American word ‘askutasquash’ in the Narragansett language, meaning ‘green thing eaten raw or uncooked’. Contrary to the origin of the name, squashes are invariably cooked in modern times.
 
The squashes are a good source of vitamin A, vitamin C, dietary fiber, niacin, folic acid, and iron. They do not contain any fat and cholesterol, thus making them an ideal addition to any diet. The early settlers depended a lot on squashes to sustain them during the cold hard winters in America.
 
ASSB-done3

The acorn squash got its name due to its acorn-like shape. It is also called pepper squash or Des Moines squash; don’t know why. Though the original acorn squash is a deep green in colour, new varieties are available in golden and white colours.
 
ASSB-ingredients

Preparing the stuffing is quite easy, just like any other.
 
ASSB-in-the-pan

Acorn squashes generally small in size and that makes them the best for baking. A great selection of fillings can be used to stuff it before baking. In this instance, I have used spinach, carrots, cooked rice, and sausage meat as the filling for the squash.
 
ASSB-filling

To add to the tastiness of the squash, rub the insides and cut edge of the squash with salt. Also, drop small pieces of butter inside the squash halves before filling them. This will keep the stuffing moist.
 
ASSB-filled

Be careful to fill the squash lightly, without pushing down. Using a spoon, you can pile up the stuffing, again without pressing it down.
 
ASSB-covered-with-foil

And use aluminum foil to loosely cover the squashes till the last 10 minutes of the baking. This will prevent the stuffing drying out in the baking process.
 
ASSB-done1

Vegetarians can easily replace the sausage meat with cubed-small potatoes or any kind of beans.
 
ASSB-done2

And it was so delicious, the flesh of the squash just melting in the mouth. One of the best things about it is that it freezes very well, heating up well in the oven.

~Ria

A Symbol of Fall… Stuffed and Baked Acorn Squash
 
Author: 
Recipe type: Dinner
Ingredients
  • 1 acorn squash, medium sized
  • 1 tbsp salted butter
  • 2 hot Italian sausage links
  • 1 tablespoon olive oil
  • 1 medium sized onion
  • 2 ribs celery
  • 2 medium sized carrots
  • ½ cup dry white wine
  • ½ cup cooked rice
  • ½ cup spinach, frozen, completely thawed
  • 1 tsp dried oregano
  • Salt and pepper to taste
Directions
  1. Chop the onion, celery ribs and carrots into small pieces and keep aside.
  2. Chop the thawed spinach.
  3. In a large pan, heat one tablespoon of the olive oil.
  4. Remove the casing from the sausage links and crumble into the hot oil.
  5. Cook over medium heat, stirring continuously, till the meat is dry.
  6. Drain the meat and keep aside.
  7. Add the remaining one tablespoon of olive oil to the pan.
  8. Add the chopped onion, celery and carrots and cook over medium heat, till they start to turn brown around the edges.
  9. Add the wine and keep stirring for 2 to 3 minutes to evaporate the alcohol content.
  10. Add the sausage meat, cooked rice and spinach. Stir to mix thoroughly.
  11. Add the oregano and salt and black pepper to taste.
  12. Remove from the heat when fully dry and heated through.
  13. Preheat the oven to 400 degrees farenheit.
  14. Cut the acorn squash into two and remove the seeds and roughage from the inside.
  15. Cut small pieces off the ends to make the halves sit well.
  16. Rub salt inside the squash halves along the cut edges.
  17. Cut the butter into two pieces and drop into the squash halves.
  18. Fill the squash halves with the stuffing till heaped full, without pressing down.
  19. Fashion a loose tent over the squash, using aluminum foil.
  20. Place the filled, tented squash halves on a baking tray lined with parchment.
  21. Place in the oven and bake for an hour.
  22. Ten minutes before the hour is up, remove the aluminum foil and continue baking.
  23. When ready, remove from the oven and serve hot.


Grilled Korean Spiced Pork with Water Chestnut Salad

With August steadily advancing into September, and the specter of cold also getting nearer, the days of the grill are numbered. So when a lovely weekend came around, we made the best of a sunny Sunday by opting for a grilled pork meal.

GPWCS-closeup

The pork was marinated with a kochujoung paste, which is a hot pepper paste commonly used in Korean cuisine. The usual ingredients for the kochujoung paste are red chili powder, powdered glutinous rice, fermented soybeans and salt.

This dark red paste adds layers of flavour to the meat and gives it enough of a kick to make it interesting.

GPWCS-grilling

In place of kochujoung paste, you could use samchang paste, which is another hot pepper sauce of Korean origin.

In addition to the water chestnuts, the salad has cucumbers, red and orange peppers, scallions, and cilantro.

GPWCS-uncut

The assortment of vegetables adds colour appeal to the salad.

GPWCS-cut-ingredients

To align the flavours of the salad with the grilled meat, I used a dressing with mirin, tamari, fish sauce, and lime zest.

GPWCS-done2

This worked very well with the crispy vegetables, giving them a lovely coating of tang and freshness.

GPWCS-dressing-ingredients

For a coolish evening, after a sunny day, this meal was just right; fully balanced in flavours and nutrition. A well chilled fruity white wine was the perfect companion for this meal.

GPWCS-done1

And a major plus, the leftover grilled pork makes great sandwiches for next day’s lunch!

~Ria

Grilled Korean Spiced Pork with Water Chestnut Salad
 
Author: 
Recipe type: Dinner
Ingredients
  • 6 pieces thin cut pork loin
  • 1 tbsp kochujoung paste; can be replaced with samchang paste
  • One 8 oz can of water chestnuts
  • 1 cucumber
  • 4 scallions
  • 1 each red and orange sweet pepper
  • 10 sprigs of cilantro
  • ½ green chili
  • ¼ inch ginger
  • Zest of 1 lime
  • 1 tbsp mirin
  • ½ tsp tamari
  • ¼ tsp fish sauce
  • Salt to taste
Directions
  1. Apply the kochujoung paste and salt on the pork and let sit for 30 minutes.
  2. Thinly slice all the vegetables for the salad (can be done in a food processor) and set aside.
  3. Thinly slice the green chili for the dressing.
  4. Finely mince the ginger.
  5. Mix all the ingredients for the dressing, in a small bowl and keep aside.
  6. Cook the pork on an outdoor grill (about 3 minutes per side). You can also use a grill pan indoors, if you prefer.
  7. Toss all the salad vegetables together.
  8. Season with salt and pepper.
  9. Dress the salad with the prepared dressing and serve.

Chicken Sausage Rice… inspired by Paella!

Paella is one of my favourite rice dishes... not only is it delicious, it is sort of a complete meal. At least the version that I make where I incorporate some vegetables into a mainly chicken and seafood dish. The other day when the craving for Paella hit me, I was in the midst of a project deadline and in no way able to spend the time to prepare it. Necessity is the mother of invention, right? I did come up with a dish which has chicken and sausages and resembled Paella enough to make my tummy happy. Win-win all the way! ch-sau-rice3 It is actually very simple... cook sausages and chicken separately. Chop some vegetables. Throw everything together along with some rice, and cook till done. Though I used hot Italian sausages, I think chorizo will be even better. chi-sau Any vegetables that will not go mushy will work. As this was not a planned-in-advance dish, I used the red peppers I had in the refrigerator. And of course, onions and garlic. Celery adds some additional flavour to the dish, but can easily be omitted. veg-mix The rice I used was regular long grained rice, but again, do you think Arborio rice would be better? Maybe next time I’ll try this dish with Arborio rice. And chorizos. ch-sau-rice1 Yeah, many ways to manage this dish with whatever ingredients you have handy! ch-sau-rice2

~Ria

Chicken Sausage Rice... inspired by Paella!
 
Author: 
Recipe type: Dinner
Ingredients
  • 2 lb skinless, boneless chicken, thighs and breasts mixed
  • 1 lb sausages
  • 1 large onion
  • 2 ribs celery
  • 4 cloves garlic
  • 1 tsp chilli powder
  • 2 tsp paprika
  • 1 tbsp coriander powder
  • ½ tsp cumin powder
  • 2 cups rice, Arborio or long grain
  • 1 large red pepper, or a mix of vegetables
  • 1 can (12 oz) crushed tomatoes
  • 1 can chicken stock (can be made from cubes or substituted with water)
  • Cooking oil, as required
  • Salt and black pepper to taste
Directions
  1. Cut the chicken into pieces and mix with chilli powder, paprika, coriander powder, cumin powder and salt. Leave aside in the refrigerator to marinate while you prepare the rest of the ingredients.
  2. Cut the sausages into bite size pieces.
  3. Wash and drain the rice and leave aside.
  4. Chop the onions and celery roughly. Slice the garlic thinly.
  5. Cut the vegetables into bite size pieces.
  6. In a large pan, heat 2 tbsp oil and fry the sausages. Drain on paper towels.
  7. In the same pan, add another 2 tbsp of oil and brown the marinated chicken pieces on all sides. Keep aside.
  8. Add 2 more tbsp oil to the pan and add the onions, celery and garlic. Fry till they turn transparent.
  9. Add the drained rice and fry for two minutes. Add the crushed tomatoes and chicken stock. Stir together. Add the sausages and chicken pieces to the mixture. Season with salt and black pepper.
  10. Bring to a boil and cover and cook for 15 minutes, checking after 10 minutes to see there is enough liquid in the dish. If not, add enough water to cook.
  11. When the rice is done, switch off the heat and let sit for another 10 minutes.
  12. Serve with a salad dressed with any creamy dressing. Quick and easy and delicious!

Meat-Vegetable Loaf

Today was a lovely day… first time the temperature crossed 70 this season. And I was in the mood for something on the lighter side for dinner. Like a piece of salmon with some lemon-habanero aioli… With that picture in mind, I set out for the grocery store. I was in the meat and fish section when I saw the shop assistant bringing out fresh ground turkey. Ground up is the best way I like to go with turkey, and it was so fresh. And all my plans underwent a sudden change; when I reached home from the grocery store, I had all the fixings for a meatloaf!meatloaf6

This is not truly a meatloaf… more like a meat vegetable loaf. I add a ton of veggies to the mix. Onion, celery, red and green peppers, green peas, brussels sprouts, green beans, broccoli… these can all go into it, in any combination. In fact, any vegetable that is not too watery like will work. You can use equal quantities of meat and vegetables.

meatloaf1

My combination of spices for this meatloaf are rosemary, thyme, dijon mustard, and red chilli powder. If it is summer and my herb garden is growing, I prefer to use the fresh herbs. If not, dried ones will do as well.

meatloaf2

So you chop up all the vegetables. And add them to the ground meat. Along with eggs, breadcrumbs and a bit of sour cream. And of course, salt and pepper for seasoning. The beauty of the whole scheme is that there is no hard and fast rule about what can and cannot go into this meatloaf. By the way, has anyone tried a veggie loaf? Could be an interesting thing to try out. 🙂

meatloaf3

By the time I had prepared the mix, there was more than could be accommodated in the loaf pan. Easy to pop the remaining mix into ramekins and bake into individual helpings. And these freeze beautifully.

meatloaf4

If one doesn’t want to use red meat, a combination of  turkey, chicken and pork will work well. This particular meatloaf I made with just ground turkey.

meatloaf5

Served on a bed of creamy mashed potatoes, with or without gravy, this meatloaf is absolute yum!

~Ria

Meat-Vegetable Loaf
 
Author: 
Ingredients
  • 2 lb ground meat (mix of turkey, chicken and pork)
  • 1 onion
  • 2 ribs celery
  • 1 red pepper
  • 1 green pepper
  • 1 handful of frozen green peas
  • 1 tsp rosemary (fresh or dried)
  • 1 tsp thyme (fresh or dried)
  • 2 tsp dijon mustard
  • 1 tsp red chilli powder
  • 4 large cloves of garlic
  • 2 eggs
  • 1 cup fine breadcrumbs
  • ½ cup sour cream
  • Salt and pepper to taste
  • Tomato ketchup for garnishing
Directions
  1. Preheat the oven to 350 degree F.
  2. Chop all the vegetables fine.
  3. Mince the garlic and herbs.
  4. Thaw the frozen green peas.
  5. In a large pan, mix together all the ingredients, seasoning well with salt and pepper. Be careful not to overmix.
  6. Place the mix into a loaf pan and form the top into a loaf shape.
  7. Garnish with tomato ketchup.
  8. Bake for 45 minutes. Check for doneness by inserting a skewer into the loaf. If it comes out clean, the loaf is done. If required, bake for another 10 minutes.
  9. Let cool for 10 minutes, before slicing. Any extra will freeze well.