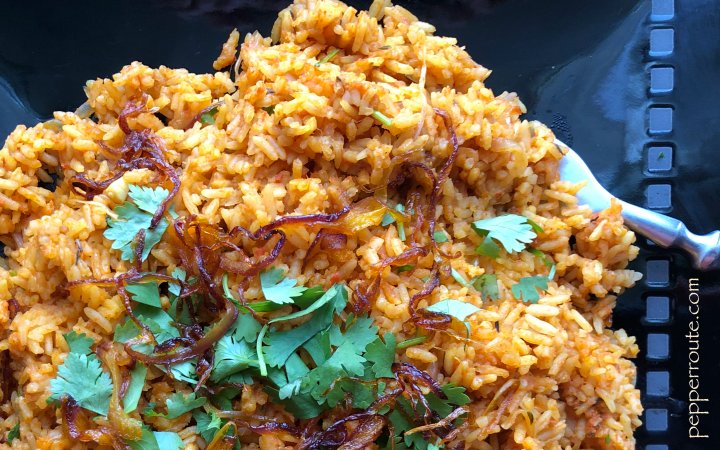
T is for Tahchin Morgh
Tahchins are a Persian/Iranian rice delicacy. The name comes from the words ‘tah’ meaning bottom and ‘chin’ meaning to layer, to arrange. True to the name, a Tahchin consists of multiple layers baked together. It is one of the most popular dishes and is served for celebrations and on special occasions.
Tahchins can be cooked with meat, fish, or vegetables or plain with just the rice. Usually bone-in meat is used as it adds to the flavor.

Creating a tahchin is an art form – the art of the tahdig. It takes expertise and practice to get it right. Tahdig is the crispy, fragrant disc of rice that form at the bottom of the dish and is the focus of a tahchin. The tahdig is separated from the main dish and served on the side along with the rest of the dish.
A tahchin has four essential layers: the bottom layer of rice, eggs, and yogurt which forms the tahdig, the spiced rice above that, the meat/fish/vegetable layer, and finally, one more rice layer.

I have used chicken thighs for this recipe. As I found the basic chicken rather bland, I’ve spiced it up a bit more than usual for this version, taking care to use the common Iranian spices to do so.
I am not very happy with the results… I know I should have left the tahchin another 10 minutes in the oven, letting it brown further. Alas, patience is not one of my qualities!

Based on the type of tahchin, the accompaniments vary. However, yogurt and green salads are usually served with all versions.


T is for Tahchin Morgh
Ingredients
Instructions
- To make the Persian spice powder, lightly roast and powder together 1 tbsp cumin, 1 tbsp black pepper, 1 tsp cloves, 1” piece of cinnamon, 1/2 tsp cardamom seeds, and 2 tbsp of dried rose petals. I had to do without the rose petals as I didn’t have them on hand.
- Wash the basmati rice and soak for 1 hour.
- Marinate the chicken pieces with onion powder, garlic powder, Persian spice, salt and pepper. Set aside for 30 minutes.
- Heat the oil in a pan and add the cut onions. Cook on medium heat till the onion turns transparent and the edges start to brown.
- Add the chicken pieces and stir well.
- Add the tomatoes, mix and continue cooking till the chicken is done and the sauce has thickened. There should be around a cup of sauces in the pan. Allow to cool.
- Bring 10 cups of water to a boil in a largish pot and add the soaked rice. Bring the water back to boiling and cook on simmer for 5 minutes.
- Drain in a colander and cool under running water. Set aside.
- Place an oven rack in the lowest position and heat the oven to 400 degrees F.
- Heat the 2 tablespoons of vegetable oil and 2 tablespoons of butter in a small pan. Pour into a baking dish.
- In a bowl, beat the egg with the yogurt, 1 tablespoon of vegetable oil, pinch of salt, and the saffron, if using. Add 1 and 1/2 cups of cooked rice to the bowl and mix well.
- Add the rice mix to the baking dish and press down, using the bottom of a measuring cup or any such utensil.
- Add half of the remaining drained and cooled rice to the baking dish.
- Add the chicken evenly as the next layer, taking care to cover all the rice.
- Finally add the remaining rice and press the whole thing down, lightly.
- Add the 1 tablespoon of cold butter, cut into cubes, on top of the rice.
- Cover the baking dish tightly with aluminum foil (cut slits in the foil to vent the steam) and place on the bottom rack of the pre-heated oven.
- Cook for 1 hour and 20 minutes. Let rest for 10 minutes.
- Invert the tahchin on to a platter. Cut into pieces and serve with accompaniments.