April 2014

Cilantro Pesto Pasta

There is no easier go-to food than pasta… In the time that the water takes to boil and cook the pasta, you can get the sauce done. And if you are in a hurry, nothing is faster than a pesto sauce. However, just because it can be done quickly, it doesn’t mean that pesto is a simple thing; the flavours in a pesto sauce can be complex and intriguing. What is more, you can experiment with different combinations of ingredients.
 
plated-pasta


Basically, a pesto sauce needs a nut base to give it body. Add to it any green herb to form the foundation of the flavour. And olive oil to bring it all together. The rest is entirely up to you… you can try various accent flavours to focus on, till you find your favourite combinations.
 
pesto-final
 
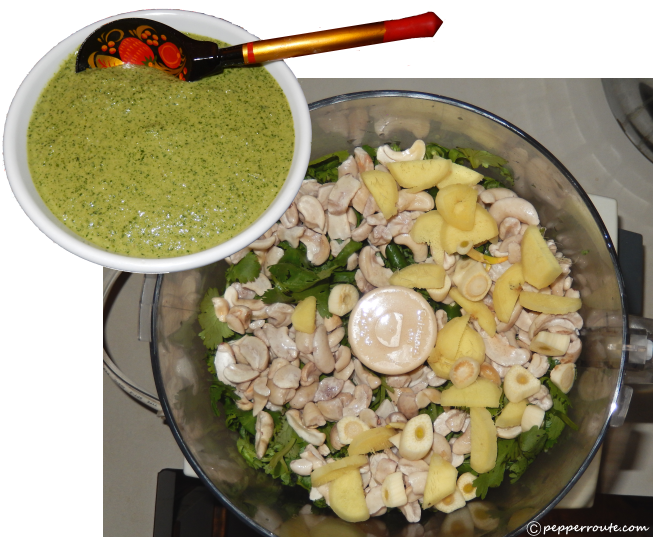
The pesto sauce I have used here is very basic, with cashew nuts and cilantro. Flavoured with garlic, ginger and lemon juice. You can keep this pesto sauce in the refrigerator for a week, in an airtight jar.
 
pasta-veggies

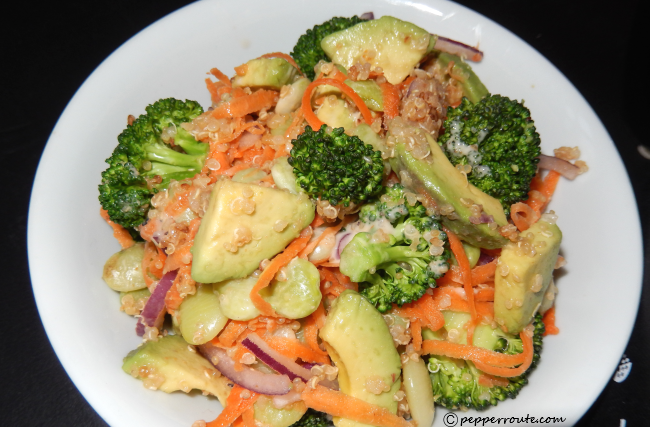
This pesto is rather versatile. You can use it with just vegetables or a combination of chicken and vegetables. If using chicken, the easiest way will be to either grill it or pan cook it and then slice it into thin strips. Here I have used just vegetables, a combination of peppers in three colours, mushrooms and egg plant.
 
veg-cooked

Also, you can use any kind small sized pasta for this dish. However, I always prefer spaghetti to go with a pesto sauce. Nice to swirl around your fork!
 
pasta-ready

Enjoy!

~Ria

Cilantro Pesto Pasta
 
Author: 
Recipe type: Dinner
Ingredients
  • ½ cup cashew nuts
  • 1 cup cilantro, measured after cleaning and chopping
  • ½ cup + 2 tbsp olive oil
  • 2 garlic cloves
  • A small piece ginger root
  • 2 tsp lemon juice
  • 1 jalapeño or any variety green chilli
  • 1 pinch sugar
  • Salt and black pepper to taste
  • 2 cups mixed vegetables, cut into thin long pieces (any combination of peppers, squash, broccoli florets, mushrooms, egg plant, etc)
  • ½ lb spaghetti
Directions
  1. Soak the cashew nuts in sufficient water to submerge for an hour. (If you do not have the time to soak the cashew, you can as well use pine nuts which do not need to be soaked.)
  2. Pick only the leaves and tender stalks of cilantro and chop.
  3. Remove the skins of garlic and ginger.
  4. Carefully remove the stem and seeds of the jalapeno.
  5. In the blender, add the nuts, cilantro, garlic, ginger, jalapeno, lemon juice, and sugar, and blend well. Add salt and black pepper to taste. When blended into a paste, drizzle the olive oil in a thin stream while the blender is still running. When all the oil is used up, switch off the blender and set the pesto sauce aside in a container.
  6. Cut the vegetables into long thin strips.
  7. Heat 1 tbsp oil in a pan, on high heat. When the oil is hot, add the vegetables and stir fry for three minutes. Add salt and pepper to taste and remove from heat.
  8. Add some salt to a pot of water and bring to boil. Add the spaghetti and cook uncovered. After 8 minutes, check for doneness. When you can bite into a strand of spaghetti easily, but there is a bit of resistance at the center, it is done enough. Drain the water off the pasta and transfer the pasta to a largish dish. Drizzle one tablespoon of olive oil over the pasta and shake together to coat.
  9. Add the stir fired vegetables to the pasta. Drizzle the pesto sauce over the pasta and vegetables and carefully mix together.
  10. Serve hot with extra pesto sauce on the side.

Chicken Sausage Rice… inspired by Paella!

Paella is one of my favourite rice dishes... not only is it delicious, it is sort of a complete meal. At least the version that I make where I incorporate some vegetables into a mainly chicken and seafood dish. The other day when the craving for Paella hit me, I was in the midst of a project deadline and in no way able to spend the time to prepare it. Necessity is the mother of invention, right? I did come up with a dish which has chicken and sausages and resembled Paella enough to make my tummy happy. Win-win all the way! ch-sau-rice3 It is actually very simple... cook sausages and chicken separately. Chop some vegetables. Throw everything together along with some rice, and cook till done. Though I used hot Italian sausages, I think chorizo will be even better. chi-sau Any vegetables that will not go mushy will work. As this was not a planned-in-advance dish, I used the red peppers I had in the refrigerator. And of course, onions and garlic. Celery adds some additional flavour to the dish, but can easily be omitted. veg-mix The rice I used was regular long grained rice, but again, do you think Arborio rice would be better? Maybe next time I’ll try this dish with Arborio rice. And chorizos. ch-sau-rice1 Yeah, many ways to manage this dish with whatever ingredients you have handy! ch-sau-rice2

~Ria

Chicken Sausage Rice... inspired by Paella!
 
Author: 
Recipe type: Dinner
Ingredients
  • 2 lb skinless, boneless chicken, thighs and breasts mixed
  • 1 lb sausages
  • 1 large onion
  • 2 ribs celery
  • 4 cloves garlic
  • 1 tsp chilli powder
  • 2 tsp paprika
  • 1 tbsp coriander powder
  • ½ tsp cumin powder
  • 2 cups rice, Arborio or long grain
  • 1 large red pepper, or a mix of vegetables
  • 1 can (12 oz) crushed tomatoes
  • 1 can chicken stock (can be made from cubes or substituted with water)
  • Cooking oil, as required
  • Salt and black pepper to taste
Directions
  1. Cut the chicken into pieces and mix with chilli powder, paprika, coriander powder, cumin powder and salt. Leave aside in the refrigerator to marinate while you prepare the rest of the ingredients.
  2. Cut the sausages into bite size pieces.
  3. Wash and drain the rice and leave aside.
  4. Chop the onions and celery roughly. Slice the garlic thinly.
  5. Cut the vegetables into bite size pieces.
  6. In a large pan, heat 2 tbsp oil and fry the sausages. Drain on paper towels.
  7. In the same pan, add another 2 tbsp of oil and brown the marinated chicken pieces on all sides. Keep aside.
  8. Add 2 more tbsp oil to the pan and add the onions, celery and garlic. Fry till they turn transparent.
  9. Add the drained rice and fry for two minutes. Add the crushed tomatoes and chicken stock. Stir together. Add the sausages and chicken pieces to the mixture. Season with salt and black pepper.
  10. Bring to a boil and cover and cook for 15 minutes, checking after 10 minutes to see there is enough liquid in the dish. If not, add enough water to cook.
  11. When the rice is done, switch off the heat and let sit for another 10 minutes.
  12. Serve with a salad dressed with any creamy dressing. Quick and easy and delicious!

Eggless Butter Cookies

P1 I can never say no to a cookie. They are always good to savour with a cup of tea or coffee or to serve with ice cream or other light desserts. I love to have savoury cookies with soup. Americans call them cookies and British traditionally used the term biscuits, although now the word cookie has become common all over the world. Cookies are not only ideal for everyday eating or a special treat (especially in lunch boxes) they can also be gift wrapped and given away as special gift. Though there is almost no end to the range of cookies that can be made at home, this time I made some eggless cashew butter cookies to gift a pure vegetarian family. P2 EC Without any fancy ingredients and as the process involved is an “all in one" method, these cookies are very easy to make. These butter cookies will fill your kitchen with a wonderful aroma when they are ready to come out of the oven especially with the cinnamon powder in the dough. P3EC Cookie dough should be handled as little as possible otherwise the cookies will be very hard (no one likes butter rocks!) Adding bits of cashew nuts give a nice bite to the otherwise soft cookies. Baking them for 18 – 22 minutes, depending on your oven, will yield cookies that are still slightly soft to touch when being removed from the oven. If you want crispy, crumbly cookies bake it for an extra 3 minutes. Once it’s removed from the oven leave it on the cookie sheet for another 5 minutes before transferring to a cooling rack. The mentioned quantity of ingredients will yield about 10 – 12 cookies. P4 EC

~Min

Eggless Butter Cookies
 
Author: 
Ingredients
  • Butter ½ cup at room temperature
  • Powdered sugar ½ cup
  • Corn flour 1 tablespoon
  • All purpose flour 1 cup
  • Baking powder ¼ teaspoon
  • Salt ⅛ teaspoon
  • Cinnamon powder 1 teaspoon
  • Nutmeg powder ½ teaspoon
  • Cashew nuts (broken into tiny pieces) ½ cup
Directions
  1. Preheat the oven at 150°C or 300°F.
  2. Combine powdered sugar, corn starch and butter and mix thoroughly with a wooden spoon or a silicone spatula till it becomes light and creamy.
  3. Sift the flour with baking powder and salt.
  4. Add the cinnamon and nutmeg powder into the flour mixture and mix well.
  5. Add the flour mixture into the beaten mixture of sugar and butter and knead well till it forms a dough. If the dough is too crumbly add one or two tablespoons more of butter and knead. Care should be taken not to over knead. Excess kneading will make the cookies hard.
  6. Cover with cling film and leave it to rest for 20 minutes.
  7. Knead it lightly once more and make into smooth lime-sized balls and place them on a buttered or parchment lined cookie sheets. Leave some space in between the balls of dough as they get bigger on baking.
  8. Place the cookie sheets in the preheated oven for 18 – 22 minutes depending your oven. After 15 minutes keep a close watch on them and remove them from the when they are still slightly soft in the middle.
  9. Leave it on the sheet for another 5 minutes before transferring to a cooling rack.

Verineki


When I used to work in downtown NYC, one of our lunch places used to be this Russian place on Fulton Street. Walking distance from work, it offered very good food. Recently, when I read a review of the book ‘Mastering the Art of Soviet Cooking’ in New York Times, I really wanted to try out some of those dishes. Fortunately, it was just a matter of sending out a request through email, for offers of authentic Russian cookbooks to be forthcoming. And today I made Varenikis, following a recipe in a book lent to me by my friend Olga. Thank you so much, Olga!
 
vareniki

Vareniki is a kind of dumplings, made of fresh dough. The dough is a simple one with flour and eggs. And then you fill it with stuff and boil it in salted water. In fact, the literal meaning of the word vareniki is just ‘boiled thing’!

vareniki-mix

Traditionally it has fillings like meat, cooked potatoes, sauerkraut, cheese, fruit etc. Here I have used a mixture of cheese and dried fruit filling.

vareniki-filling

The best part of it is, you can make whatever you want of it, with a variety of fillings. Now that I have successfully tried it, the next step would be to try out some new combinations of fillings!

vareniki-recipe

One fact common to all dumplings is that it is so easy to determine when they are done; they float up to the surface when done!

vareniki-floating

The recipe recommends serving the varenikis with sour cream, but I think it could go with many an interesting sauce or aioli. Next time…

~Ria

Verineki
 
Author: 
Ingredients
  • 2 cups flour
  • 2 eggs
  • 2 tbsp cold water
  • ½ tsp salt
  • ½ lb cottage cheese
  • ¾ cup sugar
  • 1 egg
  • 1tbsp butter
  • ½ tsp vanilla extract
  • ¼ cup raisins
  • ¼ cup glazed cherries
Directions
  1. To make the dough, mix the salt into the flour.
  2. Beat the eggs and cold water together, and add to the flour.
  3. Mix together and kneed into a smooth dough. Keep covered with cling wrap.
  4. For the stuffing, chop the raisin and cherries. Beat the egg.
  5. Mix cottage cheese, sugar, beaten egg, vanilla extract and chopped fruit together.
  6. Form small balls of the dough.
  7. Make a depression in the center of each of the dough balls with your thumb and fill with stuffing. Carefully, form into an oval shape.
  8. Bring water to boil in a pan, adding a teaspoon of salt to the water.
  9. When the water starts to boil, drop the formed varenikis carefully into the water. Let them cook for a few minutes.
  10. When done, the varenikis will float to the top. Lift them out with a slotted spoon and place on a plate.
  11. Brush them with melted butter. Serve with sour cream.

Palak Paneer – Cottage cheese and spinach

P1PP

Conducting cooking classes for my friends and colleagues was something I really enjoyed doing. We had so much fun during those classes where we cooked together and then devoured all the fruits of our labour afterwards. Though I didn’t manage to hold many sessions, I will always remember those fun filled classes with a smile. Palak paneer and chicken tikka masala were some of the most popular dishes among my friends so naturally, I received many requests to make these two in the sessions.

Palak paneer is a dish prepared mainly in Punjab, a state in northern India. It makes for an excellent accompaniment to rice or naan, Indian flat bread. The combination of palak and paneer is not only nutritious, but is also a delicious blend of taste, textures and flavours. No wonder so many wanted me to teach how to make it!

P2PP

Palak is a type of spinach with rounded green leaves that don’t have a big network of veins, making it a good candidate for blanching and puréeing. So it’s not surprising that blanching the palak is the first step in the process. Simply put all the spinach into a pan of boiling water and boil for 2 minutes without using a lid to cover the pan. This is important because if a lid is used, the volatile oils in these leaves will not be able to escape with the steam and this will result in bitter leaves.  After the 2 minutes, transfer the palak into a bowl of cold water with some ice cubes to refresh it.

Refreshing the Palak

Paneer is cottage cheese and can be made at home quite easily. I was bitten by a lazybug a few days before I last made palak paneer so I didn’t bother to make my own and used the store-bought paneer instead. It really is quite simple to do though and I will post a nice and easy guide on how to make your own paneer soon!

P4PP

Normally paneer pieces are just fried or added plain into the prepared curry at the end. I always marinate these cubes of paneer with a little lime juice, salt and half a teaspoon of cumin powder for half an hour to make it more interesting and add more flavour to the dish. I then sauté these cubes in a little oil to make them firm so that they won’t crumble when added to the palak.

P5PP

As palak is not very common in certain parts of the world, I wanted to try making this dish with chard or collard greens. But it just never happened. See, still being lazy…I shall post the result when (or if!) I eventually try it out.

~Min

Palak Paneer - Cottage cheese and spinach.
 
Author: 
Cuisine: Indian
Ingredients
  • Palak (spinach) 300g
  • Paneer 200g
  • Roasted cumin powder ½ teaspoon
  • Lime juice ½ lime
  • Onion (finely chopped) 1 big
  • Cumin seeds 1 ½ teaspoon
  • Ginger (crushed) ½ inch piece
  • Garlic (crushed) 4 cloves
  • Green chillies (finely chopped)1 – optional
  • Tomato ( puréed) 2 medium
  • Coriander powder 1 tablespoon
  • Cumin powder 1 teaspoon
  • Chilli powder ½ teaspoon
  • Salt to taste
  • Cream 4 tablespoons
  • Or Full cream milk ½ cup
  • Sunflower oil (any refined oil) 3 tablespoons
Directions
  1. Cut the paneer into 1 cm cubes, marinate with the juice of half a lime, ½ tsp cumin powder and salt for 10 minutes.
  2. Blanch the spinach, refresh in ice water and grind into a fine paste. Set aside.
  3. Shallow fry the paneer cubes until light brown in a tbsp of oil and drain on a kitchen paper.
  4. Heat the rest of the oil and fry cumin seeds until it changes colour to a darker tone.
  5. Add chopped onions and sauté till transluscent.
  6. Add crushed garlic and ginger, followed by green chilli and fry till the onion becomes slightly brown. Add corriander, chilli and cumin powder and fry for a minute.
  7. Then add the tomato puree and fry for 4-5 mnts stirring often. Add salt to taste.
  8. Once the tomato mixture is fried add the spinach puree and paneer cubes. Let it simmer for 5 minutes.
  9. Add cream or milk and simmer till a glaze appears on top of the liquid.
  10. Add a squeeze of lime (optional) and serve with a swirl of cream.

Meat-Vegetable Loaf

Today was a lovely day… first time the temperature crossed 70 this season. And I was in the mood for something on the lighter side for dinner. Like a piece of salmon with some lemon-habanero aioli… With that picture in mind, I set out for the grocery store. I was in the meat and fish section when I saw the shop assistant bringing out fresh ground turkey. Ground up is the best way I like to go with turkey, and it was so fresh. And all my plans underwent a sudden change; when I reached home from the grocery store, I had all the fixings for a meatloaf!meatloaf6

This is not truly a meatloaf… more like a meat vegetable loaf. I add a ton of veggies to the mix. Onion, celery, red and green peppers, green peas, brussels sprouts, green beans, broccoli… these can all go into it, in any combination. In fact, any vegetable that is not too watery like will work. You can use equal quantities of meat and vegetables.

meatloaf1

My combination of spices for this meatloaf are rosemary, thyme, dijon mustard, and red chilli powder. If it is summer and my herb garden is growing, I prefer to use the fresh herbs. If not, dried ones will do as well.

meatloaf2

So you chop up all the vegetables. And add them to the ground meat. Along with eggs, breadcrumbs and a bit of sour cream. And of course, salt and pepper for seasoning. The beauty of the whole scheme is that there is no hard and fast rule about what can and cannot go into this meatloaf. By the way, has anyone tried a veggie loaf? Could be an interesting thing to try out. 🙂

meatloaf3

By the time I had prepared the mix, there was more than could be accommodated in the loaf pan. Easy to pop the remaining mix into ramekins and bake into individual helpings. And these freeze beautifully.

meatloaf4

If one doesn’t want to use red meat, a combination of  turkey, chicken and pork will work well. This particular meatloaf I made with just ground turkey.

meatloaf5

Served on a bed of creamy mashed potatoes, with or without gravy, this meatloaf is absolute yum!

~Ria

Meat-Vegetable Loaf
 
Author: 
Ingredients
  • 2 lb ground meat (mix of turkey, chicken and pork)
  • 1 onion
  • 2 ribs celery
  • 1 red pepper
  • 1 green pepper
  • 1 handful of frozen green peas
  • 1 tsp rosemary (fresh or dried)
  • 1 tsp thyme (fresh or dried)
  • 2 tsp dijon mustard
  • 1 tsp red chilli powder
  • 4 large cloves of garlic
  • 2 eggs
  • 1 cup fine breadcrumbs
  • ½ cup sour cream
  • Salt and pepper to taste
  • Tomato ketchup for garnishing
Directions
  1. Preheat the oven to 350 degree F.
  2. Chop all the vegetables fine.
  3. Mince the garlic and herbs.
  4. Thaw the frozen green peas.
  5. In a large pan, mix together all the ingredients, seasoning well with salt and pepper. Be careful not to overmix.
  6. Place the mix into a loaf pan and form the top into a loaf shape.
  7. Garnish with tomato ketchup.
  8. Bake for 45 minutes. Check for doneness by inserting a skewer into the loaf. If it comes out clean, the loaf is done. If required, bake for another 10 minutes.
  9. Let cool for 10 minutes, before slicing. Any extra will freeze well.

No Fail Chocolate Cake

 P1f CC

I always love to make this chocolate cake because it’s so simple and it turns out right every time. I’ve been making this cake for years but I definitely made it the most when my girls were still in school, a few years ago. They had the annoying habit of remembering quite late on the night before that they had to bring something in for a bake sale the next day. So I would make my no fail chocolate cake late at night before bed or early in the morning just before leaving for school as it can be made without much planning as the ingredients used are store cupboard staples.

P2CC

Though this cake can be made with minimal effort and limited time, it doesn’t compromise on taste – it’s soft, light and just so yummy! Another plus is that since refined oil is used instead of butter, the cake will stay soft even if it’s been refrigerated.

P3CC

An orange glaze on this otherwise simple cake lifts it up a notch. Adding a tablespoon of finely grated orange zest to the cake batter can also complement the glaze quite well. The glaze is simple enough to make: just mix a quarter of a cup of icing sugar or powdered sugar into half a cup of orange juice. If the glaze seems too watery, a bit more icing sugar will do the trick. I also add a couple of teaspoons of orange liqueur to the glaze if it’s not a cake destined for a bake sale 🙂

Served with a dollop of orange cream cheese or a scoop of ice cream, this is perfection.

P4CC

Orange cream cheese can be made by mixing a quarter of a cup of cream cheese with 2 tablespoons of sugar, 1 tablespoon of freshly squeezed orange juice and 1 teaspoon of finely grated orange zest.

No Fail Chocolate Cake
 
Author: 
Cuisine: Cakes
Ingredients
  • Unsweetened cocoa ¾ cup
  • All purpose flour 2 ¼ cup
  • Sugar 1 ¾ cup
  • Yoghurt1 ½ cup
  • Vegetable oil 1 cup
  • Baking soda 2 teaspoons
  • Vanilla essence 1 ½ teaspoons
  • Eggs 3 large
Directions
  1. Preheat oven to 180°C or 350° F.
  2. Grease a 9” round tin.
  3. Sift the flour with cocoa and baking soda twice.
  4. Combine all the wet ingredients including eggs well with an electric mixer.
  5. Add flour in small batches and blend well with mixer at slow speed.
  6. Increase speed to medium and beat for 3 minutes.
  7. Bake for 30 minutes. Check whether it is done by inserting a tooth pick into the cake and ensuring it comes back clean.
  8. Once cooked, remove from the oven onto a wire rack.
  9. Cool for 10 minutes and remove cake from the tin.

~Min

Quinoa and Lima Beans Salad with Walnut Dressing

2013 was declared the ‘International Year of Quinoa’ by the United Nations General Assembly, with the objective drawing the world’s attention to the role that quinoa can play an important role in eradicating hunger, malnutrition and poverty.
 

red-black-quinoa

 
Official_Logo

So what is so special about quinoa?
 
For starters, quinoa is a complete source of protein that includes all nine essential amino acids. Imagine what a blessing it is to vegans who always have a problem about enough protein in their diets. While quinoa is low on calories and carbs, it is also gluten free and rich in fibre. Quinoa also contains minerals like magnesium, iron, tryptophan, copper, and phosphorous.
Its qualities are so much recognised that NASA includes it in the menu of its astronauts!
 
quinoa-salad1

Quinoa, pronounced ‘kinwah’ following its Spanish spelling, is the grain-like seed of a plant belonging to the spinach family. It was cultivated in the countries of Ecuador, Bolivia, Colombia and Peru, of the Andean region, 3,000 to 4,000 years ago. A staple in the area, quinoa has become increasingly popular world over in the last few years.
 
quinoa-salad2

Quinoa seeds have a bitter coating called saponin, which makes birds avoid them. In the case of most of the quinoa that is available today in the market, this coating has been removed. Still, it is better to wash it thoroughly before cooking it.
 
quinoa-salad4

You can cook quinoa the same way as rice. You can boil it in lots of water and then drain it. Or you can combine quinoa and water in a ratio of 1:2, bring it to boil, and simmer it till done and water absorbed, in around 15 minutes. For added flavour, quinoa can be toasted dry for five minutes over low heat and then cooked.
 
quinoa-salad5

Though quinoa can be used in many ways – quinoa burgers are quite tasty! – my favourite use for it is in salads. It is very versatile and you can add a lot of varied stuff to it to come up with interesting combinations. I like it best when I add a lot of my favourite things and come up with a satisfying meal in one dish!
The addition of lima beans, broccoli, carrots and avocados make this a complete, nutritious meal. The onions add flavour to the salad.
 
broccoli-onion
carrots-lima
 
And if you grind the dressing a bit coarse, it adds a bit of crunch too! And if you like the dressing on the spicier side, you can even add some red chilli flakes to it.

~Ria

Quinoa and Lima Beans Salad with Walnut Dressing
 
Author: 
Recipe type: Salad
Cuisine: International
Ingredients
  • Half cup quinoa seeds
  • 1 cup frozen baby lima beans
  • 1 head broccoli
  • 1 ripe avocado
  • 1 carrot
  • Half a small red onion
  • Half cup walnuts
  • Quarter cup olive oil
  • Two cloves of garlic
  • Salt and black pepper to taste
Directions
  1. Wash the quinoa thoroughly under running water and drain.
  2. Bring one and a quarter cup of water to a boil. Add a pinch of salt and the quinoa to the boiling water. Reduce heat, cover and cook for 15 minutes.
  3. Wash the frozen lima beans under running water to defrost it. Cook in a microwave with a pinch of salt and two tablespoons of water, for three minutes.
  4. Cut the broccoli head into florets. Cook in the microwave with a pinch of water and two tablespoons water, for two minutes.
  5. Scrape the carrot into longish strips.
  6. Slice the onion thinly.
  7. Cut the avocado into pieces.
  8. Soak the walnuts for 15 minutes. In a blender, add the walnuts and garlic and blend. With the blender running, add the olive oil in a steady stream. Transfer to a dish and season with salt and lots of freshly ground black pepper.
  9. To assemble, in a large bowl, toss together the quinoa, lima beans (drain off any excess cooking water from the lima beans and broccoli), broccoli, carrot, onion and avocado. Transfer to a serving bowl and drizzle the dressing over the salad. Serve the extra dressing along with the salad. Delicious!