Desserts

The Day of the Grill

July 4th… if you grill one day in the year, this will be that day! It has become so much a part of the tradition. The weather, the food, the whole atmosphere calls for it. And that is exactly what we did for our dinner on July 4th.

J4D-dinner

The menu was quite simple. To start with, the basic of basics, grilled chicken. A simple marinade of sour cream and tandoori spice mix. Marinated in the fridge for two hours and straight to the grill. As simple as that.

J4D-chicken-kababs

The next item was a bit more complex. Spicy kababs! Cilantro and mint leaves, garlic and onion, and jalapenos, to add that requisite heat.

J4D-kebab-ingredients

Mince all of them finely and add to the chopped meat. However, there is a secret ingredient that gels it all together and makes the meat hold together… baking soda! But you have to be very careful not to overdo it. Just ½ tsp will do for two pounds of chopped meat. Knead the soda well into the meat along with the minced spices. Form into kabab shapes, with or without a skewer, and lay on the grill. Not too much work, but awesome results.

J4D-chicken-kababs2

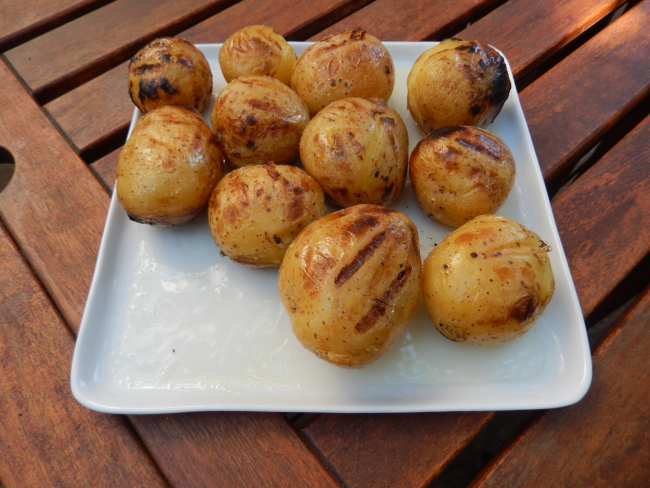
What is a summer grill without a potato salad! But this potato salad has something special about it… it is made with grilled potatoes! Boil the potatoes till they are just about done, and then lay them on the grill.

J4D-potato-on-grill

They should get a nice char and good grill marks.

J4D-potato-grilled

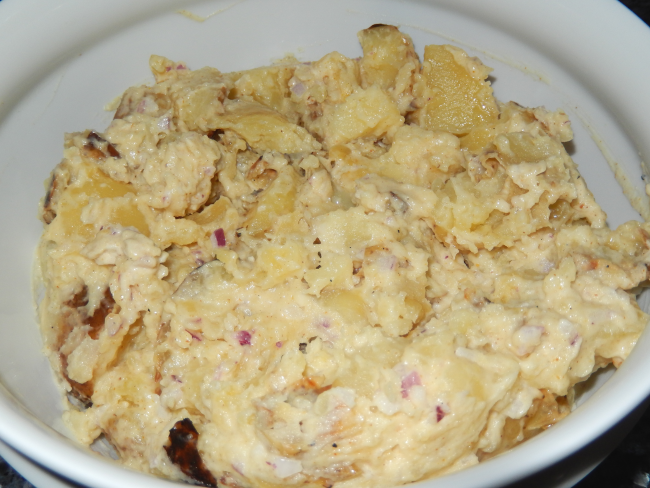
Mince some red onion. In a bowl, mix together mayonnaise, minced onions, and a spoon of madras curry powder, available in any Indian grocery.

J4D-potato-salad1

Cut the grilled potatoes into bite size pieces and add to the mayo mix. Mix thoroughly and delicious potato salad is ready!

J4D-potato-salad2

Something green… no dinner is complete without something green. Tender cucumbers cut into small pieces and dressed with sesame oil and mirin (available in Asian groceries) was the perfect accompaniment to the spicy meats.

J4D-cucumber-salad

Grilled sweet corn and rolls rounded up the food part. A fresh crisp white wine with a hint of fruit made it all come together excellently.

J4D-fruits

And dessert… we decided against a heavy baked item instead opting for a light fruit salad with ice cream. Especially as this was a dinner being enjoyed outside. Boy, did it look pretty!

J4D-fruit-salad-mix

Mangoes and strawberries cut into pieces, with a splash of lemon juice… and a sprinkling of brown sugar. Do not stir; just keep it in the refrigerator till time to serve. To serve, mix together gently and top with vanilla ice cream in individual dishes.

If you would like detailed instructions for making the items in this meal, including a shopping list for ingredients, do write to ria (at) pepperroute (dot) com.

Hope you enjoy it as much as we did!


~Ria

Roasted Peach Cobbler

I could smell the peaches even before I entered the market stall. This was a local farmers’ market that was held one every week, during the warm weather months. What is great about it is that most of the stuff there has been picked the same morning. And it is so close to home that I make it habit to go there every week.

RPC-peaches1

And the peaches were superb. Ripened on the tree, picked the same morning, bursting with fragrance and flavour. So I got a bunch of them. Would be perfect for a cobbler.

RPC-peaches2

And peaches in a cobbler are at their best when they are roasted. Roasting brings out their sweetness makes them kind of soft. All you need to do is, toss the wedges of peaches with a bit of brown sugar and place them on a baking tray, under the broiler for 15 minutes. They become glazed and so glossy.

RPC-peaches-roasted

Isn’t the best part of a cobbler the crumbly top? And I decided to add a bit of interest to the crumb by adding some almond meal to the mix. It turned out a good idea indeed.

RPC-crumble-ingredients

Roasted peaches in a baking dish with a splash of vanilla and lemon juice…

RPC-vanilla-lemom

Top it with a generous amount of crumb mix and pop it in the oven.

RPC-crumble

And the most awesome peach cobbler will come out in about 20 minutes. Not really. Actually, you have to open the oven and take it out yourself. 🙂

RPC-done

Enjoy with a scoop of vanilla ice cream.

~Ria

Roasted Peach Cobbler
 
Author: 
Recipe type: Dessert
Ingredients
  • 8 peaches
  • ¼ cup light brown sugar
  • ½ cup all purpose flour
  • ½ cup almond meal
  • ½ cup granulated sugar
  • 4 tbsp cold butter
  • ½ tsp vanilla essence
  • 1 tbsp lemon juice
Directions
  1. Pre-heat the oven to 500 degrees.
  2. Cut the peaches into ½ inch wedges.
  3. In a bowl, toss the fruit with the brown sugar.
  4. Place in a single layer on a baking tray and place on the top rack of the oven.
  5. Let it roast for 15 minutes.
  6. Remove from the oven and let cool.
  7. Reduce the oven temperature to 375 degrees.
  8. In a bowl, mix together the flour, almond meal and granulated sugar.
  9. Cut the cold butter into pieces and drop into the flour mix.
  10. With your fingers, blend the butter into the mix till the whole thing resembles large crumbs.
  11. Mix the roasted fruit with vanilla essence and lemon juice.
  12. Evenly place in a pie pan or square baking dish.
  13. Sprinkle the prepared crumb on top of the fruit.
  14. Place in the middle rack of the pre-heated oven.
  15. Bake for 20 minutes. Check whether the top is showing golden brown spots. If not, continue baking for another 5 minutes.
  16. Serve with vanilla ice cream. A streak of peach nectar will be good too, strictly optional.


Spritz Butter Cookies

Desastre, Katastrofe, Sakuna, Inhlekelele… In how many languages can I say the word ‘disaster’? However many, it won’t be enough to express my sense of frustration… I had this vision of beautiful smooth soft thin buttery morsels decorated with multicoloured crystals of sugar lying on a black plate next to a cup of coffee… And what it all turned out… it’s not that long a story, and let me start at the beginning.

SK-cookie2

Though I had got a spritz cookie maker as a present, a while back, it is only last week that I decided to try it out. So on a warm Sunday afternoon, I gathered together the ingredients for a classic butter cookie recipe.

SK-ingredients2

Two batches… one orange flavoured and one chocolate. That was my plan. And I would use two different disks for each batch.

SK-ingredients3

I could already see them sitting on a plate, the light coloured with the dark, studded with multi-coloured sugar crystals.

SK-ingredients

For the first batch – orange flavoured – I selected a simple five petaled flower pattern. Mixed the dough to a nice pliable consistency, filled the cookie maker. Set the oven to pre-heat. Took out the cookie sheet and placed a fitting piece of parchment on it. And started pressing the cookies. Alas… the cookies totally refused to co-operate!

Instead of staying on the cookie sheet and forming a nice shape, the pressed cookie rose with the cookie maker! Every time I pressed it down, the dough came out dutifully, but the cookie refused to stay down… to the point that I had a lump of cookie dough at the end of the cookie maker and a few bits on the cookie sheet! I was aghast! I, who has mastered pinwheels and Florentines and macaroons… failing miserably with some basic pressed cookies!
Setting lamentations aside, I turned my attention to salvaging the situation. After pressing each cookie, I carefully cut it off with a sharp knife. Okay, now I can see the flower shape and there are cookies on the cookie sheet.

SK-cookies-on-pan

The first batch came out of the oven… and to my great relief, they tasted good.

SK-cookie-rack

And in a rustic way, the cookies looked good too. A pinch of sugar crystals while they are still hot on the rack, made them actually look pretty smart.

SK-cookie1

Somehow, with the workaround, I was able to finish making the cookies, though it took a bit of time. Of course, I had to abandon the idea of the second batch of chocolate flavoured ones. No sense in lengthening the misery, right?

SK-cookies-on-plate

After all the cookies were done and photographed and distributed to friends (along with the story, of course!), I still was wondering what went wrong. And I went back to the directions that came with the cookie maker. The instructions were to use an ungreased cookie sheet. And it struck me right away… no wonder the cookies were not staying down on the sheet! They were supposed to stick to the sheet and here I was pressing the cookies on parchment that nothing sticks to! That was one moment when I felt the need for some facility to kick oneself… 🙂


~Ria

Spritz Butter Cookies
 
Author: 
Recipe type: Cookies
Ingredients
  • 3 cups all-purpose flour
  • 1 teaspoon baking powder
  • A pinch of salt
  • 1½ cups butter, softened
  • 1 cup granulated sugar
  • 1 egg
  • 2 tablespoons cream or milk
  • 1 tsp vanilla extract
  • 1 tsp orange essence
  • 1 tbsp orange zest
Directions
  1. Preheat oven to 350º fahrenheit.
  2. Sieve together flour, baking powder and salt.
  3. In a mixing bowl, beat the butter and sugar till light and fluffy.
  4. Add the egg and beat thoroughly.
  5. Add the cream (or milk), vanilla extract and orange essence.
  6. Add the orange zest and combine well.
  7. Add the flour to the mix, in batches, and mix well, gently. The dough should be pliable but not too loose. Do not chill the dough.
  8. Insert the pattern disk you want to use in the cookie maker and tighten the bottom.
  9. Fill the cookie maker with the dough and attach the top.
  10. Place the bottom of the cookie maker on an UNGREASED cookie sheet, and press down to shape the cookie.
  11. Lift up and repeat the process. The cookies can be placed at a distance of one and a half inches.
  12. Bake till the edges of the cookies turn light brown. This will take 10 to 12 minutes.
  13. Place the cookies on a cooling rack and sprinkle the center of each cookie with coloured sugar crystals.
  14. Store in airtight containers when completely cool.

An All-time Favourite Bread Pudding

White chocolate, berries, bananas… What is not to like? Each of them lovely on their own. So what if you put them all together? That is what is happening with this wonderful bread pudding, that I had mentioned a while ago. This was to take to a party that I went to, with some of my friends. The party was indeed great, and I wish I could say the bread pudding was the highlight of the party, but alas… that was the crawfish imported from New Orleans. Of course, the pudding was appreciated very much, and I do think the praise was genuine! 🙂
 
bp-final1
 
Actually, this is one dish that I have made for many an occasion and some among my friends are all time fans of it.
 
bp-final2
 
The berries that you use for this pudding can be any dried berries, like cranberries or blue berries. Or even dried cherries. In the cooking process, they absorb the liquids and swell up to become twice their original size. And the bananas are cooked with butter and brown sugar before being added to the mix so that their flavour really spreads through the whole pudding.
 
bp-ingredients
 
A variation that you can try with the bananas is to add some dark rum to the butter-brown sugar-bananas mix and flambé it, before adding the whole thing into the pudding mix. It adds that extra oomph to the dish. Though the alcohol will be totally evaporated through the flambéing, it is better not to use the rum if children are going to partake of the pudding.
 
bp-ready-to-bake
 
A key factor to the success of this pudding is allowing the bread pieces to thoroughly soak in the liquids. Leaving the mix aside for a minimum of 30 minutes, an hour if possible, will make the texture silky and smooth.
 
bp-done-big
 
As this was planned for a party, I prepared this pudding in a disposable aluminium foil baking pan. These pans with lids are a blessing when you need to carry stuff around.
 
bp-from-oven
 
Of course, I had also made two little ones in ramekins for taste testing. It is not advisable to take anything to anyone before testing it yourself. Believe me, I’m saying this based on some pretty painful experience… from days long gone by. 😉
 
bp-final3
 
And the best part of making this pudding? Boy, your home will be filled with the sweet fragrance of freshly baked bananas and chocolates for a long time! This is one time I would not light candles to eliminate food smells… it is that great!


~Ria


An All-time Favourite Bread Pudding
 
Author: 
Recipe type: Dessert
Ingredients
  • 6 cups bread cubes
  • 6 oz white chocolate chips
  • 3 bananas
  • 1 cup dried berries (cranberries, blue berries or cherries)
  • 6 tbsp butter
  • 4 eggs
  • 1 ¼ cup light brown sugar
  • 3 cups heavy cream
  • 1 cup milk
  • 1 tsp vanilla extract
  • ½ tsp ground cinnamon
Directions
  1. Pre-heat the oven to 350 degrees.
  2. Butter a 9 x13 inch baking pan.
  3. Cut the bread slices into ½ inch cubes.
  4. Slice the bananas into thin pieces.
  5. In a large bowl, beat together the eggs and 1 cup brown sugar (leaving ¼ cup sugar aside).
  6. Add the cream and milk to the eggs and beat well.
  7. Add the vanilla and cinnamon and mix thoroughly.
  8. Slowly add the berries, chocolate chips and bread cubes and stir together.
  9. In a heated pan, add the butter, banana slices and the remaining ¼ cup brown sugar.
  10. Stir and cook till the banana slices start losing their firm shape.
  11. Stir into the pudding mix.
  12. Pour the mix into the buttered baking pan.
  13. Place in the center of the pre-heated oven and bake for 45 minutes.
  14. Insert a skewer in the center of the pudding and if it comes out clean, take the pudding out of the oven. If raw batter is sticking to the skewer, bake for another 10 minutes and check again.
  15. Check the bread pudding cool on a rack for 10 minutes before cutting into squares for serving.

Mango Mousse

P1a MM

The light, airy and creamy mousse is a dessert I like to serve at dinner parties as it can be made ahead of time, be served in individual helpings and you can also make many variants to cater to the taste of guests. Mousse with the freshness of mangoes is one I just couldn’t resist.

In Uganda, mangoes are available throughout the year so I didn’t have to depend on preserved mango puree or canned mangoes. Since the mangoes I’d bought were not very sweet, I added a quarter cup of condensed milk while the mango pulp is made. Condensed milk certainly enhanced the taste but I felt it made the mousse slightly denser.

Mousse in general is a little tricky to make. Beaten egg whites and whipped cream should not be stirred in but has to be folded in with care so that the cream and egg whites don’t get deflated.

P2 MM

Cream should be removed from the refrigerator just before whipping to avoid it turning into butter. Overbeating will also result in butter. Using an ice bath is also not a bad idea if the room temperature is too high.Adding a quarter of a teaspoon of cream of tartar to the egg whites before beating helps in stabilising the beaten egg whites.

To avoid last minute stress, it can be made sure that the mousse sets perfectly by adding a teaspoon of gelatine to the mixture prior to transferring it into individual bowls and chilling. Shot glasses are a good choice to serve mousse of various flavours.

final MM

Mango mousse can be garnished with fresh mango pieces or some piped rosettes of freshly whipped cream.

~Min

Mango Mousse
 
Author: 
Recipe type: Dessert
Ingredients
  • 4 cups Mango pulp
  • ¼ cup Condensed Milk
  • (Only if mangoes are not sweet enough)
  • 2 Egg whites
  • ⅛ tsp Salt
  • ¼ tsp Cream of Tartar
  • 2 tsp Powdered sugar
  • 1 cup Whipping cream
  • ¼ cup Castor sugar - powdered
  • (Check the sweetness of the cream before you add the sugar)
  • 1 tsp Gelatine
  • 1 tbsp Water
  • 1 tsp Mango essence (optional)
  • To garnish
  • Fresh mango bits
Directions
  1. Peel the mangoes, remove the seed and cut into pieces. Make mango puree using a food processor. If the mango is fibrous strain the pulp. Add the condensed milk if required and mix well.
  2. Add cream of tartar and salt to the egg whites and beat till soft peaks are formed .Add powdered sugar and beat till stiff peaks are formed.
  3. In a separate bowl add whipping cream, sugar and mango essence (optional). Beat until stiff peaks are formed. This might take 4-5 minutes.
  4. Soak gelatine in 1 tablespoon water in a small heat resistant bowl. Hold it over hot water till it melts.
  5. Transfer the mango pulp into a large bowl. Add the melted gelatin and stir well. Now add the whipped cream in two or three batches and fold in gently.
  6. Now add ⅓ of the beaten egg whites into the mango cream mixture and mix through. Add the remaining egg whites and gently fold in. Avoid over mixing.
  7. Pour into individual serving bowls and garnish as you prefer.

Vanilla sponge cake with chocolate frosting

Although I make frosted cakes occasionally, birthday cakes are not really my forte. So when I had to get a birthday cake for my friend’s son, I decided to improve my skills and make one myself. It had been a long while since I last made a birthday cake, the last one I remember baking was a three layer cake for my daughter’s birthday a few years ago.

P1 VSC

The birthday boy’s craze was strawberry this season. So I decided to make a two layer vanilla sponge with white butter icing and lots and lots of fresh strawberries. Since the tastes and preferences of 8 year olds are prone to changes, I wasn’t surprised that he changed his mind and opted for a chocolate cake instead. But I had already baked the vanilla sponge when I came to know about his new preference. So the initial plan of white butter icing was changed to chocolate frosting. I made this cake when I was in Kerala and the summer was at its peak with almost unbearable levels of heat and humidity. I could only do the frosting at night and still had to make many trips to the refrigerator to keep chilling the icing and cake before I could finish frosting the cake.

P2 VSC

For the vanilla cake I used a mixture of 2 ¼ cups of all purpose flour and 6 tablespoons of corn flour. This makes the cake very soft. Since the frosting adds to the sweetness of the cake, the quantity of sugar mentioned in the recipe can be reduced by ¼-½ cup. The quantity of ingredients mentioned is enough to make two 9 inch cakes. I used the creaming method for this cake. Butter and sugar are beaten together till it becomes creamy and light. Then the eggs are added one at a time and beaten well. While making cakes the flavouring agent (vanilla essence, in this case) should always follow the eggs to get rid of any odour of the eggs.  Then the sifted flour and baking powder mixture is added in small batches alternating with milk and beaten well.

P3 VSC

P4 VSC

For the chocolate frosting I used milk chocolate as the cake was for an eight year old but dark or semi-sweet chocolate could also be used instead.  I had to make sure the frosting gets a smooth spreadable consistency. The consistency of the frosting is very important which can be adjusted by the addition of more milk. If the frosting is too thick, spreading it will be difficult and will also tear the cake and if it’s too thin it will run. If the cake is too soft to handle leave it in the freezer for 30 minutes before frosting. To avoid any mess around the cake while assembling on the serving plate insert narrow strips of aluminium foil under the cake on all four sides. Once the frosting is done these foil strips can be carefully pulled off.

P5 VSC

I certainly needed a shot of caffeine after the hard work.

P6 VSC

~Min

Vanilla sponge cake with chocolate frosting
 
Author: 
Recipe type: Cake
Ingredients
  • For the cake
  • All purpose flour 2 ¼ cup
  • Corn flour 6 tbsp
  • Baking powder 1 tbsp
  • Strawberry fruit flakes ¼ cup (optional)
  • Sugar (powdered) 1 ¾ - 2 cups
  • Unsalted butter 1 cup @ room temperature
  • Eggs 4
  • Pure Vanilla Essence2 tsp
  • Milk 1 cup
  • For the frosting
  • Chocolate 1 cup (broken into pieces)
  • Butter 1 cup (at room temperature)
  • Icing sugar 4 cups
  • Milk 2-4 tbsp (use as needed)
Directions
  1. Cake
  2. Preheat the oven at 180 degree Celsius / 350 Fahrenheit for 10 minutes.
  3. Prepare the pans by buttering and flouring two 9 inch cake pans. Lining the bottom of the pans with butter paper/ parchment really helps in releasing the cakes from the pans once done.
  4. Sift the flours and baking powder together.
  5. Cream butter and sugar using an electric beater or wire whisk.
  6. Add eggs one at a time and beat well. Once the eggs are incorporated add vanilla essence.
  7. Now add the flour and milk in small batches and mix well.
  8. Divide the batter equally between the two prepared tins and bake in the oven for 25 – 30 minutes or till a cocktail stick inserted comes out clean.
  9. Leave the cakes in the pan for 10 minutes to cool. Remove from the pan and cool it on a wire rack.
  10. Frosting
  11. Melt the chocolate pieces by keeping it in a bowl over simmering water and stir well.
  12. Once it’s almost melt remove from the heat and let it cool completely.
  13. Beat butter and icing sugar together till creamy.
  14. Add the melted chocolate and mix well.
  15. Add milk little by little till it reaches the required spreadable consistency.
  16. Assembling
  17. Place one cake on the serving plate and spread some frosting uniformly on the cake.
  18. Place the second cake on top of the frosting (with the bottom side facing up) .
  19. Now cover the cake with the remaining frosting.
  20. Pipe a border around the top edge of the cake and decorate with slices of strawberries and silver balls or whatever you fancy.

Eggless Butter Cookies

P1 I can never say no to a cookie. They are always good to savour with a cup of tea or coffee or to serve with ice cream or other light desserts. I love to have savoury cookies with soup. Americans call them cookies and British traditionally used the term biscuits, although now the word cookie has become common all over the world. Cookies are not only ideal for everyday eating or a special treat (especially in lunch boxes) they can also be gift wrapped and given away as special gift. Though there is almost no end to the range of cookies that can be made at home, this time I made some eggless cashew butter cookies to gift a pure vegetarian family. P2 EC Without any fancy ingredients and as the process involved is an “all in one" method, these cookies are very easy to make. These butter cookies will fill your kitchen with a wonderful aroma when they are ready to come out of the oven especially with the cinnamon powder in the dough. P3EC Cookie dough should be handled as little as possible otherwise the cookies will be very hard (no one likes butter rocks!) Adding bits of cashew nuts give a nice bite to the otherwise soft cookies. Baking them for 18 – 22 minutes, depending on your oven, will yield cookies that are still slightly soft to touch when being removed from the oven. If you want crispy, crumbly cookies bake it for an extra 3 minutes. Once it’s removed from the oven leave it on the cookie sheet for another 5 minutes before transferring to a cooling rack. The mentioned quantity of ingredients will yield about 10 – 12 cookies. P4 EC

~Min

Eggless Butter Cookies
 
Author: 
Ingredients
  • Butter ½ cup at room temperature
  • Powdered sugar ½ cup
  • Corn flour 1 tablespoon
  • All purpose flour 1 cup
  • Baking powder ¼ teaspoon
  • Salt ⅛ teaspoon
  • Cinnamon powder 1 teaspoon
  • Nutmeg powder ½ teaspoon
  • Cashew nuts (broken into tiny pieces) ½ cup
Directions
  1. Preheat the oven at 150°C or 300°F.
  2. Combine powdered sugar, corn starch and butter and mix thoroughly with a wooden spoon or a silicone spatula till it becomes light and creamy.
  3. Sift the flour with baking powder and salt.
  4. Add the cinnamon and nutmeg powder into the flour mixture and mix well.
  5. Add the flour mixture into the beaten mixture of sugar and butter and knead well till it forms a dough. If the dough is too crumbly add one or two tablespoons more of butter and knead. Care should be taken not to over knead. Excess kneading will make the cookies hard.
  6. Cover with cling film and leave it to rest for 20 minutes.
  7. Knead it lightly once more and make into smooth lime-sized balls and place them on a buttered or parchment lined cookie sheets. Leave some space in between the balls of dough as they get bigger on baking.
  8. Place the cookie sheets in the preheated oven for 18 – 22 minutes depending your oven. After 15 minutes keep a close watch on them and remove them from the when they are still slightly soft in the middle.
  9. Leave it on the sheet for another 5 minutes before transferring to a cooling rack.

No Fail Chocolate Cake

 P1f CC

I always love to make this chocolate cake because it’s so simple and it turns out right every time. I’ve been making this cake for years but I definitely made it the most when my girls were still in school, a few years ago. They had the annoying habit of remembering quite late on the night before that they had to bring something in for a bake sale the next day. So I would make my no fail chocolate cake late at night before bed or early in the morning just before leaving for school as it can be made without much planning as the ingredients used are store cupboard staples.

P2CC

Though this cake can be made with minimal effort and limited time, it doesn’t compromise on taste – it’s soft, light and just so yummy! Another plus is that since refined oil is used instead of butter, the cake will stay soft even if it’s been refrigerated.

P3CC

An orange glaze on this otherwise simple cake lifts it up a notch. Adding a tablespoon of finely grated orange zest to the cake batter can also complement the glaze quite well. The glaze is simple enough to make: just mix a quarter of a cup of icing sugar or powdered sugar into half a cup of orange juice. If the glaze seems too watery, a bit more icing sugar will do the trick. I also add a couple of teaspoons of orange liqueur to the glaze if it’s not a cake destined for a bake sale 🙂

Served with a dollop of orange cream cheese or a scoop of ice cream, this is perfection.

P4CC

Orange cream cheese can be made by mixing a quarter of a cup of cream cheese with 2 tablespoons of sugar, 1 tablespoon of freshly squeezed orange juice and 1 teaspoon of finely grated orange zest.

No Fail Chocolate Cake
 
Author: 
Cuisine: Cakes
Ingredients
  • Unsweetened cocoa ¾ cup
  • All purpose flour 2 ¼ cup
  • Sugar 1 ¾ cup
  • Yoghurt1 ½ cup
  • Vegetable oil 1 cup
  • Baking soda 2 teaspoons
  • Vanilla essence 1 ½ teaspoons
  • Eggs 3 large
Directions
  1. Preheat oven to 180°C or 350° F.
  2. Grease a 9” round tin.
  3. Sift the flour with cocoa and baking soda twice.
  4. Combine all the wet ingredients including eggs well with an electric mixer.
  5. Add flour in small batches and blend well with mixer at slow speed.
  6. Increase speed to medium and beat for 3 minutes.
  7. Bake for 30 minutes. Check whether it is done by inserting a tooth pick into the cake and ensuring it comes back clean.
  8. Once cooked, remove from the oven onto a wire rack.
  9. Cool for 10 minutes and remove cake from the tin.

~Min

Sticky Toffee Pudding

Sticky Toffee pudding is an indulgent and comforting pudding on a cold winter day. The warm, sweet decadent crumbs drenched in toffee sauce, topped with some cold ice cream, is a treat indeed.

p1 STF

The excitement turning into disappointment on Natasha’s face is the regular visual I get whenever I plan to make sticky toffee pudding. Natasha, a good friend of ours, is a wonderful person who appreciates good food, especially the latter part of the meal viz. desserts, with oohs and aahs. A few years back some of us got together for dinner at a restaurant called “Blue Mango”. It was Natasha’s birthday. As usual she scanned the dessert section as soon as she got hold of the menu and her face lit up the moment she spotted sticky toffee pudding. Many laughs were shared over the meal and soon it was time to place the order for desserts.Orders were promptly placed and were executed in a random manner. Most of us digged in as soon as we got our desserts only to realise moments later that Natasha was yet to get hers. The guy  waiting on us, realised that he had forgotten to mention that they ran out of sticky toffee pudding and she therefore had to choose something else. The disappointment on her face was so intense that I had to ask her over the next weekend and I made sticky toffee pudding for her, despite my busy schedule.

This time the plan to make this pudding somehow got postponed a few times.And finally when I started putting the ingredients together I realised that the girl at the supermarket till had forgotten to pack the Oman dates I bought. Hence I had to return to the supermarket and for my misfortune on my way back home a young boy on a motorbike grazed the right side my car. He was perhaps trying to squeeze through the limited space available on the right since a bus had blocked off any options on the left.  To cut the story short,the minor accident held me up for the rest of the day and was in no mood to go ahead with the pudding that day thereafter. I finally managed to make the pudding yesterday. Yipee…

 P2 STP ingredients

Sticky toffee pudding is an English steamed dessert consisting of a very moist cake with lots of dates drenched in toffee sauce. This is actually a cross between a cake and a pudding and is normally served warm with custard, whipped cream or vanilla ice cream, besides the toffee sauce.

According to Wikipedia it’s Francis Coulson, who with his partner set up the first country house hotel, created and served this pudding at his Sharrow Bay Country House Hotel. It looks like he got the recipe from Patricia Martin who published the recipe and served it at her hotel. Her son later told Simon Hopkinson, the food critic thst she got it from two Canadian soldiers who stayed at her hotel during second world war. The Canadian origin makes sense as the batter for the pudding is more similar to the American muffin rather than to an English sponge. Anyway it’s considered a modern British classic alongside the bread and butter pudding and Jam RolyPoly.

P3 STF

I used dates from Oman, which is one of the world’s top producers of dates. As an age old tradition Omanis plant a shoot of the date palm to celebrate the birth of a son.

P4 STP

I used 2 tablespoon of blackstrap molasses. Regular molasses or treacle can be used as well. If you find the flavour of molasses too strong replace it with honey or golden syrup. I used demerara sugar for the pudding and light brown sugar for the toffee sauce. If you prefer lighter coloured sauce use white refined sugar instead of brown sugar. Calorie conscious people can sustitute double cream with single cream.

P4+1 STP ingredients

To make the pudding lighter, separate the eggs and only beat in the yolks at the beginning. The egg whites can be whipped stiff separately and folded in as the last step.

P5 STP

Ramekins can be used to make individual puddings. I used an 8 inch square pan as soaking of the pudding with toffee will be easier. This pudding can be made in advance, and left at room temperature. Rewarm before serving. Can be kept in the refrigerator for a couple of weeks and warmed again just before serving.

P6a

My personal preference for a topping is the humble vanilla ice cream 🙂

~Min

Sticky Toffee Pudding
Recipe type: Dessert
Ingredients
  • For the pudding
  • 225 gms Dates with stone
  • 175 ml water
  • 1 teaspoon Baking soda
  • 175 gms All purppose flour
  • 11/2 teaspoon Baking powder
  • ¼ teaspoon Salt
  • 85 gms Butter
  • 140 gms Demerara sugar
  • 2 Eggs
  • 1 teaspoon Vanilla extract
  • 2 tablespoon Molasses
  • For the Toffee Sauce
  • 175 gms Light brown sugar
  • 50 gms Butter
  • 1 tablespoon Molasses
  • 225 ml Double Cream
Directions
  1. Stone the dates and chop them into tiny pieces.
  2. Boil the water and add the chopped dates into the boiling water along with the baking soda and simmer for 3-4 minutes. Leave it aside to cool.
  3. Preheat the oven to 180 degree celsius. Butter and flour an eight inch square baking pan.
  4. Sieve all purpose flour with baking powder and salt.
  5. Beat the butter in a medium sized bowl till creamy.
  6. Add the demarara sugar and beat well till the mixture is smooth and creamy. Scrape the sides if needed.
  7. Now add the eggs one at a time and beat well. Vanilla extract can be added now.
  8. Once the mixture is beaten well, add the sieved flour in small quantities and beat mixture till well blended.
  9. Mix the cooked dates pulp and the molasses and beat well till it is uniformly distributed in the batter.
  10. Transfer the batter into the prepared cake tin and bake for 25-30 minutes, checking after 20 minutes. Keep a close watch after that and remove the pudding from the oven as soon as a wooden toothpick inserted comes out clean.
  11. While the pudding is in the oven, make the toffee sauce.
  12. When done, cool the pudding on a wire rack for 5 minutes.
  13. After 5 minutes poke the pudding with a skewer and pour half of the warm toffee sauce all over the pudding.
  14. Keep it aside for about 20 minutes.
  15. Cut it into pieces and serve with some more toffee sauce and custard, whipped cream or ice cream as you wish.
  16. To make the toffee sauce
  17. Heat the butter and sugar till the sugar melts. Add molassess and simmer for a minute.
  18. Add cream and simmer till it reaches the right consistency (similar to warm honey). It might take only 2-3 minutes. Leave it to cool.