Entrée

Kerala Fish Meets Mediterranean Bulgur

We all know what we mean when we refer to the Mediterranean cuisine, though it is up to debate whether there is something called a Mediterranean cuisine at all! After all, the countries where the cuisine is supposed to be practiced – Greece, Turkey, Italy, Spain etc, all countries around the Mediterranean Sea – have such diverse foods and recipes!

KF-MP-closeup1

Still, Mediterranean food has been identified by study after study, as the healthiest way of eating in the world. And there are diet plans being marketed based on the concepts of Mediterranean food.

So what are the characteristics of the food style known commonly as Mediterranean cuisine? It is based on the traditional food items of the area and consists mostly of plant based ingredients like whole grains, tomatoes, olives, lemons and uses olive oil for cooking.

KF-MP-olives

Also, most of the protein in the diet comes from lentils and fish, with meat, specially red meat, limited to small quantities. In fact, the word Mediterranean itself brings up lovely images of lemon trees and olive orchards, bright sunrises, and silvery fish swimming in blue waters.

KF-MP-bulgur

One of the cereals that feature prominently among Mediterranean food is bulgur. Made out of wheat groats (hulled kernels that include the cereal germ and bran portion which are lost during regular milling), it is high-fibre, and has a light, nutty flavour. It is different from cracked wheat, which it resembles a lot.

KF-MP-peas-carrots-olives

A bulgur with some beautiful red and green components… perfect for a summer dinner!

KF-MP-pilaf-done

And to add some protein to the meal, a fish fry from the shores another sea, far away in the south western corner of India!

KF-MP-fish-to-marinate

Fish is one of the mainstays of the food in Kerala, located on the southern most western shores of India. With a long shoreline, fresh fish is abundant except for the few weeks at the height of the monsoon rains.

KF-MP-marinated-fish

And as olive oil is typical of the Mediterranean, coconut oil is the main cooking medium in Kerala. At least, it was so till the numerous warnings about the cholesterol in coconut oil turned people towards other oils. I’m so glad to see the tide turning these days and the health benefits of coconut oil being recognised.

KF-MP-pilaf-fish

So these two items from so far away, but from similar backgrounds, work well together in this great dinner. Try it, you won’t be disappointed!


~Ria


Kerala Fish Meets Mediterranean Bulgur
 
Author: 
Recipe type: Dinner
Ingredients
  • 2 filets of white fish (such as tilapia or hake)
  • 1 tbsp coconut oil
  • 1 medium sized shallot (quarter of a white or red onion will also work)
  • 4 cloves of garlic
  • 1 sprig curry leaves (available in Indian grocery stores)
  • 1 tsp cayenne pepper powder (adjust according to tolerance for heat)
  • ½ teaspoon turmeric powder
  • 1 cup bulgur
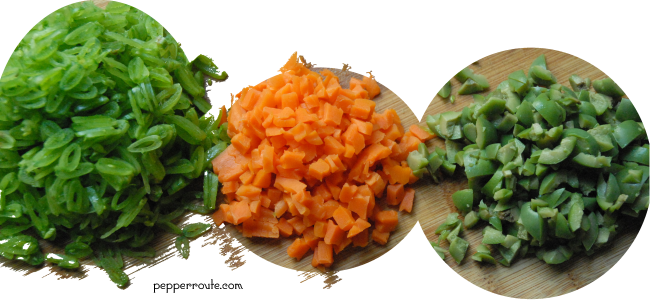
  • 1 cup chopped green olives
  • 1 cup chopped sugar snap peas
  • ½ cup chopped carrots
  • 1 ¾ cups water
  • Juice of 1 lime
  • 2 tbsp extra virgin olive oil
  • Salt to taste
Directions
  1. Grind together the shallot, garlic, curry leaves, cayenne pepper and turmeric powders, with salt to taste.
  2. Marinate the fish filets in the paste for at least 1 hour. You can keep it in the refrigerator overnight, but bring to room temperature before cooking.
  3. Bring 1 ¾ cups of water to a boil. Add olive oil, lime juice and bulgur. Mix well, remove from heat and let sit covered for about 20 minutes. Once at room temperature, add the chopped ingredients and mix well.
  4. Heat the coconut oil in a non-stick frying pan. When shimmering hot, add the fish filets (keep a splatter screen handy) and cook for about 3-5 minutes per side. Remove and serve with the prepared bulgur.

Quick & Easy Chicken Curry

Chicken curry is a dish that lends itself to innumerable variations. Indeed, when you consider the fact that ‘curry’ as such is a generic term used to refer to a spiced dish with gravy, the variations can be so many. No wonder, there are as many recipes for chicken curry, as there are cooks making them!
 
QECC-curry-closeup

Some of these dishes like the Mughlai versions can be quite complicated with a long list of ingredients, while some are quite simple with just a few things thrown together. Regions have their specialities just like families have their favourites. However, when a friend from my zumba class spoke about looking for an easy to make chicken curry recipe, I did not have to think at all… I knew right away the perfect one. The most straight forward, easy to make chicken curry! So Corina, this is for you!
 
QECC-curry-rice-salad2
 
One good thing about this curry is that, as you become an expert in it, you can experiment with it. Instead of adding water, you can try some coconut milk… or you can vary the spice mix to focus on specific flavours. This is the recipe that all kids from our family take with them when they go to unis with the hope that they will get an opportunity try it out on their friends… this is the recipe that is followed when unexpected guests turn up at the door and something good has to be whipped up right away.
 
QECC-curry2
 
The process is very simple to follow… you chop up the basic curry combo – onion, ginger, and garlic. These form the essentials of most curries. Optionally, you can include green chilles in this group. I had some very mild ones in my refrigerator; so I added them.
 
QECC-onion-mix
 
Then comes the vegetable part. If you like potatoes, definitely add them; they will turn out to be tastier than the chicken! And tomatoes to add to the flavour of the gravy. As you advance in the curry craft, you can add other vegetables like green peas or lima beans as well.
 
QECC-potato-tomato
 
The next part is the spice mix. Coriander, chilli, turmeric and black pepper powders form the base. And I use the eastern eight spice mix, which I make at home, for the curry flavour.
 
QECC-spice-mix
 
And finally, the chicken. There is no definite preference for the pieces. Chicken thighs or breasts will work well. The whole chicken cut up into pieces can also be used.
 
QECC-curry-rice-salad1
 
Then it is a matter of sauté and cook. And your curry is ready! Perfect to be served with rice/pulav and a quick salad.


~Ria

Quick & Easy Chicken Curry
 
Author: 
Recipe type: Main meal
Ingredients
  • 2 lbs skinless, boneless chicken thighs
  • 3 medium onions
  • 5 cloves of garlic
  • 2 inch piece ginger
  • 1 green chilli, optional
  • 2 medium potatoes
  • 2 tomatoes
  • 2 tbsp coriander powder
  • 1 tsp chilli powder
  • ½ tsp turmeric powder
  • 1 tsp black pepper powder
  • 2 tsp eastern eight spice powder
  • 3 tbsp cooking oil
  • Coriander leaves
  • Salt to taste
Directions
  1. Cut the chicken into bite size pieces.
  2. Slice the onion into thin wedges.
  3. Cut the ginger into juliennes.
  4. Thinly slice the garlic cloves.
  5. Cut the potatoes into cubes.
  6. Cut each tomato into eight pieces.
  7. Mince a few spring of coriander leaves.
  8. Measure out all the spice powders and keep ready.
  9. In a large frying pan, heat the oil. When the oil is hot, add the onions, ginger, garlic and green chillies, if using.
  10. Sauté till the onions start browning around the edges.
  11. Add the potato pieces and keep stirring.
  12. After 5 minutes, add the powders and stir well.
  13. Right away, add the chicken and tomatoes and stir together for two minutes.
  14. Add enough water to cook the chicken.
  15. Cover and cook till the chicken is done.
  16. Check for consistency, adding more water if required.
  17. Take off the heat and sprinkle the minced coriander on top.
  18. Garnish with a spring of coriander and serve immediately with rice/pulav.


Sardines in Roasted Coconut Gravy

The phrase that comes to mind at the mention of sardines is, ‘packed like sardines’, the phrase originating from the way sardines are packed in a can. Never been a fan of canned sardines, though I have eaten some awesome pasta made with sardines from a can and a pesto sauce. Instead, I like to think of sardines as these beautiful schools of fish freely swimming in the vast oceans. Indeed, the sardines are gorgeous looking… slim and silvery, with bluish-greyish backs. And they are equally tasty – sorry, it seems very unfriendly to talk about the sardines being pretty and tasty in the same para! But then, I learned to appreciate their taste way before I learned to appreciate their beauty! 🙂

SRC-ready1

This is a curry made with sardines and roasted coconut. A staple in the state of Kerala, the spice combination can vary based on the region. This one uses fenugreek seeds as an ingredient along with the roasted coconut, which gives an extra depth to the flavours.

SRC-ingredients

Another interesting ingredient is the bilimbi, the very sour fruit, often used in place of tamarind or tomatoes to provide tanginess.

SRC-bilimbi-cut

The bilimbi fruits are a pale green colour, about two inches long, and grow abundantly in warm weather.

SRC-bilimbi

Cleaning the sardines is an art in itself… especially removing the scales, but nothing that cannot be accomplished with a bit of patience.

SRC-sardines

Along with the coconut, most of the other ingredients are roasted. And finely ground into a thick paste. The sardines are cooked in this paste so that the flavours thoroughly get into them.

SRC-ready2

And if you can manage to get an earthenware pan to cook this dish, nothing like it. The unique flavour imparted by the earthenware cannot be replicated any other way. Try it… 🙂

~Ria


Sardines in Roasted Coconut Gravy
 
Author: 
Recipe type: Seafood
Ingredients
  • 12 sardines, fresh
  • ½ a coconut, grated
  • 6 cloves garlic
  • 12 shallots
  • 1 tsp fenugreek seeds
  • 1 tbsp coriander powder
  • 1 tsp chilli powder
  • ½ tsp turmeric powder
  • 3 green chillies
  • ½ inch piece ginger
  • 6 to 8 bilimbi fruit
  • 1 tbsp and 1 tsp cooking oil
  • 2 sprigs curry leaves
  • Salt to taste
Directions
  1. Clean the sardines and wash thoroughly. Cut each sardine into two pieces if you like it so.
  2. Slice 6 of the shallots.
  3. Split the green chillies into two lengthwise.
  4. Cut the ginger into juliennes.
  5. Cut each bilimbi into six pieces lengthwise.
  6. Heat a largish pan, add a teaspoon of cooking oil, and when the oil is hot, add the grated coconut, garlic, 6 remaining shallots, and fenugreek seeds.
  7. Roast the till dark brown. Then add the coriander powder, chilli powder and turmeric powder and fry for another minute.
  8. Cool the roasted mixture and grind to a fine paste and place in a cooking pan.
  9. Add the sardines, green chillies, ginger and bilimbi pieces to the ground mix.
  10. Add salt to taste.
  11. Cook on a medium flame, stirring every now and then.
  12. When the sardines are done, remove from the heat. Add the springs of curry leaves.
  13. In a small frying pan, heat 1 tbsp oil.
  14. Add the sliced shallots and fry.
  15. When the shallots turn golden brown, add to the sardines along with the oil they were fried in.
  16. Mix together and enjoy with steamed rice.

Boatman’s Crab Curry

There is nothing sophisticated about this dish… It is as rustic as can be. Prepared in a hurry, with ingredients that are easily available, by people who are definitely not accomplished chefs. But boy, is it yummy! Once you have tasted it, you will never forget it, I guarantee. And of course, as can be guessed, the secret behind the goodness of this dish is the freshness of its ingredients.

BCC-ready1

The backwaters of Kerala, the small state on the south western coast of India, are well known for their natural beauty. However, something that is not so well known is the fact that the same backwaters are major channels of commerce. Boats plying on them ferry commodities and people, village to village.

To the boatmen who guide these boats through the network of waterways, the boats are their homes, especially as they are away from their villages for weeks at a time. At the end of a day, they moor their boats and settle down for the night, maybe after a visit to the shop on the banks for some daily necessities. Then it is time to prepare a quick meal in the light of the hurricane lamp. And is there anything better to cook than what can be harvested out of the water, then and there? But they have no time or patience for elaborate preparations. A chop of this, a handful of that… stir together and the boatmen’s fish or crab curry is ready… hot and spicy, enticing!
The ingredients are very basic… chopped onions, tomatoes, crushed ginger and garlic. And a bit of crushed cloves and cardamom. And a mix of coriander, chilli and turmeric powders.

BCC-spices

The only change I have made to the original recipe – picked up from watching it being made – is that it has been mellowed down a bit, by the addition of coconut milk.
And of course, the key to the awesomeness of this dish is fresh crabs… I mean, really fresh ones.

BCC-crabs

Sauté the onions, add the powdered spices, stir in the tomatoes… toss in the crab pieces and stir together.

BCC-sauted

Add the coconut milk and cook covered for 10 minutes. A sprinkle of curry leaves makes it complete.

BCC-coconut-milk

Serve with hot boiled rice and you will hear the lilting songs of the boatmen echo on the silvery waters on a still night.

BCC-ready2


~Ria

Mediterranean Summer Bread Pudding

This Sunday, I have a party to go to. And I’m planning to make a bread pudding with lots of lovely stuff – white chocolate, bananas, cranberries – in it to take along. But then, that is only on Sunday… and people have to eat till then, right? I was not in a mood to go food shopping in the middle of the week. Looking in the refrigerator, I realised I had bits of different cheeses that I needed to use up. But how? And remember, I had bread pudding on my brain… voila, the end result is this Mediterranean summer bread pudding!

msbp-cutpiece1

Why Mediterranean summer? One thing I wanted in the dish was baby spinach… always have it on hand. So we have assorted cheeses and spinach. What goes with that? Of course, olives and lemon! The combination reminds you of a lovely Mediterranean summer, doesn’t it? 🙂

msbp-cutpiece2

This dish would shine with feta cheese as stated in the recipe, but I used an assortment of cheeses, the leftovers from earlier recipes… a bit of gouda, bit of mozzarella, and even a bit of brie. And of course some pecorino on the top. It tasted so yummy!

stuff

Once I arrived at the theme, the rest was easy. Add the standard spices that go with the cuisine… allspice, cumin, red chilli flakes, and oregano.

spices

You can make this with white bread as well, but of course, whole wheat bread is always better*. Whichever bread, make sure that it gets ample time to soak up the juices, before you pop it into the oven.

in-the-pans

Finally, I like to grease the baking pan with butter. If you prefer, you can use olive oil for this purpose.

msbp-done
* Hey, doesn’t that sound like a slogan? “Whole Wheat Bread is Always Good!”


~Ria

Divider-Trivia


Mediterranean Summer Bread Pudding
 
Author: 
Cuisine: Mediterranean
Ingredients
  • 6 large slices whole wheat bread
  • 1 cup baby spinach, tightly packed
  • 5 artichoke hearts, thinly sliced
  • 12 black olives
  • ½ cup crumbled feta cheese
  • 4 large eggs, beaten
  • 2 cups milk
  • 3 tablespoons extra-virgin olive oil
  • 1 teaspoon finely grated lemon zest
  • 1 tablespoon fresh lemon juice
  • 1 tsp allspice powder
  • ½ tsp cumin powder
  • 1 tsp red chilli flakes
  • 1 tsp dried oregano
  • 2 tbsp shredded pecorino cheese
  • Unsalted butter to grease the pan
  • Salt and black pepper to taste
Directions
  1. Pre-heat the oven to 350 degree fahrenheit and butter a 9 inch baking pan.
  2. Cut the crusts off the bread slices and cut them into ½ inch cubes.
  3. Cut the baby spinach finely.
  4. Slice the artichoke hearts thinly.
  5. Slice the black olives into thin circles.
  6. In a large pan, mix together the bread cubes, spinach, artichoke hearts and olives. Make sure that the vegetables are not wet so that the bread doesn’t get soggy.
  7. Transfer the bread and vegetable mix to the buttered baking pan and spread evenly.
  8. Spread the crumbled cheese evenly over the bread mix.
  9. Beat the eggs well with the milk. Add olive oil, lemon zest and juice, allspice and cumin powders, red chilli flakes, and oregano. Season with salt and freshly ground black pepper. Mix thoroughly.
  10. Pour this mixture over the bread and cheese.
  11. Keep aside for 30 minutes to allow the bread cubes to soak in the liquid.
  12. After 30 minutes, gently press down the contents of the pan and sprinkle the top with the pecorino cheese.
  13. Loosely cover the pan with aluminium foil and place in the heated oven.
  14. Bake for 30 minutes. Then, remove the foil and continue baking uncovered for another 10 minutes or till the cheese starts to get brown spots.
  15. Slice and serve with a tomato salad on the side. A semi-dry white wine goes well with this Mediterranean summer bread pudding.


Blackened Tilapia – a page from a Creole Cookbook

Originating in Louisiana, the Creole style of cooking combines the European cooking methodologies with the local American ingredients. Though it has influences of Spanish, Portuguese, and Italian cuisines, the major inspiration comes from the French. The blend of classical European cooking styles with new ingredients found in the New World gave rise to a very rich and flavourful cuisine.

blacken-fish

Also, as it is centered around the bayou region of Louisiana, Creole cooking has a strong focus on fish and shell fish, which makes it even more attractive.

The first Creole cookbook in English was La Cuisine Creole, published in 1885, which is available from Amazon in printed and Kindle editions. In addition to recipes, the books provides information on the background and development of the cuisine as well.

La-Cuisine-Creole

Jambalaya, Gumbo, Etouffee, Bananas Foster… the signature dishes of the region are many. And just the memories of them are enough to induce drooling.

With its flavour combinations that lean towards the spicy, it was love at first taste for me!

And watching Emeril Lagasse on Food Network TV made it easy to kick it up a notch too! In fact, his ‘Louisiana Real and Rustic’ is my go-to reference for Creole cooking. Though the other day, when I wanted to make blackened tilapia, I did not have to refer to any book; I have made it so many times!
Blackened fish, is a quintessential Creole dish, very easy to do, usually made with catfish. But you can attempt it with any firm white fleshed fish. This time, I made it with tilapia fillets.

tilapia

The key part of the dish is the spice rub – a combination of onion powder, garlic powder, paprika and other herbs.

blacken-spices

I have tried different spice combinations, but the one that worked to perfection for me has an wee bit of clove powder in it which adds a bit of extra flavour. (See recipe below.)

dinner

You need to let the fish sit for at least 30 minutes, up to an hour, after applying the rub. And totally against the traditional method, where the fish is fried at high heat, I baked it on an aluminium foil lined baking sheet.

fish-baking

It couldn’t have been better! Flaky, spicy, moist fish, done in 15 minutes!

tilapia-meal

~Ria

Blackened Tilapia – a page from a Creole Cookbook
 
Author: 
Ingredients
  • 2 tsp onion powder
  • 2 tsp garlic powder
  • 1 tsp paprika
  • 1 tsp red chilli powder
  • ½ tsp clove powder
  • 1 tsp dried thyme
  • 1 tsp dried basil
  • Salt to taste
  • 3 tilapia fillets
  • 1 tsp olive oil
Directions
  1. Mix together thoroughly well all the spices and dried herbs, with the salt. You can vary the proportion of paprika and red chilli powder to adjust the heat to your preference.
  2. Wash and dry the tilapia fillets.
  3. Apply the spice rub on both sides of the tilapia fillets and keep aside for at least 30 minutes.
  4. Meanwhile, preheat the oven to 350 degree Fahrenheit.
  5. Line a baking sheet with foil. Brush the foil with a teaspoon of olive oil.
  6. Lay the fillets on a foil, without overlapping.
  7. Place on the middle rack of the oven and cook for 15 minutes.
  8. Gently test with a fork. If the fish begins to flake, it is done.
  9. Serve with brown rice and vegetables.

Quesadillas for Cinco de Mayo

Cinco de Mayo… is not an excuse for margaritas! In fact, it commemorates the against-all-odds victory of the Mexican army against the much larger French forces of conquest at the Battle of Puebla on May 5, 1862. Though the victory in the battle did not lead to victory in the war, it served as a morale booster and matter for pride for the Mexican army and people. Interestingly, that war was the last time a European power invaded any country in the Americas!

margarita

Today Cinco de Mayo – Spanish for ‘fifth of May’ – has come to signify a tribute to Mexican heritage and pride and is celebrated widely in the United States and in Mexico. Usually parties with awesome Mexican food drink and music…

final

When you want to go Mexican in terms of food, there is plenty of choice. And all of them are sooo good! This year my choice is quesadilla, but of course, with a twist.

Quesadilla is one of the quintessential Mexican dishes. One of my favourites to make as well, because of the variety one can work with it. And I’m certain that the quesadilla as it originally was hardly resembles its modern version.

plated

Essentially, a quesadilla is a tortilla stuffed with cheese and various fillings and folded and heated through to form a half moon shape. The cheese is the one constant ingredient, as attested by the ‘queso’, cheese in Spanish, in the name itself. And it is always some type of melty cheese. A combination of cheddar, Monterey Jack and Pepper Jack cheeses works well. Or any one of them alone will also work. Pre-packed Mexican blends available in the store makes it super easy.

filling

I decided to stick with one traditional variety this time… South Western with traditional filling of corn, red pepper, and onions flavoured with cumin.

spices

And three variations! A Vegetable Medley for my veggie lover friends, a Tikka Chicken for those who like it hot, and a Sesame Chicken for the spicy-not-hot bunch.

chicken

Once all the ingredients were ready and chopped, and it’s a lot of chopping, believe me, assembling each one was the fun part. And they are so yummy hot off the griddle, with a cooling side of guacamole, salsa or cilantro-lime-sour cream.

sauces

Guacamole is something that goes well with a lot of things, especially of Mexican origin. Only problem is, it gets over so fast!

guacamole

And of course, accompanied by margaritas before and after…

serving

Just wondering… whether the French celebrate Cinco de Mayo… 🙂

~Ria

Recipe for Quesadillas

  • 10 whole wheat tortillas
  • 2 tbsp extra virgin olive oil
  • 2 lbs shredded cheese, combination of pepper jack and cheddar or a Mexican blend

Note: Recipe for fillings follow.

1 Heat a flat griddle, on medium heat.
2 Brush with olive oil.
3 Place a tortilla on the griddle.
4 Sprinkle cheese liberally all over the tortilla.
5 Place the filling of your choice on one half of the tortilla.
6 Carefully fold the other half over, and press with a spatula to seal.
7 Turn over and cook the second side.
8 When both sides are somewhat crisp, transfer to a plate and cut into four wedges.
9 Serve with guacamole, salsa and sour cream.


South Western Filling

  • 1 cup whole corn kernels
  • 1 can black beans
  • 1 cup tomatoes, fleshy part chopped
  • ½ cup cilantro, minced
  • A pinch of cumin powder
  • Salt to taste

Mix ingredients together and place over cheese on the tortilla on the griddle.


 Vegetable Medley Filling

  • ½ cup potato, cut into small cubes and boiled
  • ½ cup carrots, shredded
  • ½ cup broccoli, only the crown chopped
  • ½ cup corn kernels
  • ½ cup red pepper, chopped
  • ½ cup red onions, chopped
  • ½ cup black olives, sliced
  • ¼ cup cilantro minced
  • 2 tbsp pickled jalapenos, minced
  • salt to taste

Mix ingredients together and place over cheese on the tortilla on the griddle.


Tikka Chicken Filling

  • 2 skinless, boneless chicken breasts
  • 2 tbsp chicken tikka masala powder (available in Indian grocery stores)
  • 2 tbsp sour cream
  • A pinch of turmeric powder
  • 1 tbsp paprika or a mix of paprika and cayenne
  • 1 tbsp crushed garlic
  • Salt to taste
  1. Cut the chicken into small bite size pieces.
  2. Mix with all the spice powders, sour cream and salt. Keep aside for 30 minutes. It can be kept in the refrigerator for up to 24 hours.
  3. Preheat the oven on the broiler setting.
  4. Line a flat pan with aluminium foil and lay the chicken pieces in a single layer.
  5. Broil on the top most rack of the oven for 10 minutes.
  6. When done, remove from the aluminium foil and cover and keep till ready to use.


Sesame Chicken Filling

  • 2 skinless, boneless chicken breasts
  • 2 tbsp dark soy sauce
  • 2 tbsp sesame oil
  • 2 tbsp finely chopped red onion
  • 1 tbsp finely chopped garlic
  • 1 tsp red chilli flakes
  • 2 tbsp sesame seeds
  • 1 bunch scallions
  • Salt to taste
  1. Cut the chicken into thin strips.
  2. Slice the green leafy parts of the scallions.
  3. Marinate the chicken pieces with the soy sauce, sesame oil, chopped onion and garlic, chilli flakes and salt. Keep aside for 30 minutes. It can be kept in the refrigerator for up to 24 hours.
  4. Heat a pan and when the pan is hot, add the sesame seeds.
  5. When they have spluttered completely, add the marinated chicken. Stir together. Cover and cook.
  6. When the chicken is done and the liquids are evaporated, add the sliced scallions and take off the heat.
  7. Keep in a covered container till ready to use.


Cilantro Pesto Pasta

There is no easier go-to food than pasta… In the time that the water takes to boil and cook the pasta, you can get the sauce done. And if you are in a hurry, nothing is faster than a pesto sauce. However, just because it can be done quickly, it doesn’t mean that pesto is a simple thing; the flavours in a pesto sauce can be complex and intriguing. What is more, you can experiment with different combinations of ingredients.
 
plated-pasta


Basically, a pesto sauce needs a nut base to give it body. Add to it any green herb to form the foundation of the flavour. And olive oil to bring it all together. The rest is entirely up to you… you can try various accent flavours to focus on, till you find your favourite combinations.
 
pesto-final
 
The pesto sauce I have used here is very basic, with cashew nuts and cilantro. Flavoured with garlic, ginger and lemon juice. You can keep this pesto sauce in the refrigerator for a week, in an airtight jar.
 
pasta-veggies

This pesto is rather versatile. You can use it with just vegetables or a combination of chicken and vegetables. If using chicken, the easiest way will be to either grill it or pan cook it and then slice it into thin strips. Here I have used just vegetables, a combination of peppers in three colours, mushrooms and egg plant.
 
veg-cooked

Also, you can use any kind small sized pasta for this dish. However, I always prefer spaghetti to go with a pesto sauce. Nice to swirl around your fork!
 
pasta-ready

Enjoy!

~Ria

Cilantro Pesto Pasta
 
Author: 
Recipe type: Dinner
Ingredients
  • ½ cup cashew nuts
  • 1 cup cilantro, measured after cleaning and chopping
  • ½ cup + 2 tbsp olive oil
  • 2 garlic cloves
  • A small piece ginger root
  • 2 tsp lemon juice
  • 1 jalapeño or any variety green chilli
  • 1 pinch sugar
  • Salt and black pepper to taste
  • 2 cups mixed vegetables, cut into thin long pieces (any combination of peppers, squash, broccoli florets, mushrooms, egg plant, etc)
  • ½ lb spaghetti
Directions
  1. Soak the cashew nuts in sufficient water to submerge for an hour. (If you do not have the time to soak the cashew, you can as well use pine nuts which do not need to be soaked.)
  2. Pick only the leaves and tender stalks of cilantro and chop.
  3. Remove the skins of garlic and ginger.
  4. Carefully remove the stem and seeds of the jalapeno.
  5. In the blender, add the nuts, cilantro, garlic, ginger, jalapeno, lemon juice, and sugar, and blend well. Add salt and black pepper to taste. When blended into a paste, drizzle the olive oil in a thin stream while the blender is still running. When all the oil is used up, switch off the blender and set the pesto sauce aside in a container.
  6. Cut the vegetables into long thin strips.
  7. Heat 1 tbsp oil in a pan, on high heat. When the oil is hot, add the vegetables and stir fry for three minutes. Add salt and pepper to taste and remove from heat.
  8. Add some salt to a pot of water and bring to boil. Add the spaghetti and cook uncovered. After 8 minutes, check for doneness. When you can bite into a strand of spaghetti easily, but there is a bit of resistance at the center, it is done enough. Drain the water off the pasta and transfer the pasta to a largish dish. Drizzle one tablespoon of olive oil over the pasta and shake together to coat.
  9. Add the stir fired vegetables to the pasta. Drizzle the pesto sauce over the pasta and vegetables and carefully mix together.
  10. Serve hot with extra pesto sauce on the side.

Chicken Sausage Rice… inspired by Paella!

Paella is one of my favourite rice dishes... not only is it delicious, it is sort of a complete meal. At least the version that I make where I incorporate some vegetables into a mainly chicken and seafood dish. The other day when the craving for Paella hit me, I was in the midst of a project deadline and in no way able to spend the time to prepare it. Necessity is the mother of invention, right? I did come up with a dish which has chicken and sausages and resembled Paella enough to make my tummy happy. Win-win all the way! ch-sau-rice3 It is actually very simple... cook sausages and chicken separately. Chop some vegetables. Throw everything together along with some rice, and cook till done. Though I used hot Italian sausages, I think chorizo will be even better. chi-sau Any vegetables that will not go mushy will work. As this was not a planned-in-advance dish, I used the red peppers I had in the refrigerator. And of course, onions and garlic. Celery adds some additional flavour to the dish, but can easily be omitted. veg-mix The rice I used was regular long grained rice, but again, do you think Arborio rice would be better? Maybe next time I’ll try this dish with Arborio rice. And chorizos. ch-sau-rice1 Yeah, many ways to manage this dish with whatever ingredients you have handy! ch-sau-rice2

~Ria

Chicken Sausage Rice... inspired by Paella!
 
Author: 
Recipe type: Dinner
Ingredients
  • 2 lb skinless, boneless chicken, thighs and breasts mixed
  • 1 lb sausages
  • 1 large onion
  • 2 ribs celery
  • 4 cloves garlic
  • 1 tsp chilli powder
  • 2 tsp paprika
  • 1 tbsp coriander powder
  • ½ tsp cumin powder
  • 2 cups rice, Arborio or long grain
  • 1 large red pepper, or a mix of vegetables
  • 1 can (12 oz) crushed tomatoes
  • 1 can chicken stock (can be made from cubes or substituted with water)
  • Cooking oil, as required
  • Salt and black pepper to taste
Directions
  1. Cut the chicken into pieces and mix with chilli powder, paprika, coriander powder, cumin powder and salt. Leave aside in the refrigerator to marinate while you prepare the rest of the ingredients.
  2. Cut the sausages into bite size pieces.
  3. Wash and drain the rice and leave aside.
  4. Chop the onions and celery roughly. Slice the garlic thinly.
  5. Cut the vegetables into bite size pieces.
  6. In a large pan, heat 2 tbsp oil and fry the sausages. Drain on paper towels.
  7. In the same pan, add another 2 tbsp of oil and brown the marinated chicken pieces on all sides. Keep aside.
  8. Add 2 more tbsp oil to the pan and add the onions, celery and garlic. Fry till they turn transparent.
  9. Add the drained rice and fry for two minutes. Add the crushed tomatoes and chicken stock. Stir together. Add the sausages and chicken pieces to the mixture. Season with salt and black pepper.
  10. Bring to a boil and cover and cook for 15 minutes, checking after 10 minutes to see there is enough liquid in the dish. If not, add enough water to cook.
  11. When the rice is done, switch off the heat and let sit for another 10 minutes.
  12. Serve with a salad dressed with any creamy dressing. Quick and easy and delicious!

Verineki


When I used to work in downtown NYC, one of our lunch places used to be this Russian place on Fulton Street. Walking distance from work, it offered very good food. Recently, when I read a review of the book ‘Mastering the Art of Soviet Cooking’ in New York Times, I really wanted to try out some of those dishes. Fortunately, it was just a matter of sending out a request through email, for offers of authentic Russian cookbooks to be forthcoming. And today I made Varenikis, following a recipe in a book lent to me by my friend Olga. Thank you so much, Olga!
 
vareniki

Vareniki is a kind of dumplings, made of fresh dough. The dough is a simple one with flour and eggs. And then you fill it with stuff and boil it in salted water. In fact, the literal meaning of the word vareniki is just ‘boiled thing’!

vareniki-mix

Traditionally it has fillings like meat, cooked potatoes, sauerkraut, cheese, fruit etc. Here I have used a mixture of cheese and dried fruit filling.

vareniki-filling

The best part of it is, you can make whatever you want of it, with a variety of fillings. Now that I have successfully tried it, the next step would be to try out some new combinations of fillings!

vareniki-recipe

One fact common to all dumplings is that it is so easy to determine when they are done; they float up to the surface when done!

vareniki-floating

The recipe recommends serving the varenikis with sour cream, but I think it could go with many an interesting sauce or aioli. Next time…

~Ria

Verineki
 
Author: 
Ingredients
  • 2 cups flour
  • 2 eggs
  • 2 tbsp cold water
  • ½ tsp salt
  • ½ lb cottage cheese
  • ¾ cup sugar
  • 1 egg
  • 1tbsp butter
  • ½ tsp vanilla extract
  • ¼ cup raisins
  • ¼ cup glazed cherries
Directions
  1. To make the dough, mix the salt into the flour.
  2. Beat the eggs and cold water together, and add to the flour.
  3. Mix together and kneed into a smooth dough. Keep covered with cling wrap.
  4. For the stuffing, chop the raisin and cherries. Beat the egg.
  5. Mix cottage cheese, sugar, beaten egg, vanilla extract and chopped fruit together.
  6. Form small balls of the dough.
  7. Make a depression in the center of each of the dough balls with your thumb and fill with stuffing. Carefully, form into an oval shape.
  8. Bring water to boil in a pan, adding a teaspoon of salt to the water.
  9. When the water starts to boil, drop the formed varenikis carefully into the water. Let them cook for a few minutes.
  10. When done, the varenikis will float to the top. Lift them out with a slotted spoon and place on a plate.
  11. Brush them with melted butter. Serve with sour cream.