E is for Étouffée 

Étouffée (pronounced ay-too-fay) is a popular dish in the Creole cuisine of Luisiana and especially New Orleans. Creole cuisine combines European, African and native American traditions and is one of the distinctive styles of cooking in the United States.

The word étouffée means ‘smothered’ in French. Smothering is a process of cooking anything in its own juices with minimum addition of extra liquid. This is a commonly used technique in Creole cooking.

The flavor base for an étouffée is the ‘holy trinity’ of Creole (and Cajun, a similar cuisine, also developed in Louisiana) cooking: onion, celery and green pepper. Diced into uniform size, they are sautéed in butter to get a dish started. Sometimes the trinity is enhanced with garlic, parsley, or shallots. 

They form the base for other Creole-Cajun dishes like jambalaya and gumbo as well.

Étouffée can be made using different shellfish, though crawfish which are specific to Louisiana, are most often used. However, shrimp is an equally good replacement when crawfish are not available.

There are differences of opinion regarding the addition of tomatoes in an étouffée. Also, about roux. Even when there is agreement on the inclusion of roux, opinion differs as to do so at the beginning or towards the end. This version includes tomatoes and a roux, introduced half way through the recipe.

Creole seasoning elegantly blends an array of flavors to come up with a perfectly balanced spice mix. Make this a staple in your spice cabinet, as you can use it for fish, chicken or vegetables.

Étouffée is mostly served with cooked white rice, but you can try mashed potatoes as well.

To make the Creole seasoning, mix together: 2 tbsp paprika, 1 tbsp onion powder, 1 tbsp garlic powder, 1 tbsp dried thyme, 1 tbsp dried oregano, 1 tbsp black pepper, 1 teaspoon cayenne, and 1 teaspoon salt.

E is for Étouffée 

Difficulty:BeginnerServings:4 servings

Ingredients

Instructions

  1. Heat a pan over medium heat and add the butter.
  2. Add the onions, celery and back pepper. Cook till the onions turn transparent.
  3. Add the garlic and stir into the mix for 1 minute.
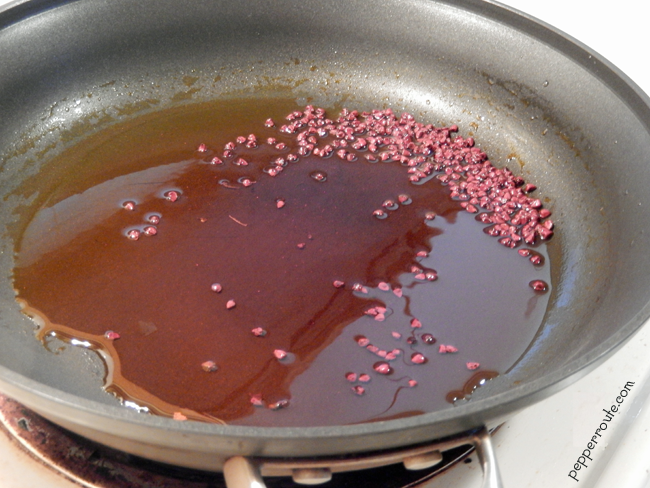
  4. Sprinkle the flour over the ingredients in the pan and stir well. Continue to cook for about three more minutes.
  5. Add the chopped tomatoes to the pan.
  6. Add the stock, Creole seasoning, and salt and pepper to taste. Continue to stir and cook till the liquid thickens. Simmer for 5 more minutes.
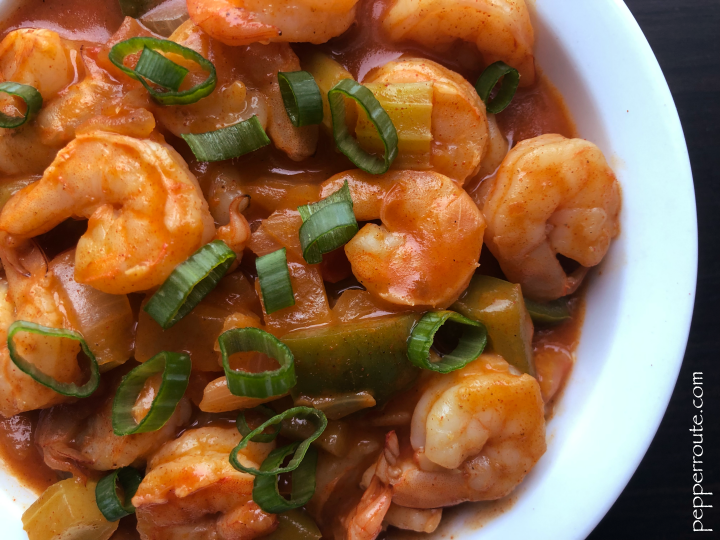
  7. Add the shrimp and continue to cook till the shrimp is fully cooked and turns pink, for another 5 minutes. Adjust seasoning if required.
Keywords:Creole, Etouffee, Seafood, Shrimp, Louisiana

D is for Dongnae Pajeon

Dongnae Pajeon (Korean scallion seafood pancakes) has its origin in the Dongnae region of Korea. Legend has it that the residents threw scallions that grew abundantly in the region, at the retreating Japanese army. Dongnae pajeon was created to honor that victory. And the dish was presented at the king’s table. 

Scallion seafood pancakes must be one of the most popular items in any Korean restaurant. However, the regular haemul pajeon differs from dongnae pajeon in that while scallions and seafood are mixed into the batter for the regular haemul pajeon, they are layered and crisped for the dongnae pajeon.

The batter is made from a combination of glutinous and non-glutinous flours. I have used equal quantities of rice flour and all-purpose flour to make the batter for this recipe.

You can use a variety of seafood in the dongnae pajeon. Clams, mussels, oysters, shrimp, squid, and scallops are all perfect for this dish. I have used shrimp and scallops for this version. 

Traditionally, minari, a green leafy herb sometimes known as water celery or chinese celery, is an ingredient in the dongnae pajeon. As the pajeon is very flavorful even without the minari, I decide to leave it out. If you want to, you can use watercress in its place.

Being around Koreatown in Manhattan, I’ve eaten many a pajeon over the years. And I have tried to perfect the recipe and the method of preparing it.

The secret is to get the batter to the right consistency of a thin pancake batter. Then you start going across the scallion pieces in lines, till you have almost covered them. Almost, but not quite.

Then you quickly lay out the seafood over the batter and follow up with another set of lines of batter over the seafood. A drizzle of oil over that, and cover and cook for two-three minutes when it will be time to turn the pajeon over. You are almost there!

Serve with dipping sauce on the side. 

To make the dipping sauce, mix together soy sauce (2 tbsp), rice vinegar (1 tbsp), mirin (1 tbsp), and gochujang, the Korean chili-soy paste (1 tbsp). If you prefer a less spicy dipping sauce, you can use any fermented soy paste instead of gochujang. On the other hand if you prefer it spicier, add a spurt of sriracha. 

D is for Dongnae Pajeon

Difficulty:AdvancedServings:8 servings

Ingredients

Instructions

  1. Sieve together the rice flour, all-purpose flour and baking powder.
  2. Cut the green parts of the scallions in long pieces, 5 to 7 inches long. All pieces need not be the same length.
  3. Cut the shrimp and scallops into small pieces.
  4. In a bowl, beat the egg together with soy sauce, rice vinegar, and gochujang. Add one and a half cups of water and mix well.
  5. Add minced ginger and garlic to the bowl. Season with salt.
  6. Add the flour mix to the bowl and mix well. Add more water if required, to make a thin pancake batter.
  7. Heat a griddle on the stove top, on medium heat. Oil the griddle.
  8. Lay down a handful of scallion pieces in parallel on the griddle.
  9. Start drizzling the batter in lines across the scallions till they are almost covered.
  10. Quickly place the chopped seafood on top of the batter.
  11. Repeat with another layer of batter on top of the seafood. Make sure you stir the batter before each use as rice flour tends to settle at the bottom.
  12. Drizzle a teaspoon of oil on top of the pajeon.
  13. Cover and cook for two-three minutes.
  14. Turn the pajeon over and continue to cook, uncovered.
  15. Check after two minutes. When sufficiently crisp, remove from the griddle and serve hot with dipping sauce.
  16. To make the dipping sauce, mix together soy sauce (2 tbsp), rice vinegar (1 tbsp), mirin (1 tbsp), and gochujang, the Korean chili-soy paste (1 tbsp).
Keywords:Dongnae Pajeon, Korean Seafood Pancake, Pancakes, Scallions, Seafood

C is for Caldereta

Caldereta is a delicious meat stew from Philippines, with a medley of vegetables slow cooked to perfection. The dish got its name from the word ‘cauldron’ (caldero in Spanish), the pot in which the dish was cooked. Cooked on special occasions and holidays, it will add color to any table.

I used a mix of peppers for this dish, in addition to the potatoes and carrots. The balance of the flavors of meat, root vegetables and the peppers was perfect. Now I’m tempted to try other vegetable combinations in this recipe. Cauliflower and peas are definitely worth a try. 

Originated in the Castile and León region of Spain, caldereta used to be cooked with meat from sheep, common to the area. Later, due to the Spanish influences on Filipino cuisine, it came to be popular in Philippines, but with goat meat instead of sheep. Modern versions are made with beef or pork. 

The addition of olives along with tomato paste gives the dish a tangy twist while the peanut butter adds to the creaminess. The cheddar brings it all together but can be omitted if you prefer it simpler. 

Traditionally, caldereta was thickened with liver pate (paste) but many modern versions avoid liver due to the gamy flavor. You can add it to the dish if you like it.

You can also try adding cooked garbanzo beans or white beans to this dish for variety.

Caldereta is generally served with cooked white rice. 

C is for Caldereta

Difficulty:IntermediateServings:6 servings

Ingredients

Instructions

  1. Heat the oil in a largish pot, over medium heat. Add the potatoes and cook till lightly brown. Drain and keep aside.
  2. Add chopped onions and carrots to the pot. Season with salt and black pepper.
  3. Cook till onions are transparent. Add the garlic and sauté for a minute.
  4. Add the beef pieces to the pot and cook, turning to brown them evenly.
  5. When the meat is browned, add the tomato paste and cook for two minutes, stirring the tomato paste well into the oil.
  6. Add the chopped tomatoes and chillies. Stir together and cook.
  7. When the liquid starts to dry up, add 1 and 1/2 cups of water.
  8. Cover the pot and lower the heat. Continue to cook till the beef is tender, about 90 minutes.
  9. Check for seasoning, adding salt and pepper as required.
  10. When the beef is done, add the potatoes to the pot. Add more water if required.
  11. When the potatoes are fully cooked, add the bell peppers and olives to the pot. Continue to cook for three minutes.
  12. Stir in the cheese evenly and allow it to melt.
  13. Check seasoning and serve hot with cooked white rice.

Notes

  • If you are using liver pate, add it to the pot just before the cheese and blend well.
Keywords:Stew, Meat, Meat stew, Peppers, Olives
Bouillabaisse

B is for Bouillabaisse

Fish soup, anyone? Likely, you may not get many responses to that. Change the name to Bouillabaisse and it becomes an inviting dish with all the allure of French cuisine! So much for the power of words!

For that is what bouillabaisse is. A basic broth with vegetables and seafood. 

The name is composed of two words meaning ‘to boil’ and ‘to simmer’, supposed to describe how the dish is made. 

Bouillabaisse has its recorded origin in Marseille, being made by local fishermen using the bony fish which could not be sold to customers. The types of fish considered essential were rascasse, sea robin, and European conger. These are fearsome looking fish indeed, as seen from pictures on the net. 

An article in the New Yorker magazine ‘The Soul of Bouillabaisse Town’, by A. J. Liebling and published in 1962, talks about the importance of rascasse for a bouillabaisse and the search for it in the US. A very interesting read indeed. 

By and by there were so many versions of bouillabaisse in Marseille alone that in 1980 a Bouillabaisse Charter was drawn up by a number of prominent Marseille restaurateurs, defining the ingredients and method of preparation of this dish.

The identifying flavors of a bouillabaisse today are fennel and saffron. 

All ingredients except for the seafood are cooked in stock to form a delicious broth, which gets its beautiful color and enticing aroma from the saffron.

The vegetables are chopped small so that they blend well into the broth.

You can make your own stock. Any combination of fish bones and shrimp/ lobster shells will work for the stock. Just boil them up for about 30 minutes, in sufficient water with some garlic, celery, onions, black pepper – whatever you have on hand. Cool, strain and freeze, and there it is ready anytime you need it. I find using shrimp shells for the stock the easiest.

When making a bouillabaisse, I totally take advantage of the versatility of bouillabaisse and use pretty much any combination of white fleshed fish and shellfish. And any variety of scallops. Yum!

To serve, you can remove the seafood from the broth after it is cooked and serve them separately on a platter. I prefer to keep them in the broth to be ladled out into the soup bowls.

Bouillabaisse is traditionally served with thick slices of bread and a rouille made of olive oil, garlic, saffron, and red peppers. Cayenne can also be added to the mix to add an extra kick.

B is for Bouillabaisse

Difficulty:IntermediateServings:4 servings

Ingredients

Instructions

  1. Soak saffron in a spoonful of stock or water. Set aside.
  2. Heat oil in a largish pot or deep skillet on the stove top.
  3. Add onion, garlic, celery, carrot, potato, and fennel to the hot oil.
  4. When the onion starts to turn transparent, add the stock, tomatoes and saffron (with the soaking liquid) to the pot.
  5. Season with salt and pepper and continue to cook.
  6. When the vegetables are cooked, reduce the heat to a simmer.
  7. Add the fish to the pot and cook for two minutes.
  8. Add the shrimps and continue cooking for another two minutes.
  9. Add the clams/ mussels and cook till they open, about three to four minutes.
  10. Add the scallops and immediately turn off the heat.
  11. Serve hot along with slices of bread and the rouille.
Keywords:Bouillabaisse, Dinner, Fish, French, Soup, Seafood

A is for Avial

Avial

Avial comes from Kerala, the state located on the western coastline of India, historically known as the Malabar coast. A vegetarian dish, it is made of a mixture of vegetables with coconut, green chilies and yogurt. It is an essential part of ‘Sadya’ (https://en.wikipedia.org/wiki/Sadya) the traditional feast served for festivals and celebrations.

Origin stories variously credit mythological characters Bhima or Ganesha for coming up with the dish. 

What I like most about avial is that it is so versatile; it can be made out of any mix of vegetables as long as they are not too soft or wilty. Root vegetables – potatoes, yams, taro – work well in the mix. So do some of the gourds like ash gourd and snake gourd. Though traditionally not included in the mix, carrots and red peppers add color to the mix.

Some versions even add bitter gourd, which of course gives the whole avial a slight bitter flavor liked by many. 

Vegetables are cut into uniform sized long pieces and added to the pot based on their cooking time. For example, if you have included any of the yams or taros in your mix, they should be allowed to cook half way through before the rest of the vegetables are added. 

Curry leaves are the signature ingredient that gives avial its unique flavor. 

Crushed along with freshly grated coconut, green chilies and cumin, the spice blend is so fragrant.

And the final touch is a spoonful of coconut oil drizzled over the dish.

Though the traditional Avial is made with a mix of vegetables, you can try this dish with a single vegetable. A favorite one to try will be potato avial. Also, egg avial, made with boiled eggs, can be so yummy!

A is for Avial

Ingredients

Instructions

  1. Cook the vegetables in a largish pot, adding them to the pot in batches based on the time they will take to be done. Add the turmeric powder, if using.
  2. Coarsely crush the coconut, green chilies, cumin and curry leaves.
  3. When the vegetables are almost done, add half cup of yogurt and salt to taste. Mix well.
    Continue to cook.
  4. Mix the remaining yogurt with the crushed coconut blend.
  5. When the excess water is cooked off and the vegetables are almost dry, add the yogurt-coconut blend. Gently mix together taking care not to break up the vegetables too much.
  6. Turn off the heat and drizzle the coconut oil over the top.
    Serve with cooked rice.
Keywords:Avial, Kerala, south indian, Vegetarian

Blogging A to Z – Theme Reveal

This is my first experience with the Blogging from A to Z Challenge. When my friend Molly (of Molly’s Canopy) mentioned the challenge, I was intrigued and here I am, ready to jump in! 

A to Z Challenge Theme Reveal

As Pepper Route is food-focused, the A to Z blog posts will all be about food… recipes, ingredients, a bit of trivia, all about food.

The role of food in our lives has evolved over time, the changes accelerating in recent times.

From being a primary necessity of life, food and its planning, preparing and presenting have evolved into forms of art, craft and science. 

Food processing has moved from the kitchen to the lab, advancements in food chemistry helping us understand the interactions of carbs, proteins, lipids, vitamins, minerals, enzymes, etc.

Culinary programming is raised to the status of spectator sports on television channels.

New cooking techniques like sous vide and hot smoking have become popular. 

New terms like ‘food porn’ have entered the common language. 

Social media – Facebook, Instagram, TikTok, Reels – is abounding with food themes and memes. 

Awareness of the relationship between food and health has grown, with the popularity of processed foods waning in inverse proportion to the attraction of organic and natural ingredients. Not only the caloric value but the source of ingredients is gaining focus.

New concepts like farm to table, nose to tail eating, and intermittent fasting are gaining traction. 

New diet practices like veganism and keto have hit the mainstream in a big way.

And the latest noticeable trend is the popularity of meal kits that ship ingredients for a recipe, all measured out in correct proportions, along with instructions, to homes. Accentuated by the corona pandemic, meal kits have helped expand the repertoire of even previously reluctant home cooks. Most likely, more meals will continue to be cooked at home even after the pandemic is managed and restrictions are eased.

Despite all these ongoing changes, the classic cuisines and recipes have held their own through ages. A lasagna, a shepherd’s pie, a tandoori chicken will always have its place on people’s tables. Currently we are in a very lucky space where we have the classics to hold on to, at the same time enjoying the offerings of the new trends. 

While selecting recipes to feature on Pepper Route during the A to Z Challenge, one factor that jumped to my notice: the universal nature of dishes. For example, let’s take the meat stew. Every regional cuisine has a version of this dish. They all involve meat cooked in a liquid for a long time, with the added options of beans, vegetables and spices. However… however, each of them is unique. What makes them unique are ingredients that were only available locally. In parts of Spain, it is asturia fabada, in Puerto Rico, it is gandinga, in Peru it is olluquito con charqui (or any one of a dozen regional variations). 

It is this duality – the universal yet unique nature of food – that I have chosen as my theme. 26 dishes from 26 different regions will be featured on Pepper Route as part of the A to Z Challenge, exemplifying the theme Universal Yet Unique!

Hope you will keep me company through this exciting blogging adventure!

Old Fashioned Coconut Macaroons

If there is any baked goodie that is easier to make than a fruit cobbler, it is a coconut macaroon. A soft slightly chewy center, with a light crisp outside… altogether yum!

 
OFCM-closeup2
Not to be confused with ‘macaron’, the trendy sandwich cookie that has been all the rage recently… that will come later. This is about the egg white and sweetened coconut concoction that is airy and light. But not meringue light, it has some chewiness to it too.

 
OFCM-cooling4
Macaroons have their origin in Italy, during the renaissance period. Initially they were made with almond paste. Later, for the sake of convenience, bakers started replacing the almond paste with either almond meal (powder) or dried sweetened coconut.

 
OFCM-cooling2
The coconut macaroons were popularised by the European Jewish communities who found it suitable for Passover as it was unleavened.

 
OFCM-cooling1
Macarons, the French version which were small round cookies without any coconut added, were developed by the chefs and bakers who accompanied the Italian noblewoman Catherine de Medici to the French court when she became the wife of King Henri 2nd. Like I mentioned earlier, more about them later.

 
OFCM-cooling5
I have made the coconut macaroons with almond and cashew slivers as well, and they do taste great.

 
OFCM-closeup3
However, adding a bit of colour makes you reach straight for them!

 
OFCM-ingredients
Next time, I’ll try spicing them up with some ginger, cinnamon or allspice.

 
OFCM-closeup1
If you would like uniformly shaped macaroons, you can pipe the mix through a star nozzle onto the baking sheet. I am usually too lazy for that; I just shape them into balls by hand.

 
OFCM-cooling3
I like to imagine Nora (the chief protagonist of Henrik Ibsen’s ‘A Doll’s House) eating coconut macaroons, though Ibsen just uses the generic ‘makroner’ and not ‘kokosmakroner’ in the original Norwegian. Though coconut macaroons are a typical Christmas treat in Norway today, it is unlikely that coconuts were commonly available in the Oslo of 1879, the play’s setting. Still, I see Nora munching on coconut macaroons and they definitely had little specks of red glace cherries on them! 🙂 So here is to the Noras of the world…


~Ria

Old Fashioned Coconut Macaroons
 
Author: 
Recipe type: Dessert
Cuisine: European
Ingredients
  • 1 cup sweetened condensed milk
  • 4 cups sweetened shredded coconut
  • 10 glace cherries
  • 2 large egg whites
  • 1 tsp vanilla extract
  • ½ tsp coarse salt
Directions
  1. Preheat the oven to 350 degrees farenheit.
  2. Prepare two rimmed baking sheets with parchment.
  3. In a large bowl, thoroughly mix together the condensed milk, vanilla extract and the coconut.
  4. In a medium bowl, beat the egg whites using a hand-held electric beater, till stiff peaks form, for about three to four minutes.
  5. Using a spatula, gently fold in the beaten egg whites into the coconut mixture, being careful not to overmix.
  6. Lastly sprinkle the salt grains on the mix lightly blend in with the spatula.
  7. With moistened hands, form small balls of about 1 ½ inches diameter and place on the baking sheets, 1 inch apart, giving the macaroons space to expand while baking.
  8. Bake in the preheated oven, for about 22 to 25 minutes, till the top of the macaroons start to brown.
  9. Transfer to a cooling rack and they are ready to go!
  10. Note: These can be stored in an airtight container in the refrigerator for three weeks, that is, if they last that long!


Quick and Easy Strawberry Cobbler

Life has been lazy, lazy these days. After all, these are the days of ‘lazy hazy crazy days of summer’, right? Unfortunately lost in the excitement of summer, is the routine of regular cooking. Actually that was the case ever since I came back from my winter stay in the tropics, where all I had to do was appear at the dining table to be pampered with mouthwatering food, all my favourites  Now I had to get back to my regular routines. You can survive only so long with eatouts and takeouts and leftovers and quick fix solutions. But the lazy bug had bitten me real hard and I needed a magical cure to defeat it.

So, I devised a plan to cook (or rather bake) a bunch of stuff I love to cook and eat and serve… like fruit cobblers, coconut macaroons and flancocho and tres leches cakes. I knew… I knew what it will do to my weight, but who is afraid of a few desserts in the season of fresh vegetables and long walks? Pffft!
SC-closeup1

First in the plan was a strawberry cobbler. Fruit cobblers are great in that they do not need much sugar to taste great. The natural sweetness of the fruit is brought forward by the concentrating of flavours that happen while baking. So winners all around.
SC-done2

A strawberry cobbler right out of the oven, with the fruit still bubbling in red juicyness and fragrant… a mental image of that was inspiration enough to get off my butt and into the kitchen! 🙂
SC-slice3

Apparently, cobblers are fairly newcomers on the food scene. The British settlers in America found that it was impossible to make their traditional puddings with the ingredients available to them in the new land.
SC-slice2

I have been trying to determine the etymology of the word ‘cobbler’ without much success. My best guess would be that the name originated from the cobbled together appearance of the dish when done.
SC-slice4

This cobbler can be frozen, tightly wrapped in aluminum foil. However, do not warm it up in the microwave; that will totally ruin it. The oven at 350 degrees is the only way to go.
SC-slice5

The best thing about fruit cobblers is that you can whip them up in a jiffy… you see some excellent ripe fruit in the farmers’ market and 30 minutes after you get them home, the cobbler can be starting to bubble in the oven. That quick and easy!
SC-done1

The strawberry cobbler comes out great whether you use fresh strawberries or frozen. If using frozen, make sure that you use whole strawberries and not slices which tend to sort of disintegrate.
SC-ingredients

Adding a bit of strawberry liqueur can give the cobbler an extra oomph, but that is strictly optional. The strawberries on their own provide enticing flavour enough.
SC-closeup2

Though fruit cobblers are made from mixed fruit as well, I prefer the single fruit varieties with their individual personalities and flavours.

~Ria

Quick and Easy Strawberry Cobbler
 
Author: 
Recipe type: Dessert
Cuisine: American
Ingredients
  • 3 cups fresh or 2 cups frozen strawberries
  • 1 ¼ cup all purpose flour
  • 6 tbsp sugar
  • ½ tsp lemon zest
  • 2 tsp baking powder
  • A pinch salt
  • 5 tbsp unsalted butter
  • ½ cup milk
  • 2 tbsp strawberry liqueur (optional)
Directions
  1. Preheat the oven to 375 degrees.
  2. Clean and husk the fresh strawberries and slice them in half. If using frozen ones, leave them whole.
  3. In a medium bowl, gently mix together the strawberries, 3 tablespoon sugar, 2 tablespoon flour, and the lemon zest. Also, add the strawberry liqueur to the mix, if using.
  4. Arrange the fruit in a 8 or 9 inch baking dish. For something I’m not planning to cut into exact rectangle pieces, I prefer round baking dishes; they are much easier to clean! 🙂
  5. To make the topping, mix together the remaining flour, sugar, baking powder, and salt in a large bowl. Cut the butter into small pieces and rub into the flour mix till it resembles coarse bread crumbs.
  6. Sprinkle just enough milk over the flour and gently stir together, till it starts to come together.
  7. Distribute the topping uniformly over the strawberries in the baking dish, till the fruit is more or less covered. Small gaps in the topping does not matter.
  8. Bake in the center of the preheated oven, for 30 minutes or till the topping is golden brown and the fruit is bubbling.
  9. Serve with vanilla bean ice cream or whipped cream.

The Truly Wonderful Scotch Eggs

The word ‘Scotch’ is invariably associated with Scotch whiskey, and the age-old distilleries of Scotland. However, there are many more products that are associated with the word, like Scotch tape, Scotch bonnet chillies and the wonderful Scotch eggs!

SE-done

By the way, the Scotch bonnet chillies are named so only for their shape resembling the traditional Tam o’ Shanter hat of Scotland; they are not grown anywhere near Scotland!
The best thing about Scotch eggs is that it is a meal in itself. Add a green salad of any kind, and you have a well balanced meal.

SE-closeup

Scotch eggs are commonly a party and picnic food item and has existed for a long while, with a British department store claiming to have invented it in 1738. The all-knowing Wikipedia speculates that the inspiration for the dish came from the ‘Nargisi kofta’ of the Mughal cuisine.

SE-eggs

Though the initial versions were made from sausage meat you can make them with any chopped meat. If you do not fancy red meat, minced turkey or chicken, or a mix of the two, will work equally well.

SE-ingredients

My version of a Scotch egg is a truly fusion one. I use the eastern eight spice powder, along with ginger and garlic, to add flavour and a little bit of red chilli powder for heat.

SE-breadcrumbs

The breading process becomes very easy if you do it assembly line style, with three shallow bowls set up with the flour, egg wash and breadcrumbs.

SE-done2

Though a bit time consuming to make, Scotch eggs are worth the trouble. Not only do they taste good, they look great too!

SE-plated

The concept of hardboiled eggs covered in meat and fried or baked is popular in many cuisines. In addition to the Nargisi kofta mentioned earlier, Kwek-Kwek, made with quail eggs and Tokneneng made with chicken or duck eggs, both from Philippines, are dishes very similar to Scotch eggs.

~Ria


The Truly Wonderful Scotch Eggs
 
Author: 
Recipe type: Appetizer
Ingredients
  • 6 eggs
  • 2 lb chopped (minced) meat of your choice
  • 2 medium red onions
  • 4 cloves garlic
  • 1 inch piece ginger
  • 3 medium potatoes
  • ½ tsp red chilli powder
  • 2 tsp coriander powder
  • 1tsp eastern eight spice powder
  • 1 small bunch cilantro
  • 1 cup breadcrumbs
  • ½ cup all purpose flour
  • 1 egg
  • Vegetable oil
  • Salt to taste
Directions
  1. Hard boil the 6 eggs. Shell them and keep aside.
  2. Finely chop the onions, ginger and garlic.
  3. Discard the stems of the cilantro and chop the leaves.
  4. Boil the potatoes till soft. Peel them and keep aside.
  5. Heat 2 tablespoons of vegetable oil in a frying pan and sauté the onions.
  6. When the onions turn transparent, add the chopped ginger and garlic.
  7. Continue to sauté till the onions start to brown.
  8. Add the coriander powder and stir together.
  9. Add the chopped meat and mix well.
  10. Add salt to taste.
  11. Reduce the heat and cook covered, till the meat is cooked. Add ladlefuls of water, if required.
  12. When the meat is cooked and all water is evaporated, add the chilli powder and eastern eight spice powder.
  13. Mash the boiled potatoes and add to the meat mix.
  14. Add the chopped cilantro and mix thoroughly.
  15. Remove from heat and allow to cool.
  16. Place the flour in a shallow bowl and season with salt.
  17. In another bowl, beat the egg with an equal quantity of cold water.
  18. Place the breadcrumbs in a third bowl.
  19. When the meat mix is cool, divide it into six portions.
  20. Form each portion into a ball, make a depression in the middle and place a boiled egg into it.
  21. Cover the egg completely with the meat mix, trying for an even thickness all around.
  22. Form into a oval shape and keep aside.
  23. Prepare all 6 eggs similarly.
  24. Roll each covered egg in the seasoned flour and then in the beaten egg, and finally in the breadcrumbs.
  25. Brush off the extra breadcrumbs and keep aside.
  26. Prepare all 6 eggs similarly.
  27. Heat a sufficient quantity of vegetable oil in a deep pan.
  28. When the oil is hot, add the prepared eggs one at a time and gently fry till evenly browned.
  29. Drain on a paper towel.
  30. Cut into two lengthwise and serve with a salad as a light meal.


Kare Kare… a Meat Stew Perfect for the Winter!

Last week was real cold… and breezy to boot. Perfect weather for a meaty stew. I had been planning to make a Kare Kare for a few days and last week, I finally got around to it. And man, am I glad! It looked good, tasted good, and was healthy as well!

KKMSPG-ready

The vibrant orange colour of the dish is achieved by the use of achiote seeds, something new for me.

Achiote seeds are commonly used in Latin American and Caribbean cuisines to add colour and flavour to food. I had seen them used by one of my friends from Puerto Rico and I was charmed. And I bought a bottle of the seeds from a Hispanic store. So the Kare Kare was the perfect opportunity to try it out!

KKMSPG-achiote

The seeds are not used directly in the food; at least that is what my friend told me. You soak it in some water and use that water for adding colour to food. Or you can fry it in some oil and use the oil for colour. Achiote is also available in powder form, which actually is the extracted colour mixed with corn flour.

KKMSPG-achiote-oil

To use achiote with oil, heat the oil and add a teaspoon of the seeds. Keep stirring on a low heat. When the seeds turn dark, take off the heat and discard the seeds. You can use the oil like any other oil for cooking, and it will add a brilliant yellow-orange colour to whatever you cook.

KKMSPG-achiote-colour

See how the drained seeds (to be discarded) have stained the paper towel!

The achiote trees are a warm weather species, growing around the world.

In addition to the seeds, the pericarp covering of the seeds are also used for colour extraction. Since ancient times, achiote has been used to add colour to cheeses and other dairy products and processed foods.

KKMSPG-plated

Traditionally, the meat used for Kare Kare is oxtails. You can also add pork hocks or different cuts of beef. I used a combination of oxtails and short ribs with perfect results.

KKMSPG-closeup

The meats are first cooked in a broth. As the oxtails are quite fatty, it is a good idea to remove most of the pure fat from the broth. I usually cook the meat the previous day and pop it in the refrigerator overnight so that the fat can be easily and completely removed.

KKMSPG-ingredients

The health aspect of this dish is that it hits a perfect balance of meat and vegetables. Yard long beans (sitaw), bok choy, and eggplant are the most commonly used vegetables. I added a red pepper as well, for the colour.

This all around great dish has its origin in Philippines, where it is commonly served on festive occasions.

Kare Kare... a Meat Stew Perfect for the Winter!
 
Author: 
Recipe type: Entree
Kare Kare is ideally cooked over two days - cook the meat in the stock the first day and finish the dish the second day. This way, you can get rid of the excess fat content from the oxtails easily.
Ingredients
  • 4 pieces of oxtail, 2 inch thick
  • 2 lbs of beef; bone-in cuts like short ribs work best
  • 2 onions
  • 8 cloves of garlic
  • 1 tsp black peppercorns
  • 6 cloves
  • A small bunch yard long beans (sitaw)
  • 1 large bok choy or a bunch of baby bok choy
  • 1 purple eggplant
  • 1 red pepper
  • 4 tbsp all-natural peanut butter
  • 2 tbsp fish sauce
  • 1 tsp achiote seeds
  • 2 tbsp cooking oil
  • Salt and black pepper to taste
  • Cooked rice and shrimp paste to serve
Directions
  1. One day one, cut the beef into large pieces.
  2. Place the oxtail pieces and the beef pieces in a large pot.
  3. Cut one onion into big wedges and add to the meat.
  4. Crush 4 of the garlic cloves with their skin on and add to the meat.
  5. Add the whole peppercorns and cloves to the pot as well.
  6. Pour cold water up to two inches above the meat and bring to a boil.
  7. Simmer on low heat till the meat is very tender (usually takes 2 to 2 ½ hours), stirring once in a while.
  8. Add more water to the pot as required, to maintain the level. At the end you should have seven to eight cups of stock.
  9. When the meat is cooked well, remove from the heat and allow to cool.
  10. Keep in the refrigerator overnight or for at least three hours.
  11. When ready to continue, bring the pot out of the refrigerator and carefully remove and discard the sheet of fat on the top.
  12. Carefully remove the meat pieces onto a platter.
  13. Sieve the stock and discard the solids.
  14. Cut the remaining onion into smallish wedges.
  15. Skin and thinly slice the remaining 4 garlic cloves.
  16. Cut the vegetables into two-inch long narrow pieces.
  17. In a large pan, heat the oil on medium heat.
  18. Add the achiote seeds, reduce the heat to low and keep stirring.
  19. When the achiote seeds get dark, remove from the heat and separate and discard the seeds.
  20. Return the pan with the oil to the stove and add the onions.
  21. When they start to brown around the edges, add the garlic and sauté for a minute.
  22. Add the peanut butter, fish sauce and the stock.
  23. Stir together and bring to boil.
  24. Add the cooked meat and cut vegetables to the pot.
  25. Season with salt and freshly ground black pepper.
  26. Cook till the vegetables are done yet crisp.
  27. Remove from heat and serve with cooked rice and sautéed shrimp paste (bagoong) on the side. Yum!

~Ria