Dessert

Old Fashioned Coconut Macaroons

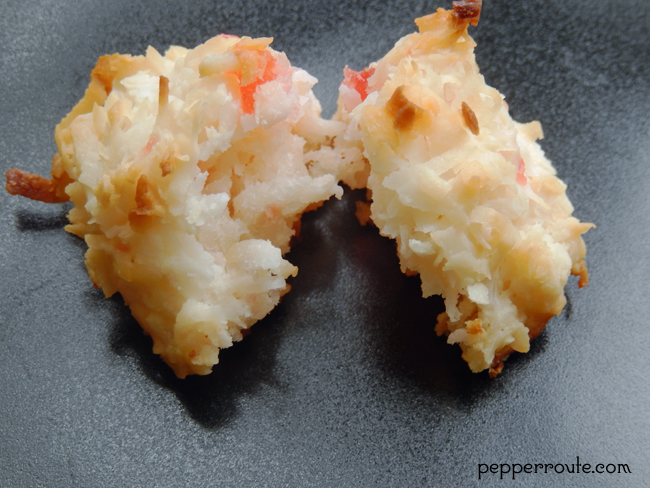
If there is any baked goodie that is easier to make than a fruit cobbler, it is a coconut macaroon. A soft slightly chewy center, with a light crisp outside… altogether yum!

 
OFCM-closeup2
Not to be confused with ‘macaron’, the trendy sandwich cookie that has been all the rage recently… that will come later. This is about the egg white and sweetened coconut concoction that is airy and light. But not meringue light, it has some chewiness to it too.

 
OFCM-cooling4
Macaroons have their origin in Italy, during the renaissance period. Initially they were made with almond paste. Later, for the sake of convenience, bakers started replacing the almond paste with either almond meal (powder) or dried sweetened coconut.

 
OFCM-cooling2
The coconut macaroons were popularised by the European Jewish communities who found it suitable for Passover as it was unleavened.

 
OFCM-cooling1
Macarons, the French version which were small round cookies without any coconut added, were developed by the chefs and bakers who accompanied the Italian noblewoman Catherine de Medici to the French court when she became the wife of King Henri 2nd. Like I mentioned earlier, more about them later.

 
OFCM-cooling5
I have made the coconut macaroons with almond and cashew slivers as well, and they do taste great.

 
OFCM-closeup3
However, adding a bit of colour makes you reach straight for them!

 
OFCM-ingredients
Next time, I’ll try spicing them up with some ginger, cinnamon or allspice.

 
OFCM-closeup1
If you would like uniformly shaped macaroons, you can pipe the mix through a star nozzle onto the baking sheet. I am usually too lazy for that; I just shape them into balls by hand.

 
OFCM-cooling3
I like to imagine Nora (the chief protagonist of Henrik Ibsen’s ‘A Doll’s House) eating coconut macaroons, though Ibsen just uses the generic ‘makroner’ and not ‘kokosmakroner’ in the original Norwegian. Though coconut macaroons are a typical Christmas treat in Norway today, it is unlikely that coconuts were commonly available in the Oslo of 1879, the play’s setting. Still, I see Nora munching on coconut macaroons and they definitely had little specks of red glace cherries on them! 🙂 So here is to the Noras of the world…


~Ria

Old Fashioned Coconut Macaroons
 
Author: 
Recipe type: Dessert
Cuisine: European
Ingredients
  • 1 cup sweetened condensed milk
  • 4 cups sweetened shredded coconut
  • 10 glace cherries
  • 2 large egg whites
  • 1 tsp vanilla extract
  • ½ tsp coarse salt
Directions
  1. Preheat the oven to 350 degrees farenheit.
  2. Prepare two rimmed baking sheets with parchment.
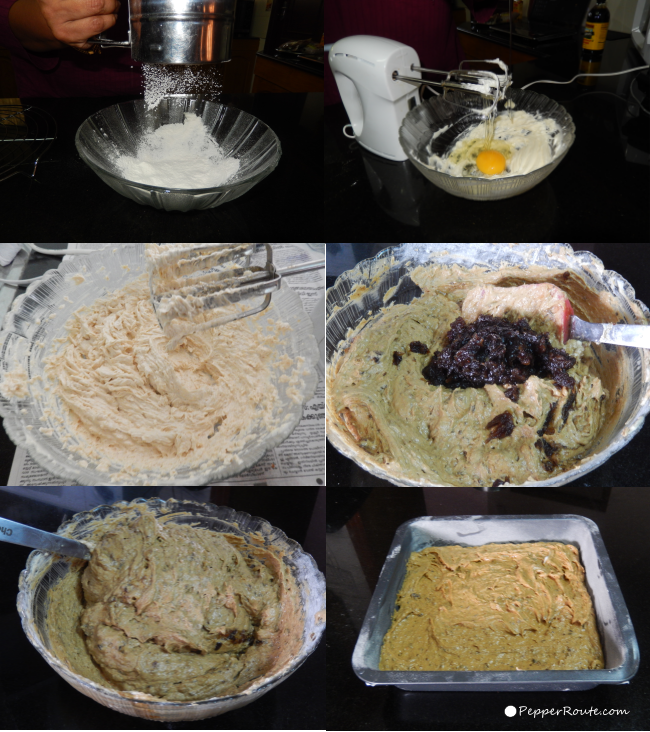
  3. In a large bowl, thoroughly mix together the condensed milk, vanilla extract and the coconut.
  4. In a medium bowl, beat the egg whites using a hand-held electric beater, till stiff peaks form, for about three to four minutes.
  5. Using a spatula, gently fold in the beaten egg whites into the coconut mixture, being careful not to overmix.
  6. Lastly sprinkle the salt grains on the mix lightly blend in with the spatula.
  7. With moistened hands, form small balls of about 1 ½ inches diameter and place on the baking sheets, 1 inch apart, giving the macaroons space to expand while baking.
  8. Bake in the preheated oven, for about 22 to 25 minutes, till the top of the macaroons start to brown.
  9. Transfer to a cooling rack and they are ready to go!
  10. Note: These can be stored in an airtight container in the refrigerator for three weeks, that is, if they last that long!


Quick and Easy Strawberry Cobbler

Life has been lazy, lazy these days. After all, these are the days of ‘lazy hazy crazy days of summer’, right? Unfortunately lost in the excitement of summer, is the routine of regular cooking. Actually that was the case ever since I came back from my winter stay in the tropics, where all I had to do was appear at the dining table to be pampered with mouthwatering food, all my favourites  Now I had to get back to my regular routines. You can survive only so long with eatouts and takeouts and leftovers and quick fix solutions. But the lazy bug had bitten me real hard and I needed a magical cure to defeat it.

So, I devised a plan to cook (or rather bake) a bunch of stuff I love to cook and eat and serve… like fruit cobblers, coconut macaroons and flancocho and tres leches cakes. I knew… I knew what it will do to my weight, but who is afraid of a few desserts in the season of fresh vegetables and long walks? Pffft!
SC-closeup1

First in the plan was a strawberry cobbler. Fruit cobblers are great in that they do not need much sugar to taste great. The natural sweetness of the fruit is brought forward by the concentrating of flavours that happen while baking. So winners all around.
SC-done2

A strawberry cobbler right out of the oven, with the fruit still bubbling in red juicyness and fragrant… a mental image of that was inspiration enough to get off my butt and into the kitchen! 🙂
SC-slice3

Apparently, cobblers are fairly newcomers on the food scene. The British settlers in America found that it was impossible to make their traditional puddings with the ingredients available to them in the new land.
SC-slice2

I have been trying to determine the etymology of the word ‘cobbler’ without much success. My best guess would be that the name originated from the cobbled together appearance of the dish when done.
SC-slice4

This cobbler can be frozen, tightly wrapped in aluminum foil. However, do not warm it up in the microwave; that will totally ruin it. The oven at 350 degrees is the only way to go.
SC-slice5

The best thing about fruit cobblers is that you can whip them up in a jiffy… you see some excellent ripe fruit in the farmers’ market and 30 minutes after you get them home, the cobbler can be starting to bubble in the oven. That quick and easy!
SC-done1

The strawberry cobbler comes out great whether you use fresh strawberries or frozen. If using frozen, make sure that you use whole strawberries and not slices which tend to sort of disintegrate.
SC-ingredients

Adding a bit of strawberry liqueur can give the cobbler an extra oomph, but that is strictly optional. The strawberries on their own provide enticing flavour enough.
SC-closeup2

Though fruit cobblers are made from mixed fruit as well, I prefer the single fruit varieties with their individual personalities and flavours.

~Ria

Quick and Easy Strawberry Cobbler
 
Author: 
Recipe type: Dessert
Cuisine: American
Ingredients
  • 3 cups fresh or 2 cups frozen strawberries
  • 1 ¼ cup all purpose flour
  • 6 tbsp sugar
  • ½ tsp lemon zest
  • 2 tsp baking powder
  • A pinch salt
  • 5 tbsp unsalted butter
  • ½ cup milk
  • 2 tbsp strawberry liqueur (optional)
Directions
  1. Preheat the oven to 375 degrees.
  2. Clean and husk the fresh strawberries and slice them in half. If using frozen ones, leave them whole.
  3. In a medium bowl, gently mix together the strawberries, 3 tablespoon sugar, 2 tablespoon flour, and the lemon zest. Also, add the strawberry liqueur to the mix, if using.
  4. Arrange the fruit in a 8 or 9 inch baking dish. For something I’m not planning to cut into exact rectangle pieces, I prefer round baking dishes; they are much easier to clean! 🙂
  5. To make the topping, mix together the remaining flour, sugar, baking powder, and salt in a large bowl. Cut the butter into small pieces and rub into the flour mix till it resembles coarse bread crumbs.
  6. Sprinkle just enough milk over the flour and gently stir together, till it starts to come together.
  7. Distribute the topping uniformly over the strawberries in the baking dish, till the fruit is more or less covered. Small gaps in the topping does not matter.
  8. Bake in the center of the preheated oven, for 30 minutes or till the topping is golden brown and the fruit is bubbling.
  9. Serve with vanilla bean ice cream or whipped cream.

Caramelized Pear And Roquefort Cheese Tart

I have been interested in cooking for a very long time. Of course, at the bottom of it is my love of good food. And never been afraid to try new food items or recipes. A friend has suggested that ‘Fearless in the kitchen’ could be my tagline! 🙂 So when I started this blog, there was no dearth of topics to write about; there are so many tried and tested recipes lying around. But then, I also want to continue my adventures with new things… so this post is about something that I tried for the first time – a delicious tart of caramelized pear and Roquefort cheese!
 
CPRT-closeup1

This tart was a continuation of the theme of contrasting food flavours, which turned out truly terrific. However, a word of warning… do not attempt this tart unless you are a hard core cheese aficionado. Roquefort cheese is not for the faint of heart. Its sharp, tangy, salty, and ripe flavour comes from the mould Penicillium Roqueforti that grows on the floor of the Combalou caves in which the cheese is aged.
 
CPRT-cheese-closeup

You can see and smell the mould in green powdery veins on the cheese. And boy, is it delicious! A bit of it on a warm cracker, and your evening is made! No wonder it is called the ‘cheese of kings and popes’!
 
CPRT-done

Roquefort cheese is made from the milk of sheep of the Lacaune, Manech and Basco-Béarnaise breeds, in the south of France. And aged for five months in the natural caves of Roquefort-sur-Soulzon. According to legend, a young shepherd left his bread and sheep’s milk cheese in the cave while he went courting. When he came back months later, the cheese had gotten all mouldy from the mould growing on the floor of the cave. Either he must have been a courageous guy, or extremely hungry… he tried that cheese and found that it was sooo good. Thus was born the Roquefort cheese.
 
CPRT-closeup2

The cheese is very creamy and moist, and has the distinctive bluish green veins of edible mould all over. A typical Roquefort cheese weighs around six pounds and has no rind.
 
It can be used for salad dressings and dips, meat sauces, tarts, pies and quiches. Crumbled over pasta, it is yummy as well.
 
Roquefort belongs to the family of blue cheeses, Stilton and Gorgonzola being other well-known members.
 
There are restrictions on the production and labeling of the cheese, imposed by the EU to ensure quality standards. There are only seven companies manufacturing Roquefort cheese today.
 
CPRT-pears

A group of doctors at a biotech company, based in Cambridge has advanced theories that Roquefort and similar mouldy cheeses help improve cardiovascular health and prevent joint inflammation. Even the longevity and good health of the French population is being ascribed to the anti-inflammatory properties of these cheeses. So people, all you have to do is consume some cheese and crackers along with your daily red wine for a long, healthy life! Don’t you love research of this kind?
 
Another thing about this tart is that it is a bit time consuming to make. So don’t attempt this if you are in a hurry… pour yourself a glass of wine and enjoy the making of the tart.
 
CPRT-ingredients

You need to prepare the dough for the shell and chill it first.
 
CPRT-dough

Then, blind bake the shell. That is, bake just the shell without any filling, but with some weights in it so that the shell holds its perfect shape.
 
CPRT-rolled-dough

Then you grill the pears… look at them glistening!
 
CPRT-pears-grilled

Prepare the liquid filling.
 
CPRT-filling-ingredients

Arrange the pears in the shell, add the liquid filling and the cheese and ready for the oven.
 
CPRT-filled

And the mouth-watering pear and cheese tart is done!
 
CPRT-done-closeup

Perfect finish to a fabulous dinner! The port wine reduction for drizzling is so delicious it adds much to the tart. Next time, maybe I’ll take it another level by adding a bit of jalapeno oil to that. Let’s see.

~Ria


Caramelized Pear And Roquefort Cheese Tart
 
Author: 
Recipe type: Dessert
Ingredients
  • 1 ½ cups all-purpose flour
  • ¾ cup almond flour
  • ⅓ cup sugar
  • ½ teaspoon salt
  • ½ cup cold unsalted butter, cut into ½ inch pieces
  • 1 egg yolk, beaten with 4 teaspoons of water
  • 2 tablespoons unsalted butter
  • 5 medium sized firm pears, peeled, halved and cored
  • 2 tbsp light brown sugar
  • 3 ounces Roquefort cheese
  • ½ cup half-and-half or light cream
  • 3 tablespoons sugar
  • 2 egg yolks
  • 1 tablespoon all-purpose flour
  • 2 cups port wine
Directions
  1. To make the crust, mix together the all purpose flour, almond flour, sugar and salt.
  2. Add the butter cut into pieces and using your finger tips, mix into the flour mix to form a bread crumb like texture.
  3. Add the egg mix and form into a dough.
  4. Shape into a disk, cover with cling wrap and chill in the refrigerator for at least 1 hour. You can keep the dough in the refrigerator for up to 24 hours.
  5. Peel and core the pears, and cut them into 1 inch thick slices.
  6. Melt 2 tablespoons of butter in a large pan, on medium high heat.
  7. Lay down the pieces of pear flat in the butter and cook till browned on one side.
  8. Turn over to brown the other side.
  9. Add 2 tablespoons of brown sugar and stir.
  10. Allow to cook till the brown sugar is dissolved and starts to caramelize. Remove from heat and keep aside.
  11. Preheat the oven to 350 degree farenheit.
  12. Carefully roll out the chilled dough to cover a 10-inch tart pan.
  13. Place the rolled out dough in the tart pan and push gently in, to fit into the pan.
  14. Place a piece of parchment paper over the dough and fill with pie weights or any of the larger beans. (These beans will not be suitable for cooking after this, but you can use them again and again for baking.)
  15. Bake in the preheated oven for 20 minutes. Remove the parchment paper and pie weights and replace in the oven for another 5 minutes. When done, allow to cool.
  16. When the shell is slightly cooled, layer the caramelized pears in it. Keep aside any pan juices from the pears.
  17. Crumble the cheese over the pears.
  18. To the pan juices from the pears, add the half and half, sugar, egg yolks, and flour and mix well.
  19. Pour over the pears and cheese.
  20. Place in the center of the preheated oven and bake for 40 to 45 minutes, till the center is set.
  21. Remove from the oven and allow to cool.
  22. In a small pan, bring the port to a boil.
  23. Constantly stirring, reduce the port to about half and the consistency is syrupy.
  24. Cut the tart into wedges and serve garnished with the port reduction.

A Fruit Tart… Redolent of Summer

I’m depressed… pretty much badly. Looks like the summer is gone already. It is just about the middle of August, and the mornings are already getting cooler. Everywhere you look, there are the inevitable signs… fall fashions in the shops, fall programs in the pages of the Times… Not that one minds too much either. After all, there is a lot to enjoy in the autumn. But this early? Did summer really have its turn this year? I don’t think so!
 
FTRS-closup
 
A colourful, rich, delicious fresh fruit tart is a sure fire cure for the depression induced by oncoming weather changes; at least, temporarily. So I headed for the farm market to get some tree ripened fragrant and sweet fruit. This is a small market held three afternoons a week, and has produce only from within locavore distance. What do you think I saw when I got there? Tables and tables of squash! Acorn squashes, butternut squashes, kabocha squashes… all winter varieties! Nnnnno! No one loves a baked acorn half stuffed with onions and mushrooms and drenched in béchamel more than I do, but not already!
 
Keeping my eyes firmly averted, I moved towards the fruits. There they were in all their glory, bursting with a healthy glow of summer. Peaches, nectarines, plums, cherries… I returned home somewhat mollified.
 
FTRS-close-closup

This is one fruit tart that I have made many times and it comes out great every time. Most of the fruit tart recipes call for baking the shell empty (called blind baking) and then adding a creamy filling, topped with sliced fruit. Here the shell is baked with a cashew nut-based filling in it and the fruit added when cooled. Traditionally it is a frangipane – an almond paste filling – but then isn’t it always fun to tinker with traditions! 🙂
 
FTRS-half-tart

You can use any of the seasonal fruit which will look and taste good in combination. For this tart, I used peaches, plums, cherries, kiwis and bananas. Mangoes, strawberries, raspberries, blue berries, etc. will be excellent as well.
 
This might look complicated with all that talk, but actually it is quite easy. If you have ever baked a cake, you can do this – easy peasy!
 
Three sets of ingredients: one for the shell…
 
FTRS-ingredient1

Another for the filling…
 
FTRS-ingredient2

And a third for the topping.
 
FTRS-ingredient3

Blend the first group of ingredients with your fingers and shape into the tart pan.
 
FTRS-mixing-shell

Mix the second group using the food processor.
 
FTRS-mixing-filling

And pour into the chilled shell in the tart pan.
 
FTRS-pouring-filling

Bake.
 
FTRS-filling-in-shell

Finally slice the third group and arrange as pretty as you can on the baked tart base, sticking it in place with some fruit preserve.
 
FTRS-full-tart

Tada! Your lovely fruit tart is ready to dig into!
 
FTRS-cut

Truly juicy and yummy!

 ~Ria


A Fruit Tart... Redolent of Summer
 
Author: 
Recipe type: Dessert
Ingredients
  • 1 ½ cup all purpose flour
  • ¼ cup sugar
  • 8 tbsp butter
  • 1 egg yolk
  • 1 ½ cup cashew nuts (whole or pieces)
  • ⅔ cup sugar
  • 8 tbsp butter
  • 2 eggs
  • 1 tbsp all purpose flour
  • 2 lb ripe mixed fruit
  • 4 tbsp fruit preserve, of a flavor that goes with the fruits you have chosen
Directions
  1. Mix the flour and sugar together.
  2. Cut the butter into slices.
  3. Make a hole in the middle of the flour mix and place the butter slices in it.
  4. Blend the egg yolk with the butter using your fingers.
  5. Now blend this mixture into the flour-sugar mix till you get a uniform crumply mixture.
  6. Sprinkle it thinly on the bottom of the pan and press down to form a uniform layer.
  7. Form small ropes with the mix and flatten them to the sides of the pan to form a continuous wall.
  8. Cover in plastic or foil wrap and place in the refrigerator to chill for a minimum of 30 minutes. You can chill it overnight.
  9. Preheat the oven to 375 degree farenheit.
  10. Keep the butter in the refrigerator.
  11. Roast the cashews on medium heat, till the edges start to brown.
  12. Remove from heat and set aside to cool.
  13. When cooled, place them in the food processor (with a metal blade) along with the sugar and pulse them till they are sandy in texture. Do not grind them to a smooth powder.
  14. Cut the butter into pieces and add to the cashew-sugar mix. Blend well.
  15. Add the eggs and blend well.
  16. Add the flour and blend well.
  17. Take the chilled tart shell out of the refrigerator and pour the filling evenly into the shell.
  18. Bake in the center of the oven for 40-45 minutes, till the filling is puffed up and golden.
  19. Remove from the oven and cool on a rack.
  20. Pit, peel and slice all fruits as required.
  21. When the tart base has cooled, apply 3 tablespoons of the fruit preserve, uniformly on the top. (Leave aside 1 tablespoon of preserve.)
  22. Place the fruit slices in an attractive pattern over the fruit preserve.
  23. Mix the 1 tablespoon of remaining fruit preserve with 1 tablespoon of water and using a pastry brush, apply over the fruit slices to glaze them. Make sure you cover all the pieces. This will prevent them from drying out.
  24. The fruit tart is ready to serve. You can keep it in the refrigerator if not using right away, but bring it to room temperature before serving.


Roasted Peach Cobbler

I could smell the peaches even before I entered the market stall. This was a local farmers’ market that was held one every week, during the warm weather months. What is great about it is that most of the stuff there has been picked the same morning. And it is so close to home that I make it habit to go there every week.

RPC-peaches1

And the peaches were superb. Ripened on the tree, picked the same morning, bursting with fragrance and flavour. So I got a bunch of them. Would be perfect for a cobbler.

RPC-peaches2

And peaches in a cobbler are at their best when they are roasted. Roasting brings out their sweetness makes them kind of soft. All you need to do is, toss the wedges of peaches with a bit of brown sugar and place them on a baking tray, under the broiler for 15 minutes. They become glazed and so glossy.

RPC-peaches-roasted

Isn’t the best part of a cobbler the crumbly top? And I decided to add a bit of interest to the crumb by adding some almond meal to the mix. It turned out a good idea indeed.

RPC-crumble-ingredients

Roasted peaches in a baking dish with a splash of vanilla and lemon juice…

RPC-vanilla-lemom

Top it with a generous amount of crumb mix and pop it in the oven.

RPC-crumble

And the most awesome peach cobbler will come out in about 20 minutes. Not really. Actually, you have to open the oven and take it out yourself. 🙂

RPC-done

Enjoy with a scoop of vanilla ice cream.

~Ria

Roasted Peach Cobbler
 
Author: 
Recipe type: Dessert
Ingredients
  • 8 peaches
  • ¼ cup light brown sugar
  • ½ cup all purpose flour
  • ½ cup almond meal
  • ½ cup granulated sugar
  • 4 tbsp cold butter
  • ½ tsp vanilla essence
  • 1 tbsp lemon juice
Directions
  1. Pre-heat the oven to 500 degrees.
  2. Cut the peaches into ½ inch wedges.
  3. In a bowl, toss the fruit with the brown sugar.
  4. Place in a single layer on a baking tray and place on the top rack of the oven.
  5. Let it roast for 15 minutes.
  6. Remove from the oven and let cool.
  7. Reduce the oven temperature to 375 degrees.
  8. In a bowl, mix together the flour, almond meal and granulated sugar.
  9. Cut the cold butter into pieces and drop into the flour mix.
  10. With your fingers, blend the butter into the mix till the whole thing resembles large crumbs.
  11. Mix the roasted fruit with vanilla essence and lemon juice.
  12. Evenly place in a pie pan or square baking dish.
  13. Sprinkle the prepared crumb on top of the fruit.
  14. Place in the middle rack of the pre-heated oven.
  15. Bake for 20 minutes. Check whether the top is showing golden brown spots. If not, continue baking for another 5 minutes.
  16. Serve with vanilla ice cream. A streak of peach nectar will be good too, strictly optional.


An All-time Favourite Bread Pudding

White chocolate, berries, bananas… What is not to like? Each of them lovely on their own. So what if you put them all together? That is what is happening with this wonderful bread pudding, that I had mentioned a while ago. This was to take to a party that I went to, with some of my friends. The party was indeed great, and I wish I could say the bread pudding was the highlight of the party, but alas… that was the crawfish imported from New Orleans. Of course, the pudding was appreciated very much, and I do think the praise was genuine! 🙂
 
bp-final1
 
Actually, this is one dish that I have made for many an occasion and some among my friends are all time fans of it.
 
bp-final2
 
The berries that you use for this pudding can be any dried berries, like cranberries or blue berries. Or even dried cherries. In the cooking process, they absorb the liquids and swell up to become twice their original size. And the bananas are cooked with butter and brown sugar before being added to the mix so that their flavour really spreads through the whole pudding.
 
bp-ingredients
 
A variation that you can try with the bananas is to add some dark rum to the butter-brown sugar-bananas mix and flambé it, before adding the whole thing into the pudding mix. It adds that extra oomph to the dish. Though the alcohol will be totally evaporated through the flambéing, it is better not to use the rum if children are going to partake of the pudding.
 
bp-ready-to-bake
 
A key factor to the success of this pudding is allowing the bread pieces to thoroughly soak in the liquids. Leaving the mix aside for a minimum of 30 minutes, an hour if possible, will make the texture silky and smooth.
 
bp-done-big
 
As this was planned for a party, I prepared this pudding in a disposable aluminium foil baking pan. These pans with lids are a blessing when you need to carry stuff around.
 
bp-from-oven
 
Of course, I had also made two little ones in ramekins for taste testing. It is not advisable to take anything to anyone before testing it yourself. Believe me, I’m saying this based on some pretty painful experience… from days long gone by. 😉
 
bp-final3
 
And the best part of making this pudding? Boy, your home will be filled with the sweet fragrance of freshly baked bananas and chocolates for a long time! This is one time I would not light candles to eliminate food smells… it is that great!


~Ria


An All-time Favourite Bread Pudding
 
Author: 
Recipe type: Dessert
Ingredients
  • 6 cups bread cubes
  • 6 oz white chocolate chips
  • 3 bananas
  • 1 cup dried berries (cranberries, blue berries or cherries)
  • 6 tbsp butter
  • 4 eggs
  • 1 ¼ cup light brown sugar
  • 3 cups heavy cream
  • 1 cup milk
  • 1 tsp vanilla extract
  • ½ tsp ground cinnamon
Directions
  1. Pre-heat the oven to 350 degrees.
  2. Butter a 9 x13 inch baking pan.
  3. Cut the bread slices into ½ inch cubes.
  4. Slice the bananas into thin pieces.
  5. In a large bowl, beat together the eggs and 1 cup brown sugar (leaving ¼ cup sugar aside).
  6. Add the cream and milk to the eggs and beat well.
  7. Add the vanilla and cinnamon and mix thoroughly.
  8. Slowly add the berries, chocolate chips and bread cubes and stir together.
  9. In a heated pan, add the butter, banana slices and the remaining ¼ cup brown sugar.
  10. Stir and cook till the banana slices start losing their firm shape.
  11. Stir into the pudding mix.
  12. Pour the mix into the buttered baking pan.
  13. Place in the center of the pre-heated oven and bake for 45 minutes.
  14. Insert a skewer in the center of the pudding and if it comes out clean, take the pudding out of the oven. If raw batter is sticking to the skewer, bake for another 10 minutes and check again.
  15. Check the bread pudding cool on a rack for 10 minutes before cutting into squares for serving.

Mango Mousse

P1a MM

The light, airy and creamy mousse is a dessert I like to serve at dinner parties as it can be made ahead of time, be served in individual helpings and you can also make many variants to cater to the taste of guests. Mousse with the freshness of mangoes is one I just couldn’t resist.

In Uganda, mangoes are available throughout the year so I didn’t have to depend on preserved mango puree or canned mangoes. Since the mangoes I’d bought were not very sweet, I added a quarter cup of condensed milk while the mango pulp is made. Condensed milk certainly enhanced the taste but I felt it made the mousse slightly denser.

Mousse in general is a little tricky to make. Beaten egg whites and whipped cream should not be stirred in but has to be folded in with care so that the cream and egg whites don’t get deflated.

P2 MM

Cream should be removed from the refrigerator just before whipping to avoid it turning into butter. Overbeating will also result in butter. Using an ice bath is also not a bad idea if the room temperature is too high.Adding a quarter of a teaspoon of cream of tartar to the egg whites before beating helps in stabilising the beaten egg whites.

To avoid last minute stress, it can be made sure that the mousse sets perfectly by adding a teaspoon of gelatine to the mixture prior to transferring it into individual bowls and chilling. Shot glasses are a good choice to serve mousse of various flavours.

final MM

Mango mousse can be garnished with fresh mango pieces or some piped rosettes of freshly whipped cream.

~Min

Mango Mousse
 
Author: 
Recipe type: Dessert
Ingredients
  • 4 cups Mango pulp
  • ¼ cup Condensed Milk
  • (Only if mangoes are not sweet enough)
  • 2 Egg whites
  • ⅛ tsp Salt
  • ¼ tsp Cream of Tartar
  • 2 tsp Powdered sugar
  • 1 cup Whipping cream
  • ¼ cup Castor sugar - powdered
  • (Check the sweetness of the cream before you add the sugar)
  • 1 tsp Gelatine
  • 1 tbsp Water
  • 1 tsp Mango essence (optional)
  • To garnish
  • Fresh mango bits
Directions
  1. Peel the mangoes, remove the seed and cut into pieces. Make mango puree using a food processor. If the mango is fibrous strain the pulp. Add the condensed milk if required and mix well.
  2. Add cream of tartar and salt to the egg whites and beat till soft peaks are formed .Add powdered sugar and beat till stiff peaks are formed.
  3. In a separate bowl add whipping cream, sugar and mango essence (optional). Beat until stiff peaks are formed. This might take 4-5 minutes.
  4. Soak gelatine in 1 tablespoon water in a small heat resistant bowl. Hold it over hot water till it melts.
  5. Transfer the mango pulp into a large bowl. Add the melted gelatin and stir well. Now add the whipped cream in two or three batches and fold in gently.
  6. Now add ⅓ of the beaten egg whites into the mango cream mixture and mix through. Add the remaining egg whites and gently fold in. Avoid over mixing.
  7. Pour into individual serving bowls and garnish as you prefer.

Sticky Toffee Pudding

Sticky Toffee pudding is an indulgent and comforting pudding on a cold winter day. The warm, sweet decadent crumbs drenched in toffee sauce, topped with some cold ice cream, is a treat indeed.

p1 STF

The excitement turning into disappointment on Natasha’s face is the regular visual I get whenever I plan to make sticky toffee pudding. Natasha, a good friend of ours, is a wonderful person who appreciates good food, especially the latter part of the meal viz. desserts, with oohs and aahs. A few years back some of us got together for dinner at a restaurant called “Blue Mango”. It was Natasha’s birthday. As usual she scanned the dessert section as soon as she got hold of the menu and her face lit up the moment she spotted sticky toffee pudding. Many laughs were shared over the meal and soon it was time to place the order for desserts.Orders were promptly placed and were executed in a random manner. Most of us digged in as soon as we got our desserts only to realise moments later that Natasha was yet to get hers. The guy  waiting on us, realised that he had forgotten to mention that they ran out of sticky toffee pudding and she therefore had to choose something else. The disappointment on her face was so intense that I had to ask her over the next weekend and I made sticky toffee pudding for her, despite my busy schedule.

This time the plan to make this pudding somehow got postponed a few times.And finally when I started putting the ingredients together I realised that the girl at the supermarket till had forgotten to pack the Oman dates I bought. Hence I had to return to the supermarket and for my misfortune on my way back home a young boy on a motorbike grazed the right side my car. He was perhaps trying to squeeze through the limited space available on the right since a bus had blocked off any options on the left.  To cut the story short,the minor accident held me up for the rest of the day and was in no mood to go ahead with the pudding that day thereafter. I finally managed to make the pudding yesterday. Yipee…

 P2 STP ingredients

Sticky toffee pudding is an English steamed dessert consisting of a very moist cake with lots of dates drenched in toffee sauce. This is actually a cross between a cake and a pudding and is normally served warm with custard, whipped cream or vanilla ice cream, besides the toffee sauce.

According to Wikipedia it’s Francis Coulson, who with his partner set up the first country house hotel, created and served this pudding at his Sharrow Bay Country House Hotel. It looks like he got the recipe from Patricia Martin who published the recipe and served it at her hotel. Her son later told Simon Hopkinson, the food critic thst she got it from two Canadian soldiers who stayed at her hotel during second world war. The Canadian origin makes sense as the batter for the pudding is more similar to the American muffin rather than to an English sponge. Anyway it’s considered a modern British classic alongside the bread and butter pudding and Jam RolyPoly.

P3 STF

I used dates from Oman, which is one of the world’s top producers of dates. As an age old tradition Omanis plant a shoot of the date palm to celebrate the birth of a son.

P4 STP

I used 2 tablespoon of blackstrap molasses. Regular molasses or treacle can be used as well. If you find the flavour of molasses too strong replace it with honey or golden syrup. I used demerara sugar for the pudding and light brown sugar for the toffee sauce. If you prefer lighter coloured sauce use white refined sugar instead of brown sugar. Calorie conscious people can sustitute double cream with single cream.

P4+1 STP ingredients

To make the pudding lighter, separate the eggs and only beat in the yolks at the beginning. The egg whites can be whipped stiff separately and folded in as the last step.

P5 STP

Ramekins can be used to make individual puddings. I used an 8 inch square pan as soaking of the pudding with toffee will be easier. This pudding can be made in advance, and left at room temperature. Rewarm before serving. Can be kept in the refrigerator for a couple of weeks and warmed again just before serving.

P6a

My personal preference for a topping is the humble vanilla ice cream 🙂

~Min

Sticky Toffee Pudding
Recipe type: Dessert
Ingredients
  • For the pudding
  • 225 gms Dates with stone
  • 175 ml water
  • 1 teaspoon Baking soda
  • 175 gms All purppose flour
  • 11/2 teaspoon Baking powder
  • ¼ teaspoon Salt
  • 85 gms Butter
  • 140 gms Demerara sugar
  • 2 Eggs
  • 1 teaspoon Vanilla extract
  • 2 tablespoon Molasses
  • For the Toffee Sauce
  • 175 gms Light brown sugar
  • 50 gms Butter
  • 1 tablespoon Molasses
  • 225 ml Double Cream
Directions
  1. Stone the dates and chop them into tiny pieces.
  2. Boil the water and add the chopped dates into the boiling water along with the baking soda and simmer for 3-4 minutes. Leave it aside to cool.
  3. Preheat the oven to 180 degree celsius. Butter and flour an eight inch square baking pan.
  4. Sieve all purpose flour with baking powder and salt.
  5. Beat the butter in a medium sized bowl till creamy.
  6. Add the demarara sugar and beat well till the mixture is smooth and creamy. Scrape the sides if needed.
  7. Now add the eggs one at a time and beat well. Vanilla extract can be added now.
  8. Once the mixture is beaten well, add the sieved flour in small quantities and beat mixture till well blended.
  9. Mix the cooked dates pulp and the molasses and beat well till it is uniformly distributed in the batter.
  10. Transfer the batter into the prepared cake tin and bake for 25-30 minutes, checking after 20 minutes. Keep a close watch after that and remove the pudding from the oven as soon as a wooden toothpick inserted comes out clean.
  11. While the pudding is in the oven, make the toffee sauce.
  12. When done, cool the pudding on a wire rack for 5 minutes.
  13. After 5 minutes poke the pudding with a skewer and pour half of the warm toffee sauce all over the pudding.
  14. Keep it aside for about 20 minutes.
  15. Cut it into pieces and serve with some more toffee sauce and custard, whipped cream or ice cream as you wish.
  16. To make the toffee sauce
  17. Heat the butter and sugar till the sugar melts. Add molassess and simmer for a minute.
  18. Add cream and simmer till it reaches the right consistency (similar to warm honey). It might take only 2-3 minutes. Leave it to cool.